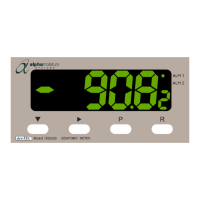
2.6 Installing your
dew
TEC DS2000 Hygrometer
The dewTEC DS2000 is a standard 1/8
th
-DIN size.
2.6.1 Panel mounting cut out
The panel on which your hygrometer is to be mounted must be rigid and up to 6mm thick.
The cut out size required is shown in the diagram below.
92.00mm
+0.5 | 0.0
2.6.2 Panel mounting
Your hygrometer is supplied with a panel gasket and push-fit fixing strap. Do not remove the
panel gasket, as this may result in inadequate clamping of the hygrometer in the panel.
Remove the push-fit fixing strap and place the hygrometer through the cut out from the front.
Then slide the fixing strap over the hygrometer housing from the rear of the panel until the
tongues engage in the ratchets and hygrometer is firmly in place.
2.7 Electrical interface connections
The rear terminal houses all connections to the unit. The connections are shown in the
diagram below and each input is described further in the following paragraphs. See the full
specification given at the end of this manual for more details on the interfaces.
13 14 15 16 17 18 19 20 21
12 22
11 23
10 24
987654321
N/O
COM
N/C
+
-
TOP
INTERNAL USE ONLY
N/O
COMN/C
RELAY 1
NPN
O/P1
COM
NPN
O/P2
A
COMB
RS485
COMMS
LN
POWER SUPPLY
90 - 264V
50/60Hz 7.5VA
Sensor
Connector
Relay Contacts
2A Resistive
110 - 240V ac
dewTEC DS2000 User’s Manual Page 6