Do you have a question about the Alpine CDA-7832R and is the answer not in the manual?
Attempts to disassemble or alter may lead to accident, fire, or electric shock.
Store small articles out of reach of children. Consult physician if swallowed.
Replace fuses only with fuses of the same ampere rating to prevent fire or damage.
Halt use immediately and contact dealer for issues like no sound, odors, or smoke.
Avoid changing settings while driving. Stop vehicle in a safe location for prolonged display operations.
Keep volume at a level to hear outside noises to prevent accidents.
Do not use for purposes other than vehicle use to avoid electric shock or injury.
Prevent foreign objects, including fingers, from entering the CD compartment slot.
Stop vehicle in a safe location before operations that could interfere with driving.
Use specified battery and correct polarity to prevent injury or malfunction.
Ensure vehicle temperature is between -10°C and +60°C to prevent player shutdown.
Remove disc and wait an hour for condensation to evaporate if sound wavers.
Do not play cracked, warped, or damaged discs to avoid mechanism damage.
Do not grip discs during auto-reload or insert discs with power off.
Do not attempt self-repair; return unit to dealer or service station for servicing.
Player accepts one disc at a time. Ensure label side is up. Ejects incorrectly inserted discs.
Check new discs for bumps/irregularities near center hole and edge; rub to smooth if needed.
Avoid locations with direct sun, heat, high humidity, water, dust, or excessive vibrations.
Protect from rain/water. Do not drop or apply shock to the front panel.
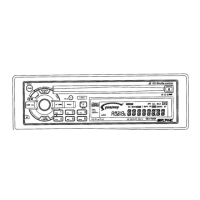
Press the PWR button to turn off the unit before detaching the front panel.
Press the release button until the front panel pops out.
Grasp the left side of the front panel and pull it out.
Place the detached front panel in the supplied carrying case for protection.
Insert the right side of the front panel into the main unit, aligning holes with projections.
Push the left side of the front panel until it locks firmly into the main unit.
Ensure connector terminals are clean and free of foreign objects before attaching the front panel.
After installation or battery disconnect, set volume minimum, remove panel, press reset.
Automatically sets up unit after installation: activates Auto Memory, centers audio controls, sets volume, turns Loudness on.
Press the PWR button to turn the unit on or off. Volume returns to previous level.
Press and hold Eject button to toggle Subwoofer On/Off. Initial mode is SUBW OFF.
Press and hold AUDIO CONTROL for 2 seconds to toggle Loudness On/Off. Display shows 'LOUD' when active.
Adjust FM signal level (HI/LO) to match volume difference between CD and FM radio.
Repeatedly press AUDIO CONTROL to choose Volume, Bass, Treble, Balance, or Fader modes.
Rotate AUDIO CONTROL knob to adjust selected audio mode. Settings are source-specific.
Provides audible feedback with tones for button presses. Press BAND to toggle ON/OFF.
Press and hold PWR for 3 seconds, then use Preset 6 to switch between green and amber.
Press and hold PWR for 3 seconds, then use T.INFO to select MUTE ON/OFF for cellular calls.
Press and hold DEMO button for 3 seconds. Unit scans CD player and CD Shuttle sources.
Press the DEMO button to exit the mode. 'DEMO' disappears from the display.
Press SOURCE button to select radio mode. Display shows frequency and CD/Radio mode.
Press BAND button repeatedly to cycle through FM1, F2, F3, MW, LW bands.
Press TUNE button repeatedly until 'DX SEEK'/'SEEK' disappear. Use DN/UP buttons to step tune stations.
ST indicator shows stereo FM. Unit auto-switches to mono if signal weakens, then back to stereo when signal improves.
Press SOURCE to select radio mode. Display shows frequency and CD/Radio mode.
Press BAND button repeatedly to select the desired radio band.
Press TUNE to illuminate DX/SEEK indicators. DX mode tunes strong/weak stations; local mode tunes only strong stations.
Press DN/UP buttons to automatically seek stations. Unit stops at next station found.
Select radio band and tune desired station.
Press and hold preset button (1-6) for 2 seconds until frequency blinks. Press again within 5 seconds to store.
Repeat procedure to store up to 5 more stations on the same band. Repeat for other bands.
Stores 30 stations (6 per band: FM1-3, MW, LW). Overwriting replaces existing stations.
Press SOURCE to select radio mode. Display shows frequency and CD/Radio mode.
Press BAND button repeatedly until the desired radio band is displayed.
Press and hold A.MEMO for 2 seconds. Tuner seeks and stores 6 strong stations by signal strength.
Stores 6 strong stations per band. Returns to station 1 if memory is complete, or original station if none stored.
Press SOURCE to select radio mode. Display shows frequency and CD/Radio mode.
Press BAND button repeatedly until the desired radio band is displayed.
Press preset button with desired station. Indicator illuminates. Shows band, preset number, frequency.
Press and hold INTLZ button for 3 seconds to enter setting mode.
Press Preset 3 to select AF ON/OFF. AF OFF prevents automatic re-tuning.
Press INTLZ button to exit setting mode. Press 'F' button to turn off function indicator.
Press RDS button to activate RDS mode. Display shows 'RDS'.
RDS stations can be tuned while listening to a CD. Select desired RDS station within 5 seconds.
Press DN/UP buttons to tune desired RDS station. When signal weakens, unit seeks stronger station in AF list.
Press and hold RDS button for 2 seconds for AF seek mode. Displays 'SEEK END' if no AF station found.
Press RDS button again to deactivate RDS mode. Press 'F' to activate normal mode.
Lists RDS data types: PI, PS, AF, TP, TA, PTY, EON, CT.
Press and hold INTLZ button for 3 seconds to activate setting mode.
Press Preset 3 to select AF ON or AF OFF. AF ON auto-tunes to stronger stations; AF OFF disables this.
Press INTLZ button to exit setting mode.
Press 'F' button to turn off function indicator.
Press RDS button to activate RDS mode. Display shows 'RDS'.
Press 'F' button to activate normal mode. Function indicator illuminates.
Press preset button with desired RDS station. Unit auto-searches for stronger station if signal is weak.
If station/AF list unreceivable, unit searches PI list. Displays frequency if no stations found. Press preset again for regional station.
Press and hold INTLZ button for 3 seconds to activate setting mode.
Press Preset 4 to select REG ON/OFF. REG ON continuously receives related local RDS stations.
Press INTLZ button to exit setting mode.
Press T.INFO button repeatedly until T.INFO indicator appears.
Press DN/UP buttons to select traffic station. TP indicator lights up when tuned.
Mutes CD/Radio during broadcast, returns to original source after. Shows 'TRF-INFO'.
Unit remains in receiving mode for 1 min if signal drops. Alarm sounds if below level for >1 min. Lightly press T.INFO to skip message.
Press and hold INTLZ button for 3 seconds to activate setting mode.
Press Preset 2 repeatedly to select desired volume level (TA-LV 1-4).
Press INTLZ button again to set selected volume. Unit auto-adjusts volume to preset level during broadcasts.
Press 'F' button to turn off function indicator.
Press and hold PTY for 5 seconds. Displays current programme type or 'NONE'/'NO RDS'.
Press DN/UP within 5 seconds of 'NEWS' display to choose type. Then press PTY to activate.
Press PTY within 5 seconds after selection to search. Indicator blinks during search, lights when found. Shows 'NO PTY' if none found.
Press 'F' button to return to normal mode. Function indicator illuminates.
Press T.INFO repeatedly until indicator appears.
Press DN/UP to select traffic station. TP indicator lights up.
Mutes CD/Radio during broadcast, returns to original source after. Shows 'TRF-INFO'.
Tuner mode: Alarm after 1 min if TP signal lost. CD mode: Auto-selects another frequency.
EON function tracks alternative frequencies. Tunes related station broadcasting traffic info if current one doesn't.
Press 'F' button to turn off function indicator.
Press and hold P.PTY. Displays 'PRIO PTY' then programme type. Initial setting is 'NEWS'.
Press DN/UP within 5 seconds of 'NEWS' display to choose type. Then press P.PTY to activate.
Press and hold P.PTY to reactivate. Use Step 3 to change category; press P.PTY to disable.
Press 'F' button to return to normal mode. Function indicator illuminates.
Press and hold INTLZ button for 3 seconds.
Press Preset 5 repeatedly to select PTY31 ON or PTY31 OFF. PTY31 ON sounds alarm for emergency broadcasts.
Press PWR button to activate the selected mode.
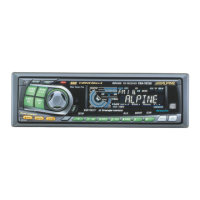
Insert disc halfway, label up. Player draws it in. Disc indicator shows loaded. Note: 8cm CDs not usable.
Press the eject button to eject the CD.
Insert CD. Playback starts from first track. Display shows track number and time. Returns to track 1 after last track.
If disc is loaded, press SOURCE to select CD mode.
Press DN to return to current track start. Press repeatedly to go back further. Press UP to advance to next track start. Press repeatedly to go forward.
Music sensor feature works during play or pause mode for track skipping.
Press and hold DN or UP to quickly move backward or forward through the track.
Press 'F' button to turn off function indicator (only when CD Shuttle connected).
Press RPT to repeat current track. RPT indicator appears. Press RPT again to deactivate.
With CD Shuttle and RPT ALL, unit plays back all tracks on selected disc repeatedly.
Press 'F' button to return to normal mode (only when CD Shuttle connected).
Press 'F' button to turn off function indicator (only when CD Shuttle connected).
Press M.I.X. in play/pause mode. Indicator illuminates. Tracks play in random sequence. Cancels by pressing M.I.X. again.
With M.I.X. ALL, tracks from all CDs in the magazine play in random sequence.
Press 'F' button to return to normal mode (only when CD Shuttle connected).
Press SCAN button to deactivate Scan mode.
Press SCAN button. Plays first 10 seconds of each track in succession.
Press 'F' button to return to normal mode (only when CD Shuttle connected).
Press TITLE button to display entered CD titles. Toggles between Normal, Clock, and CD Title modes.
If CD Shuttle is connected, 'Shuttle' is displayed when showing CD titles.
Press TITLE button to select disc-titling mode (Refer to page 82).
Press and hold TITLE for 3 seconds. The first digit blinks.
Rotate AUDIO CONTROL knob to select letters/numerals/symbols for naming.
Press Audio Control to store first character. Display advances to next blinking character.
Repeat steps 3 and 4 to complete title. Fill all 8 digits.
Memory capacity is 18 titles. 'FULL DATA' displayed if limit exceeded.
Press TITLE to select title erasing mode. Then press and hold for 3 seconds.
Press and hold SOURCE for 3 seconds. Title blinks on display (e.g., 'ALPINE').
Press DN or UP repeatedly until the desired title is displayed.
Press and hold SOURCE for 3 seconds to erase the displayed title.
Press and hold TITLE for 3 seconds to cancel title erasing mode.
Supports up to 6 Shuttles via Ai-NET. KCA-400C needed for 2+ changers.
CD Shuttle controls only active when a Shuttle is connected to the unit.
Press SOURCE on unit or remote to activate mode. Display shows disc/track number.
Ensure Function indicator is lit. Press preset button corresponding to desired disc in magazine.
Press TITLE button to select disc titling mode.
Ensure Function indicator is lit. Press preset button to select disc for titling. Refer to pages 76 and 80 for details.
Press TITLE button to activate Title Display mode.
Press and hold BAND for 2 seconds while title is displayed. Title blinks in display.
Press DN or UP button to select the desired disc title.
Press BAND button to play selected disc. Unit automatically searches and plays it.
Supports up to 6 Shuttles via Ai-NET. KCA-400C needed for 2+ changers.
CD Shuttle controls only active when a Shuttle is connected to the unit.
Press SOURCE on unit or remote to activate mode. Display shows disc/track number.
Press BAND to activate selection mode. Press BAND until desired Shuttle indicator appears.
Press PROG on remote until desired changer indicator appears.
See 'CD Shuttle Operation' section, pages 82 to 88, for operating the selected changer.
Connect optional Alpine Equalizer via Ai-NET system. Functions accessed from Remote Controller.
Press A.PROC repeatedly to select desired equalizer mode.
Press A.PROC repeatedly until head unit functions are displayed.
Refer to the processor's Owner's Manual for detailed equalizer operating procedures.
Press the switch to turn the power on/off.
Radio: SEEK (UP). CD Shuttle: Advance to next track start. Radio presets (descending), Disc select (descending).
Press button to call external audio processor mode (e.g., equalizer, surround).
Press to select the audio source.
Press UP/DOWN buttons to increase/decrease volume level.
Refer to the external audio processor's manual for its operation.
Button used with optional Ai-NET processor.
Radio: Select presets ascending. CD Shuttle: Select discs ascending. External processor: Select equalizer/surround preset.
Radio: SEEK (DN). CD Shuttle: Go to current track beginning.
Radio: Press button to change band (F1-F3, MW, LW).
Place remote upside down. Insert pointed object into side of elongated hole to slide holder and pull cover.
Put battery in case with (+) indication upward.
Push battery holder back until it clicks.
Hold disc by edges to avoid fingerprints. Do not affix labels or write on disc.
Wipe playing surface from center to edge with soft cloth. Use mild detergent solution for heavy soil.
Avoid accessories affecting disc thickness/diameter, as they may cause operational problems.
Check ignition status, power connections, fuse, or internal micro-computer (use reset button).
Review checklist to isolate problems. Ensure system connections are correct or consult dealer.
Check antenna connection, cable, or replace if necessary. Ensure tuner is in DX mode.
Check for weak signal area or proper antenna grounding. Extend antenna fully or replace if broken.
Check antenna length and grounding. Extend fully or replace if broken. Ensure proper grounding at mounting location.
Check operating temperature range (+50°C / +120°F). Allow interior to cool if too hot.
Check for moisture condensation in CD module. Allow about 1 hour for evaporation.
Check if CD is already in player or improperly inserted. Eject and remove, or ensure correct insertion.
Check if CD is damaged. Eject and discard damaged CD to prevent unit damage.
Check unit mounting. Clean disc if dirty. Replace disc if scratched.
Check if disc is dirty or scratched. Clean disc; replace if damaged.
Protective circuit activated due to high temperature. Indicator disappears when temperature returns to normal.
Consult dealer. Eject magazine, check indication, reinsert. If magazine won't eject, consult dealer.
Press EJECT. Insert empty magazine to receive ejected disc.
Insert a magazine into the CD Shuttle.
Choose another disc.
Details tuning range, sensitivity, selectivity, S/N ratio, and stereo separation for FM reception.
Details tuning range and sensitivity for Medium Wave (MW) reception.
Details tuning range and sensitivity for Long Wave (LW) reception.
Details frequency response, wow/flutter, distortion, dynamic range, S/N ratio, and channel separation for CD playback.
Lists battery type (CR2025), quantity (1), dimensions (39x6x90mm), and weight (17gr).
Includes power requirement (14.4V DC), max output (35W x 4), output voltage, pre-output voltage, bass/treble range, and weight.
Provides width, height, and depth measurements for the main unit chassis.
Provides width, height, and depth measurements for the detachable front panel (nosepiece).
Specifications and design may change without notice due to product improvements.
| Brand | Alpine |
|---|---|
| Model | CDA-7832R |
| Category | Car Receiver |
| Language | English |