12-EN
Before performing the following procedures, see “About the Crossover”
(page 14).
Setting item:
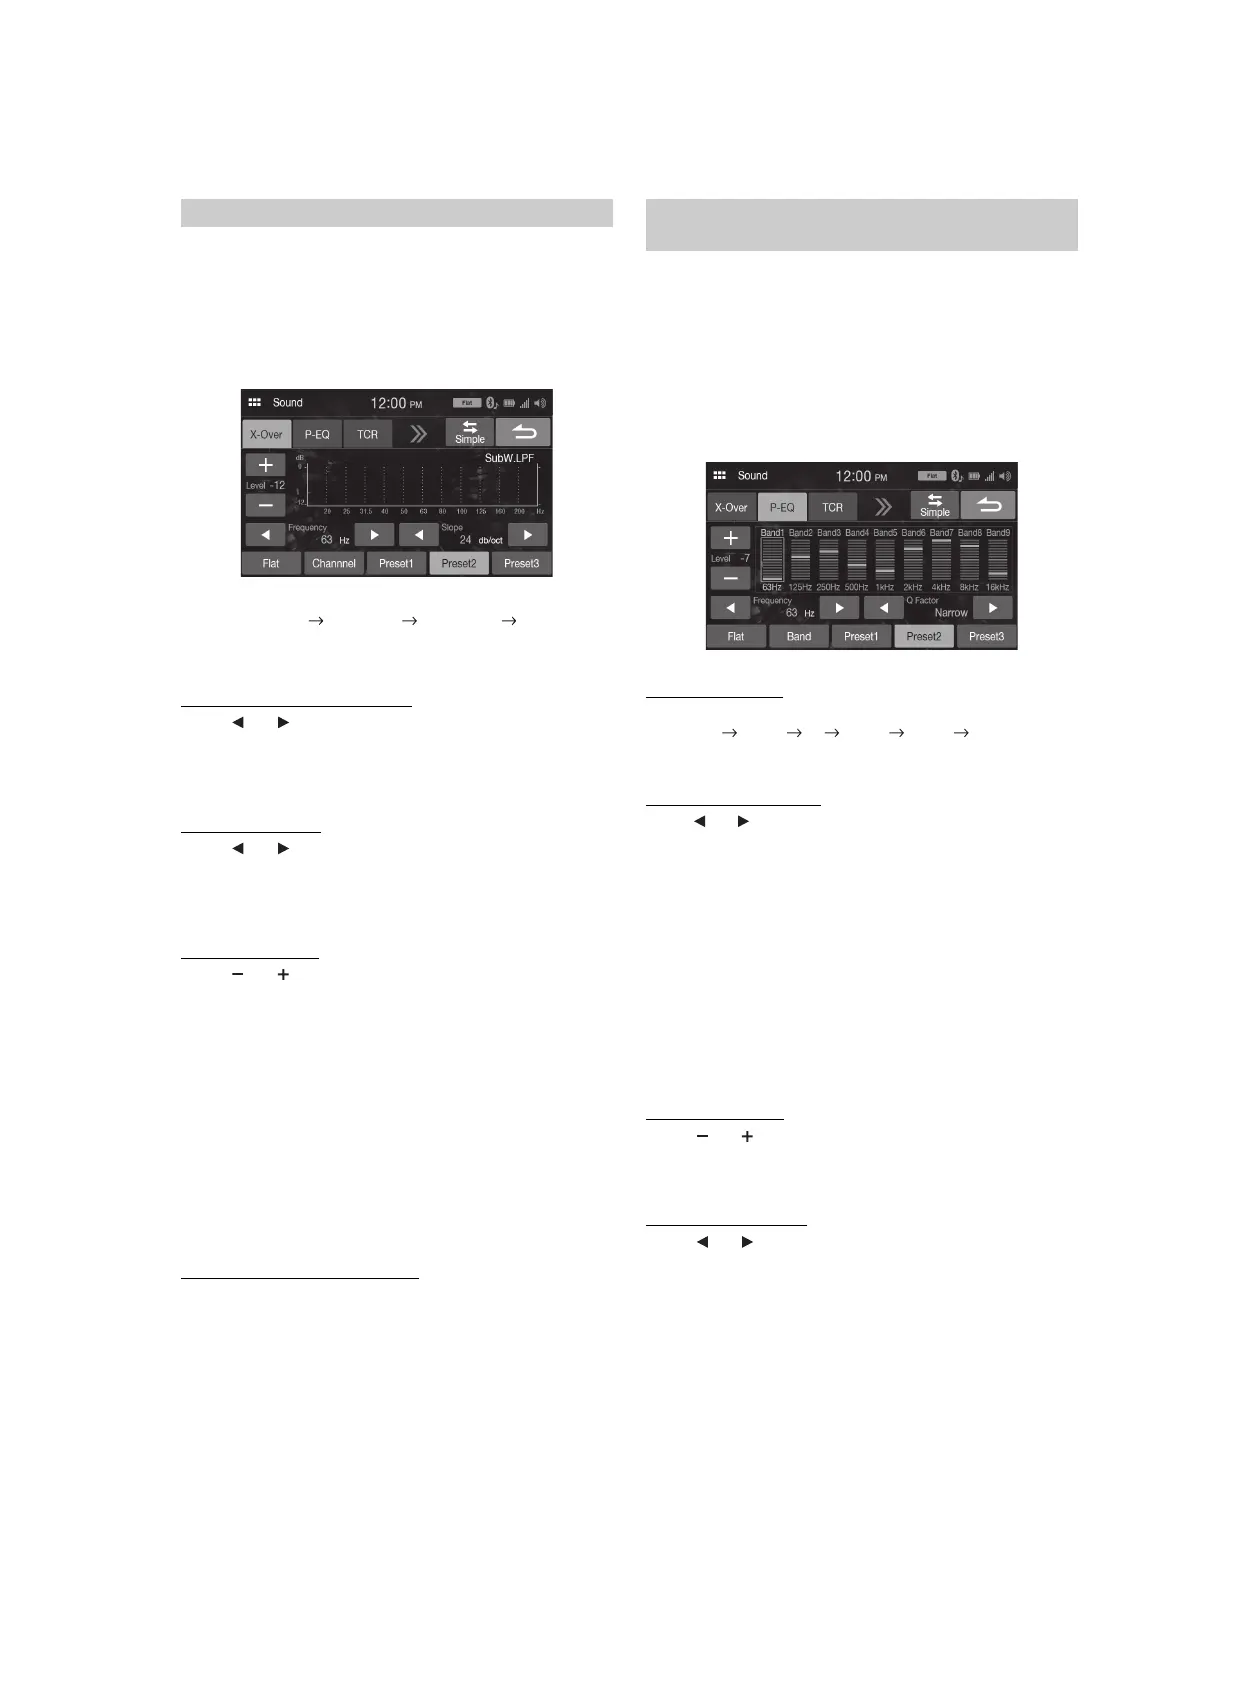
X-Over
1 To uc h [Channel] to select the channel.
Each time you touch, the channel switches.
• The channel being adjusted is displayed in red.
2 Adjust the crossover to your preference.
Selecting the Cut-Off Frequency
Touch [] or [] of “Frequency,” and then select the cut-off
frequency.
Setting contents:
20 / 25 / 31.5 / 40 / 50 / 63 / 80 (Initial setting) / 100 / 125 / 160 / 200 Hz
Adjusting the Slope
Touch [] or [] of “Slope,” and then adjust the HPF or LPF
slope.
Setting contents:
0 (Initial setting) / 6 / 12 / 18 / 24 dB/oct.
Adjusting the Level
Touch [] or [] of “Level,” and then adjust the HPF or LPF level.
Setting contents:
-12 to 0 dB (Initial setting: 0)
3 Repeat steps 1 to 2 to make adjustment to the other
channels.
4 To store the adjusted setting value, touch and hold
[Preset 1], [Preset 2], or [Preset 3] for at least 2 seconds.
•Touch [Flat] to initialize all values.
• If the Subwoofer setting is [Off], the Subwoofer setting cannot be edited
(page 11).
• While adjusting the X-Over you should consider the frequency response
of the connected speakers.
Calling the X-Over adjusted value
Calling the pre-set X-Over adjusted value.
To uc h [Preset 1], [Preset 2], or [Preset 3] on the X-Over
screen.
The setting stored in the Preset will be recalled.
Parametric Equalizer (P-EQ) can adjust the center frequency/Q Factor
(bandwidth)/level for the front and rear speakers independently.
You can adjust only to the approximate frequency zone, but can then
compensate by performing advanced correction of the sound.
Setting item:
P-EQ
• When the Defeat setting is [On], you cannot perform the set up.
1 Adjust the P-EQ to your preference.
Adjusting the Band
Touch [Band] to select the band to be adjusted.
Band1 Band2 ••• Band8 Band9 Band1
• You can select a band directly by touching the screen.
Adjusting the Frequency
Touch [] or [] of “Frequency” to adjust the frequency of the
selected band.
Adjustable frequency bands:
20 Hz to 20 kHz (in 1/3 octave steps)
Adjusting the Level
Touch [] or [] of “Level” to adjust the level of selected band.
Setting contents:
-7 to 7 (Initial setting: 0)
Setting the Bandwidth
Touch [] or [] of “Q Factor” to select the bandwidth.
Setting contents:
Narrow / Medium / Wide (Initial setting)
2 To adjust another band, repeat step 1, and adjust all
bands.
3 To store the adjusted setting value, touch and hold
[Preset 1], [Preset 2], or [Preset 3] for at least 2 seconds.
• Band2 and Band5 are the same as the Bass and Middle controls. For
details on setting Bass and Treble, see “Adjusting the Bass/Middle/
Treble” (page 11).
• Settings exceeding the frequency of adjacent bands are not available.
Adjusting the Crossover Settings (X-Over)
Front HPF Rear HPF SubW LPF Front HPF
Adjusting the Parametric Equalizer Curve
(P-EQ)
Band1: 20 Hz to 100 Hz (63 Hz)
Band2: 63 Hz to 315 Hz (125 Hz)
Band3: 125 Hz to 500 Hz (250 Hz)
Band4: 250 Hz to 1 kHz (500 Hz)
Band5: 500 Hz to 2 kHz (1 kHz)
Band6: 1 kHz to 4 kHz (2 kHz)
Band7: 2 kHz to 7.2 kHz (4 kHz)
Band8: 5.8 kHz to 12 kHz (8 kHz)
Band9: 9 kHz to 20 kHz (16 kHz)