Do you have a question about the Alpine TDA-7572R and is the answer not in the manual?
Do not disassemble/alter; keep small parts from children; use correct fuse rating.
Do not operate/look at screen while driving; do not raise volume excessively.
Use unit as intended; avoid foreign objects; use correct battery polarity.
Do not block vents; stop vehicle if operation interferes with driving.
Operate within temperature limits; manage tape slack and avoid thin tapes.
Prevent foreign objects, clean tape head, replace fuses correctly.
Do not attempt self-repair; return unit to dealer or service station.
Avoid direct sun, humidity, dust, and vibrations for installation.
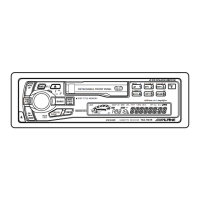
Turn off power, press RLS button, then grasp and pull the left side of the panel.
Insert right side, align groove, push left side until it locks firmly.
Press RESET button immediately after installing or applying power to initialize the unit.
Press PWR to turn on; press and hold PWR for 3 seconds to turn off.
Use MODE to select settings; use or buttons to adjust levels.
Press INTLZ, select 'SUBW' with UP, then toggle ON/OFF with TUNE.
Use N.F.P. On mode for effective non-fading signal, e.g., for subwoofer amplifiers.
Press TUNE to switch between NFP ON/OFF; ON is ideal for subwoofer amps.
Press and hold LOUD for 3 seconds to toggle Loudness; display shows 'LOUD' when active.
Bass center frequency can be set to 60, 70, 80, or 100 Hz.
Set DIMMER to AUTO for headlights ON; navigate modes with INTLZ/UP; toggle modes with TUNE.
Press MUTE to lower volume by 20 dB; press again to restore previous level.
Press S.P.S. for 2 seconds, then use or buttons to select position within 5 seconds.
Press and hold BBE for 2 seconds; press BBE to toggle ON/OFF.
Press INTLZ, use UP to select 'MUTE'; DN reverses; TUNE toggles ON/OFF.
Adjust FM signal level (HI/LO) if volume difference between tape and FM is too large.
Use DN or UP buttons to adjust angle; press and hold INTLZ to confirm.
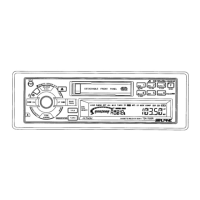
Press SOURCE, BAND, TUNE to select mode, band, and station.
Use DN or UP buttons to tune to desired station; ST indicator shows stereo signal.
Press SOURCE, BAND, TUNE to activate; TUNE illuminates DX/SEEK indicators.
Press TUNE again to return to local mode; DX indicator turns off.
Press DN or UP to automatically seek next station.
Select band/station, press and hold F1-F6 for 2 seconds until frequency blinks.
Press preset button within 5 seconds; display shows band, preset number, frequency.
Press SOURCE, BAND, then press and hold A.ME for 2 seconds.
Tuner seeks and stores 6 strong stations; returns to preset location No. 1.
Press SOURCE, BAND, then press F1-F6 buttons for desired stored station.
Press BAND to select band, then press and hold T.R.V.S. for 3 seconds.
Unit searches and stores up to 12 stations in temporary memory.
Press SOURCE to display frequency, then press AF to activate RDS mode.
In AF seek mode, press and hold AF for 2 seconds to seek stronger station.
Use DN or UP buttons to tune to desired RDS station.
Press AF button; display shows 'AF'.
Press F1-F6; unit seeks stronger station in AF list if signal is weak.
If regional station signal is weak, press preset button to tune another local station. RDS stations preset in F1, F2, F3 bands only.
Press and hold INTLZ for 3 seconds to activate setting mode.
Press T.INFO button to activate Traffic Information mode.
T.INFO blinks if TP signal lost for >1 min; tape mode auto-selects another frequency.
Use DN or UP buttons to select traffic station; TP indicator lights up.
Press 'F' button; FUNC indicator illuminates.
Press F1 (PTY) within 5 secs after PTY selection to search for station.
Press F1 (PTY); Programme Type displayed for 5 seconds.
Use DN or UP buttons to choose type; scrolls through options.
Press T.INF repeatedly until T.INFO indicator appears.
T.INFO blinks if TP signal lost for >1 min; tape mode auto-selects another frequency.
Press F6 in tape mode to select Dolby B NR or C NR; cycle through B NR, C NR, NR (OFF) modes.
Press DN or UP during tape play to rewind or fast forward.
Press PROG button during tape play to change direction and play the other side.
Press and hold DN or UP to quickly move backward or forward through the track.
Repeat steps 3 & 4 to complete titling; press /II after 8th character to auto-store.
Check ignition, power connections, fuse; press Reset button for internal malfunction.
Check antenna connection and cable; replace if damaged.
Check signal area, DX mode, antenna grounding, and length.
Check antenna length/grounding; clean tape head; check Dolby NR setting.
Check operating temperature range for shuttle; allow condensation to evaporate.
Check for damaged CD; clean or replace dirty/scratched discs.
Consult dealer for shuttle malfunction; check/re-insert magazine.
Press eject button; consult dealer if magazine does not eject.
| Tuner | AM/FM |
|---|---|
| Bluetooth | No |
| USB Port | No |
| Aux Input | Yes |
| Display | Yes |
| Equalizer | Yes |
| Type | CD Receiver |
| Playable Media | CD |
| Channels | 4 |
| Display Type | LCD |
| Power Output | 4 x 50W |
| Form Factor | 1 DIN |
| Compatible Audio Formats | CD Audio |