○ On the 3-pin JTAG MUX, enable header J37 to inhibit the JTAG MUX. Move the 2-pin
jumper to be installed on pins 1-2 for high-z mode. See Default Jumper and Switch Sengs
for defaults and Board Component Locaon for locaon.
○ 2-pole DIP SW3[1:2] seng does not maer as the MUX is inhibited/turned o.
○ Power-cycle the VPK180 board or press the power-on reset pushbuon (SW2). SW2 is
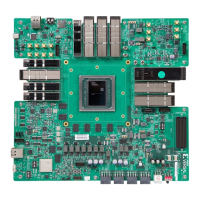
near the USB-C JTAG port J369 in the gure in Board Component Locaon).
QSPI32
This boot mode is supported onboard and is wired to XCVP1802 U1 bank 500 PMC_MIO[0:12]
pins. The supported QSPI conguraon is dual-parallel x8. To boot from QSPI:
1. Store a valid XCVP1802 ACAP boot image le in the QSPI.
2. Set boot mode SW1 for QSPI32 as indicated in the "Mode Switch SW1 Conguraon Opon
Sengs" table in Versal ACAP Conguraon.
3. Power-cycle the VPK180 board or press the POR pushbuon SW2. SW2 is near the USB-C
JTAG port J369 in the gure in Board Component Locaon.
SD1_3.0
To boot from a SD card installed in microSD card socket J302:
1. Store a valid XCVP1802 ACAP boot image le on a microSD card. Plug the SD card into the
VPK180 evaluaon board SD socket J302 connected to the XCVP1802 U1 bank 501 MIO
SD interface.
2. Set boot MODE SW1 for SD1_3.0 as indicated in the table in Versal ACAP Conguraon.
3. Power-cycle the VPK180 board or press the POR pushbuon SW2. SW2 is near the USB-C
JTAG port J369 in the gure in Board Component Locaon.
Chapter 2: Board Setup and Configuration
UG1582 (v1.0) February 21, 2023 www.xilinx.com
VPK180 Board User Guide 22