EasyManua.ls Logo

Anderic DC1 - User Manual

Anderic DC1
5 pages
Print Icon
To Next Page IconTo Next Page
Loading...
!"#$%&'()*+,+-*.*/0123*4567)%"1&73*4)789*:178*.*;1<6%&787"=* /!>?/!@*
ANDERIC® DC1 + DC8 Installa2on Instruc2ons
*
TRANSMITTER OPERATION
A6="B6*)(6*C0D6%$*7"B6%*E%"=*)(6*%6=")6*7"1)%"5*
)%013=&D6%*01<*&13)055*C0D6%&638*A6#5076*)(6*7"B6%8*
Note: Use two 1.5V/AAA ba2eries (included).
Note: If not used for an extended ?me, remove the
ba2ery to prevent damage to the remote transmi2er,
and store the remote transmi2er away from excess heat
or humidity.
*
DIMMING / NON-DIMMING SETTING
F(6*G/:HI*36567J"1*&3*)(6*5&'()*<&==0C56*36567J"1K*)(6*
5&'()*L&55*7$756*E%"=*C%&'()*)"*<&=*)"*C%&'()*M1J5*)(6*
CMD"1*&3*%656036<8*F(6*GNOI*36567J"1*&3*"15$*)(6*5&'()*NOPNQQ*R1"1S<&==&1'*EM17J"1T8*U&'()*
L&55*=0&1)0&1*)(6*503)*36V1'*&E*)M%16<*"W8*
*
Note: The remote control is preset with light dimming func?on enabled at the factory.
Note: Ensure electricity is turned off before installing the receiver (Refer to the ceiling fan
instruc?ons).
*
UNIVERSAL MODE AND LEARNING MODE
F(6%6*&3*0*GX1&B6%305*H"<6I*01<*GU60%1&1'*
H"<6I*L&)(*)(6*%6=")6*7"1)%"58*Y(61*
36567J1'*GX1&B6%305*H"<69I*3&=#5$*#5076*
)(6*<&#*R7"<6T*3L&)7(*0)*)(6*XZZ4A*#"3&J"1*
R!NHHNO*!N/4T8*["M%*E01*%6=")6*7"1)%"5*
&3*%60<$*)"*M368*
*
Note: If using universal mode, your fan can
be controlled with other remote
transmi2ers in the same seKng.
*
F"*7"1)%"5*)(6*E01*L&)(*0*3#67&\7*%6=")6*
)%013=&D6%9*7(""36*GU60%1&1'*H"<6I*C$*
#507&1'*)(6*<&#*R7"<6T*3L&)7(*0)*)(6*UNY4A*
#"3&J"1*RU8*!N/4T*01<*)(61*36567)*)(6*
EM17J"1*36V1'*03*C65"L8*
*
U60%1*EM17J"1*36V1']**A63)"%6*)(6*#"L6%*
3"M%76*)"*$"M%*E019*#%633*01<*("5<*)(6*
GU4;AOI*CMD"1*E"%*0)*5603)*-*367"1<38*["M*
=M3)*#%633*)(6*GU4;AOI*CMD"1*L&)(&1*^,*367"1<3*"E*%63)"%&1'*#"L6%*)"*)(6*E018*
Question and Answer IconNeed help?

Do you have a question about the Anderic DC1 and is the answer not in the manual?

Summary

Transmitter Operation and Settings

Battery Installation and Storage

Instructions for installing batteries and advice for storing the transmitter when not in use.

Light Dimming Functionality

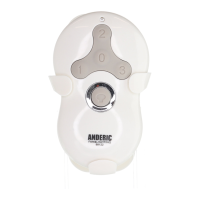
Explains the 'DIM' and 'ON' settings for light control and dimming.

Universal and Learning Mode Setup

Guides for setting the remote to Universal or Learning mode for fan pairing.

Receiver Protective Functions and Key Descriptions

Receiver Safety Features

Details lock protection against obstruction and overload protection.

Remote Control Button Functions

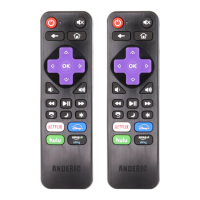
Explains fan speed, fan off, and forward/reverse controls.

Fan Operation and Installation Procedures

Fan Direction and Light Control

How to change fan direction and operate light on/off/dimming.

Wall Mount Cradle Installation

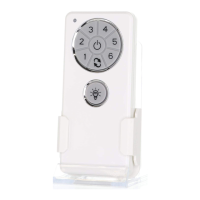
Instructions for installing the remote control's wall mount cradle.

FCC Compliance and Post-Installation Notes

FCC rules statement and important notes for post-installation.

DC8 Receiver Installation and Pairing

DC8 Receiver Specifications

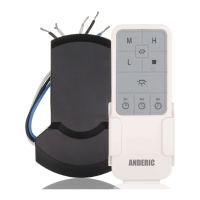
Technical specifications for the DC8 receiver unit.

Wiring and Pairing Procedure

Steps for making wiring connections and pairing the remote with the receiver.

Dimmer Switch Usage Warning

Warning against using wall-dimmer switches to control fan speed.

Multiple Fans - Special Considerations

Pairing Multiple Fans Individually

Procedure for wiring and pairing multiple fans individually on the same circuit.

Overview

The Anderic DC1 + DC8 is a remote control system designed for ceiling fans, offering both universal and learning modes for operation, along with dimming and non-dimming light control. The system comprises a remote control transmitter (DC1) and a receiver (DC8).

Function Description

The DC1 transmitter allows users to control fan speed, turn the fan on/off, reverse fan direction, and control the fan's light. The DC8 receiver integrates with the ceiling fan to execute these commands.

Important Technical Specifications

DC1 Transmitter:

  • Batteries: Requires two 1.5V/AAA batteries (included).
  • Dimming Function: Supports light dimming, cycling from bright to dim to bright upon button press.
  • Non-Dimming Function: Supports simple ON/OFF light control.
  • Universal Mode: Allows control of the fan with other remote transmitters set to the "COMMON CODE."
  • Learning Mode: Enables pairing the transmitter with a specific fan for exclusive control.
  • Auto-Resume Function: Retains the last fan and light settings after a power cycle.

DC8 Receiver:

  • Input: 120VAC, 60Hz power supply only.
  • Output (Motor): 40W (Maximum).
  • Output (Light - LED): 60W (Maximum).
  • Operating Range: Approximately 10 meters.
  • Protection Features:
    • Lock Protection: Built-in safety feature for DC motors against blade or motor obstruction. The motor attempts to run five times, then stops after 60 seconds of interruption. Requires obstacle removal and reset (turn fan off/on with remote or power off for 15 seconds).
    • Overload Protection (Current Limit): Limits maximum current output if fan or light load increases abnormally. The fan shuts off if input power exceeds ratings.

Usage Features

Transmitter Operation:

  1. Battery Installation: Remove the battery cover, install two 1.5V/AAA batteries, and replace the cover.
  2. Dimming/Non-Dimming Setting: The "DIM" selection enables dimmable light control, cycling from bright to dim to bright. The "ON" selection provides simple ON/OFF light control. The remote is factory preset with dimming enabled.
  3. Universal Mode: Place the dip (code) switch in the UPPER position (COMMON CODE). The fan remote is ready for use. Note that in this mode, other remote transmitters with the same setting can control the fan.
  4. Learning Mode: Place the dip (code) switch in the LOWER position (L. CODE). Restore power to the fan, then press and hold the "LEARN" button on the remote for at least 3 seconds within 60 seconds of restoring power. If the fan has a light, it will blink twice to confirm successful pairing.
  5. Fan Speed Control: Buttons labeled 1 through 6 control fan speeds from low (1) to high (6).
  6. Fan Off: The "S" button turns the fan off.
  7. Forward/Reverse: The button with the circular arrows controls the direction of fan rotation. Press once to change direction (fan must be running).
  8. Light On/Off/Dimming: The light bulb button turns the light on/off. Holding it down dims the light (if set to "DIM" position).

Receiver Installation (DC8):

  1. Power Off: Switch off power to the fan at the circuit breaker.
  2. Wiring: Make wiring connections as indicated in the provided diagram (Fig. 1).
    • BLACK (L) from AC Power to BLACK on receiver.
    • WHITE (N) from AC Power to WHITE on receiver.
    • RED from receiver to FAN BLDC MOTOR.
    • GRAY from receiver to FAN BLDC MOTOR.
    • PURPLE from receiver to FAN BLDC MOTOR.
    • BLUE from receiver to LED LIGHT.
    • WHITE from receiver to LED LIGHT.
  3. Restore Power: Turn power back on to the fan.
  4. Pairing: Refer to the "Universal Mode and Learning Mode" section to pair the remote with the receiver. Important: After AC power is on, do not press any other button on the transmitter before pressing the "LEARN" key, as this will cause pairing to fail.
  5. Troubleshooting Pairing: If the fan is not responding, turn off power to the receiver and repeat the pairing process.

Wall Mount Cradle Installation: Install the provided wall mount cradle using the two screws.

Multiple Fans - Special Considerations: When installing multiple fans on the same circuit breaker that require pairing:

  1. Turn off power at the breaker.
  2. Wire up the first fan, leaving others unwired.
  3. Turn on power at the breaker.
  4. Press and hold the "LEARN" button on the first fan's remote control.
  5. Turn off power at the breaker.
  6. Wire up the second fan, unwiring the first.
  7. Turn on power at the breaker.
  8. Press and hold the "LEARN" button on the second fan's transmitter.
  9. Repeat for any additional fans. This ensures each fan responds to its designated remote and prevents multiple fans from responding to only the most recent remote transmitter.

Maintenance Features

  • Battery Removal: If the remote is not used for an extended period, remove batteries to prevent damage.
  • Storage: Store the remote away from excess heat or humidity.
  • Resetting: If the fan or light is not working, reset power (off for at least 10 seconds, then on) and redo the learn function setting.
  • FCC Compliance: The device complies with Part 15 of FCC rules, meaning it may not cause harmful interference and must accept any interference received.

Anderic DC1 Specifications

General IconGeneral
BrandAnderic
ModelDC1
CategoryRemote Control
LanguageEnglish

Related product manuals