Do you have a question about the Anton Paar SVM 2001 and is the answer not in the manual?
Covers general safety guidelines, liability, installation, maintenance, disposal, returns, and precautions for flammable materials.
Details specific safety precautions for measuring certain types of fluids and handling the instrument during transport.
Explains the use of DANGER, WARNING, CAUTION, and NOTICE symbols for risk communication.
Highlights the importance of keeping warning symbols on the instrument legible.
Defines the purpose of SVM viscometers for measuring dynamic viscosity and density of liquids.
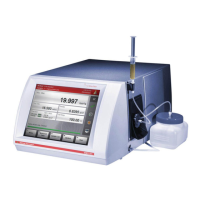
Provides descriptions and images of the SVM's connectors and functional parts.
Details the main screen layout, including header, output fields, quick access, and buttons.
Outlines the necessary setup location and environmental conditions for proper instrument installation.
Provides instructions for unpacking, placing, and connecting hoses and optional equipment to the SVM.
Explains how to safely connect the power cord to the instrument, emphasizing protective earthing.
Provides instructions for turning the instrument on and off, including power requirements and tips for energy saving.
Outlines post-installation steps like setting date/time, regional settings, rinsing cells, and initial calibration.
Details the procedure for calibrating the SVM, including required preparations and applying corrections.
Describes the manual filling procedure using a syringe for the SVM measuring cells.
Explains how to enter sample names and quick settings before starting the measurement process.
Details the precision widget, which displays measurement status, stability, and repeat deviation values.
Covers extrapolated values, stored results, and graph visualization for scan data.
Guides on selecting appropriate cleaning liquids based on sample types and material compatibility.
Provides standard procedures for cleaning measuring cells and checking their cleanliness.
Explains the syringe method for cleaning measuring cells, offering better control over liquid volume.
Describes the cleaning screen interface for checking cell cleanliness and quality factor against precision classes.
Lists common causes for poor cleaning results and provides troubleshooting tips.
Instructs on how to clean the instrument's outer housing and touch screen safely.
Details the procedure for performing a leak test to ensure the measuring cells are leak-tight.
Lists the required equipment for performing a complete measuring cell leak test.
Provides instructions for performing a leak test specifically on the measuring cell lock.
Explains how to rinse the thermostat tube and measuring cell without the rotor for cleaning.
Details the procedure for regular cleaning of the measuring rotor to ensure proper viscosity cell function.
Guides on how to replace O-rings on rotor bearings and the measuring cell lock.
Outlines the required periodical maintenance by certified personnel and lists parts subject to wear.
Explains how to contact Anton Paar for instrument repairs and the procedure for returning the instrument.
Presents tables detailing measuring ranges, repeatability, and reproducibility for SVM models.
Provides general technical specifications including dimensions, weight, power, housing materials, and safety standards.
Lists materials that come into contact with samples and cleaning liquids, specifying parts used in different models.
Identifies materials that may contact liquids due to spills, referencing housing materials.
| Brand | Anton Paar |
|---|---|
| Model | SVM 2001 |
| Category | Measuring Instruments |
| Language | English |