-11-
-12-
(Fig.15) (Fig.16)
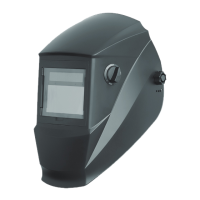
REPLACEMENT OF WELDING FILTER
1. Front cover lens retainer removal
There are 4 lugs on the front cover lens retainers, locked into the 4 slots on the shield.
Use a tool like ball pen will make it much easier to loose these lugs.
1) Put the helmet on one hand, holding the lens cover retainer, with the interior side of helmet
facing up. Use the ball pen to push the lug inwards to the center of the filter, the lug will sag
a bit into the slot(Unlocked from the slot on the shield),
2) then press the lug downwards (completely unlocked from the shield). (Fig.15)
3) Repeat 1)-2) for all 4 lugs.
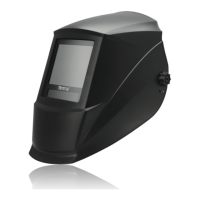
2. Front cover lens retainer removal
Now the front cover lens retainer can be removed. (Fig.16)
3. Filter removal
There are 4 lugs on the shield holding the filter firmly. To remove the filter, lift TOP lugs using
thumb of one hand and at the mean time push the TOP part of filter with the other hand, the
Filter will be lifted out of the lugs. Once it is completely popped up, take the filter out of the
shield carefully.
4. Filter installation
1) Position the filter, make sure the solar panel is outside and up postilion.
2) Slide the bottom of the filter first into the shield, with all bottom edge sitting correctly into
bottom lugs.
3) Lift the TOP lugs from inside while pushing the UP edge of the filter into the TOP lugs, once
both of the TOP lugs are on the UP edge of the filter,push the filter slightly and the lugs will
lock the filter in position.
5. Front cover installation
Position the lens retainer correctly, push and lock the lens retainer in the shield properly.
6.INSPECTION
1. Carefully inspect your Auto-Darkening Welding Filter regularly.
2. Cracked, pitted or scratched filter glass or cover lenses reduced vision will seriously impair
protection.
3. Worn parts should be replaced immediately to avoid injury to the eyes.
CLEANING AND DISINFECTION
Clean the helmet with mild soap and lukewarm water.
Clean the welding filter with a clean lint-free tissue or cloth.
DO NOT immerse in water.
DO NOT use solvents.
TROUBLE SHOOTING
AUTO DARKENING FILTER DOES NOT DARKEN OR FLICKER
- Check the lens cover for dirt and spatter that may be blocking the arc sensors.
- The sensors are dirty, wipe them clean with a soft lint-free cloth.
- Check the sensitivity setting recommendations and increase the sensitivity if possible.
- Increasing lens delay 0.1-0.3 second may also reduce flickering.
- Check batteries and verify that they are in good condition and installed properly.
- Battery terminals and the contact surface of the filter are dirty or oxidized(clean both) .
- Shade adjustment knob is on "GRIND" position, set helmet on “WELD” and/or proper shade
from “5-13”.
THE LENS STAYS DARK AFTER THE WELD ARC IS EXTINGUISHED, OR THE
AUTO-LENS STAYS DARK WHEN NO ARC IS PRESENT.
- Fine-tune the sensitivity setting in small increments. In extreme light conditions, it may be
necessary to reduce the surrounding light levels.
SLOW SWITCHING
- The operating temperature is too low, don’t use at temperatures of below -5 ℃(+23℉).
POOR VISION
- The cover lens and the filter cartridge is dirty or damaged, clean the dirty components and
replace the damaged ones.
- Ensure ambient light is not too low.
- Ensure the shade number is correct and adjust accordingly.
IRREGULAR DARKENING
- Headband has been set unevenly so the distance between the eyes and the lens is different
from the left to the right side.
 Loading...