Back-UPS does not power computer/monitor/external drive during an outage
Internal battery is not connected.
Computer, monitor or external disk/
CD-ROM drive is plugged into a
Surge Only outlet.
Check the battery connections. (refer to Replace the Internal Battery).
Move computer, monitor, or external drive power cord plug to the
Battery Back Up outlets.
Back-UPS operates on battery although normal facility voltage exists
Back-UPS circuit breaker “tripped”.
The wall outlet that the Back-UPS is
connected to does not supply facil-
ity power to the unit.
Disconnect non-essential equipment from the
Back-UPS. Reset the circuit breaker (located
on the rear panel of the Back-UPS) by push-
ing the circuit breaker button fully inward
until it catches.
Back-UPS does not provide expected backup time
Back-UPS is excessively loaded.
Back-UPS battery is weak due to
recent outage and has not had time
to recharge.
Battery requires replacement.
Unplug non-essential Battery Backup connected equipment, such as
printers and plug them into Surge Only outlets.
Note: Devices that have motors or dimmer switches (laser printers,
heaters, fans, lamps, and vacuum cleaners, for example) should not be
connected to the Battery Backup outlets.
Charge the battery. The battery charges whenever the Back-UPS is
connected to a wall outlet. Typically, eight hours of charging time are
needed to fully charge the battery from total discharge. Back-UPS
run-time is reduced until the battery is fully charged.
Replace battery (see Order Replacement Battery). Batteries typically
last 3-6 years, shorter if subjected to frequent power outages or ele-
vated temperatures.
Replace Battery indicator is lit
Battery is not connected properly.
Battery requires replacement.
Check the battery connections. Refer to Replace the Internal Battery.
The battery should be replaced within two weeks (see "Order
Replacement Battery"). Failure to replace the battery will result in
reduced run-time during a power outage.
Connect the Back-UPS to another wall outlet or have a qualified
electrician check the building wiring.
Overload indicator is lit or flashing
Battery Back Up outlets are draw-
ing more power than the Back-UPS
can provide.
Move one or more equipment power plugs to the Surge Only outlets.
Turn the Back-UPS off and then on to reset the Overload indicator
Service
1. Consult the Troubleshooting section to eliminate common problems.
2. Determine if the circuit breaker is tripped. If the circuit breaker is tripped, reset the breaker and
determine if the problem still exists.
3. If the problem persists, consult the APC Worldwide Web site (www.apc.com) or call customer
service.
• Record the model number of the UPS, the serial number, and the date purchased. Be prepared
to troubleshoot the problem over the telephone with a technician. If this is not successful, the
technician will issue a Return Merchandise Authorization Number (RMA#) and a shipping
address.
• If the UPS is under warranty, repairs are free. If not, there is a repair charge.
4. Pack the UPS in its original packaging. If the original packing is not available, ask customer service
about obtaining a new set. Pack the UPS properly to avoid damage in transit.
5. Write the RMA# on the outside of the package.
6. Return the UPS by insured, prepaid carrier to the address provided by customer service.
Note: If the UPS requires service, do not return it to the dealer. The following steps should
be taken:
Note: Never use Styrofoam
TM
beads for packaging. Damage sustained in transit is
not covered under warranty (insuring the package for full value is recommended).
Copyright © 2003 American Power Conversion. All rights reserved.
Troubleshooting
Use the tables below to solve minor Back-UPS installation and operation problems. Consult APC On-line
Technical Support or call APC Technical Support for assistance with problems that cannot be resolved using
this document:
Possible Cause Procedure
Back-UPS will not switch on
Back-UPS not connected to an AC
power source.
Back-UPS circuit breaker “tripped”.
Very low or no facility voltage.
Check that the Back-UPS power plug is
securely connected to the wall outlet.
Disconnect non-essential equipment from the
Back-UPS. Reset the circuit breaker (located
on the rear panel of the Back-UPS) by push-
ing the circuit breaker button fully inward
until it catches. If the circuit breaker resets,
switch the Back-UPS on and reconnect the
equipment one-at-a-time. If the circuit
breaker trips again, it is likely that one of the
connected devices is causing the overload.
Check the wall outlet that supplies power to
the Back-UPS using a table lamp. If the lamp
bulb is very dim, have the facility voltage
checked by a qualified electrician.
180 - 266 Vac (default setting)
47 - 63 Hz (autosensing)
Stepped Sine Wave
350 VA - 225 W 500 VA - 325 W
4 Hours
0
o
to 40
o
C (32
o
to 104
o
F)
-5
o
to 45
o
C (23
o
to 113
o
F)
0 to 95% non-condensing
8.1 x 11.1 x 45.3 cm (3.2 x 4.4 x 17.8 inches)
350 VA - 3.1kg (6.8 lb) 500 VA - 3.4 kg (7.5 lb)
350 VA - 3.8 kg (8.3 lb) 500 VA - 4.1 kg (9.0 lb)
EN 55022 Class B
350 VA - 11 minutes, 500 VA - 20 Minutes
Desktop Computer and 15 inch (38.1 cm) monitor (110 watts)
Specifications
Input Voltage (on line)
Frequency Limits (on line)
On Battery Waveshape
Maximum Load
Typical Recharge Time
Operating Temperature
Storage Temperature
Operating and Storage
Relative Humidity
Size (H x W x D)
Weight
Shipping Weight
EMI Classification
On Battery Run-Time
Circuit
Breaker
Circuit
Breaker
Replace Battery indicator is flashing
Back-UPS failure. Disconnect the Back-UPS from facility power. Call APC for service.
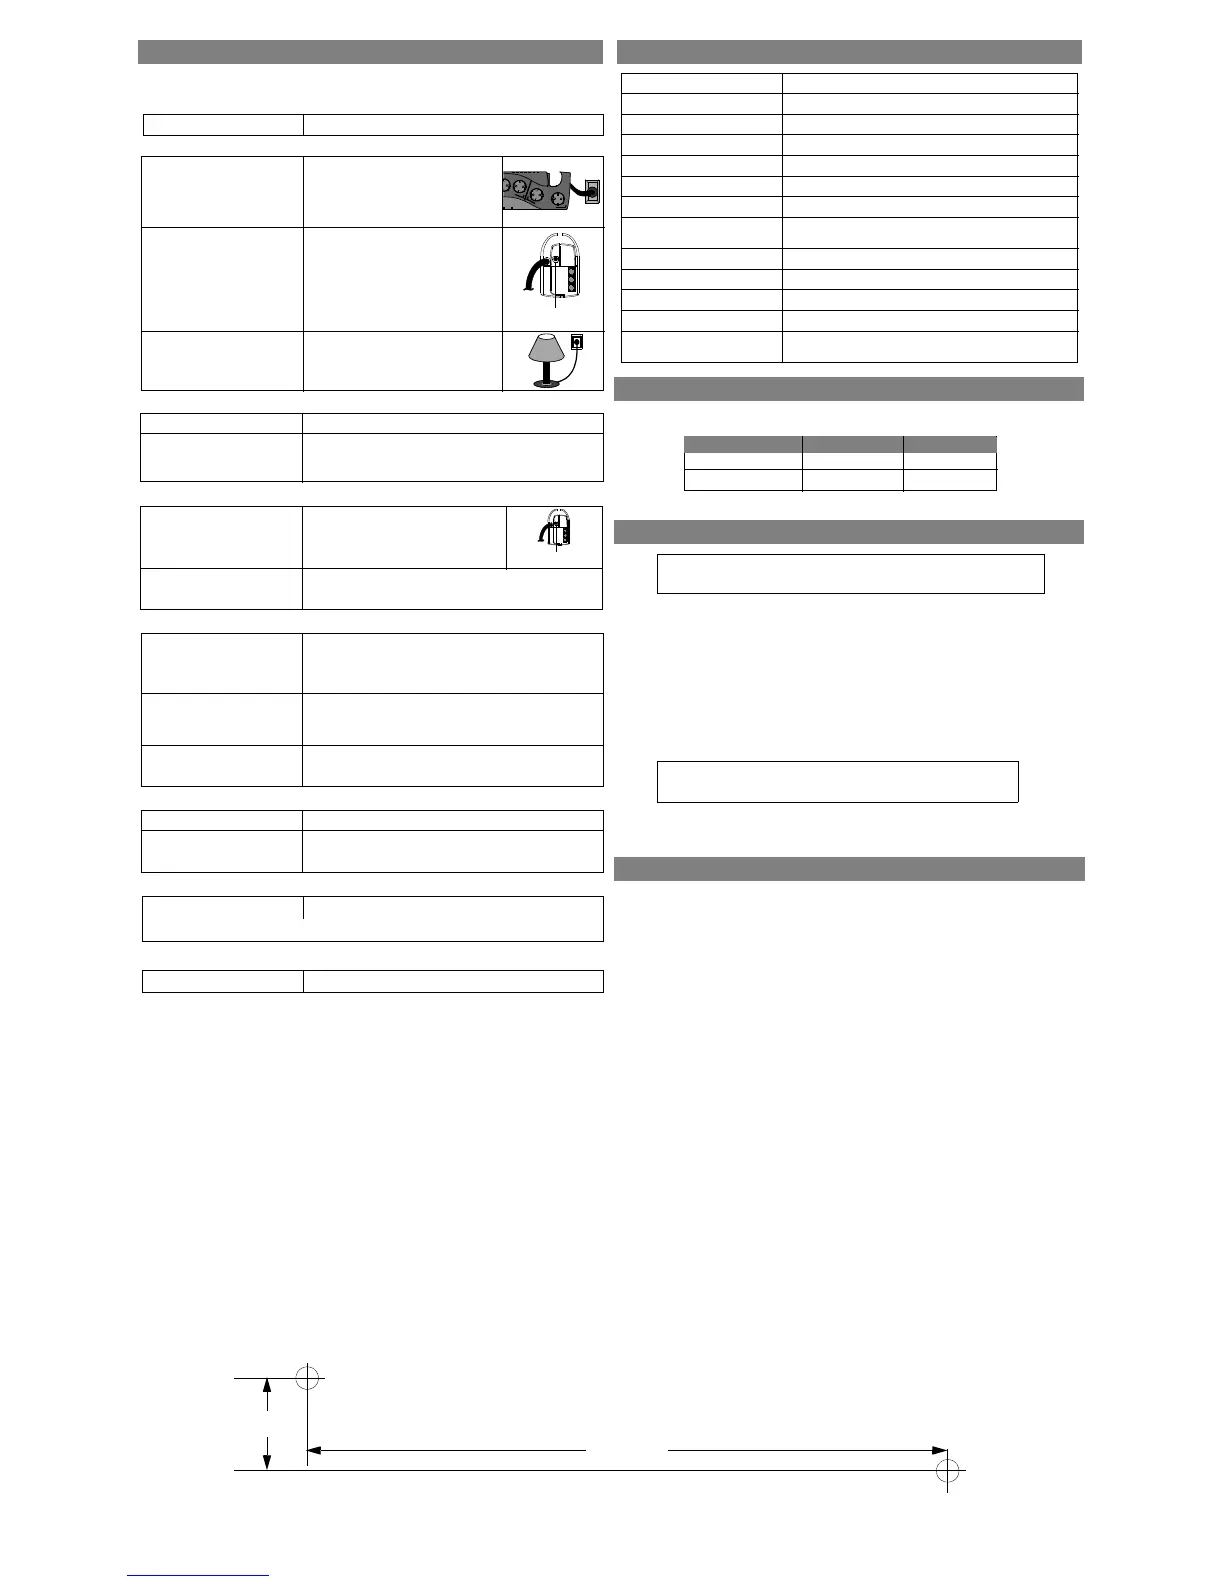
Wall Mount of UPS
The UPS can be mounted vertically or horizontally to a wall surface. Use the template below to position
the mounting fasteners (not supplied). Wall mount the UPS as follows:
1. Hold this page against the wall in the desired mounting location.
2. Use thumbtacks or tape to hold this page in place against the wall. Use a sharp nail or pin to puncture
the center of each template circle to mark the wall.
3. Install the mounting fasteners at the marked locations. Leave the head of both fasteners 8 mm (5/16")
out from the face of the wall. The fasteners must be able to support 6.8 kg (15 lb).
4. Mount the UPS by positioning the key-hole slots over the mounting fastener heads. For vertical
mounting, slide the UPS down into place. For horizontal mounting, turn it slightly counterclockwise
until it is securly in place.
Back-UPS Storage
Before storing, charge the Back-UPS for at least eight hours. Store the Back-UPS covered and upright in
a cool, dry location. During storage, recharge the battery in accordance with the following table:
Storage Temperature Recharge Frequency Charging Duration
-5 to 30
o
C (23 to 86
o
F)
30 to 45
o
C (86 to 113
o
F)
Every 6 months
Every 3 months
8 hours
8 hours
6.88 Inches
(17.5 cm)
1 Inch
(2.5 cm)
 Loading...