Do you have a question about the Argos FUTON 656/0032 and is the answer not in the manual?
| Brand | Argos |
|---|---|
| Model | FUTON 656/0032 |
| Category | Indoor Furnishing |
| Language | English |
Instructions for cleaning and maintaining the unit's surface using mild detergent.
Advice to retain assembly instructions for future use and reference.
List of tools needed for assembly, including included and not included items.
Ensuring the washer is correctly oriented before assembly to prevent damage.
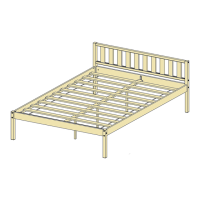
Attaching the headboard to the metal leg using bolts and ensuring correct orientation.
Attaching the lower headboard to the metal leg with bolts and washers.
Attaching another metal leg to the headboard using bolts.
Attaching a metal leg to the lower footboard using screws and washers.
Attaching the filler bar to the headboard using bolts.
Attaching the headboard to the metal leg using bolts and noting orientation.
Attaching the lower footboard to the metal leg with bolts and washers.
Attaching another metal leg to the headboard using bolts.
Attaching the lower footboard to the metal leg using bolts and washers.
Attaching the filler bar to the headboard using bolts.
Attaching the top cross bar to the unit using bolts and washers, requiring two people.
Attaching the bottom cross bar to the unit using bolts and washers, requiring two people.
Joining cross bars to the completed units using bolts and washers, requiring two people.
Joining additional cross bars to the unit using bolts and washers, requiring two people.
Spreading out bed slats and ensuring their hooks point downwards for proper installation.
Tapping slats into place on cross bars using a rubber mallet, recommended for two people.
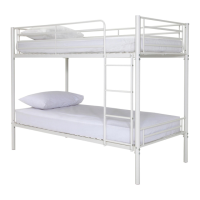
Attaching the safety barrier to the unit using bolts and washers, requiring two people.
Fixing the safety barrier to the unit and top cross bar using bolts and washers.
Options for fixing the ladder to either the left or right side of the bunk bed.
Attaching the front safety barrier to the top bunk using bolts and washers from side and bottom.
Securing the front safety barrier to the underside of the unit using bolts and washers.
Attaching a spring hinge to the unit using bolts and washers.
Attaching another spring hinge to the unit using bolts and washers.
Laying down the futon frame onto a spring hinge and securing it with bolts, washers, and nuts.
Fixing the other side of the futon frame to a spring hinge using bolts, washers, and nuts.
Laying down the futon frame onto a spring hinge and securing it with bolts, washers, and nuts.
Fixing the other side of the futon frame to a spring hinge using bolts, washers, and nuts.
Attaching the ladder to the unit and securing it with bolts and nuts.
Attaching plastic covers to various points on the assembled unit as shown.
Steps to lift, push inward, and lock the front futon frame into its final position.
Final check of the assembly, with a warning about mattress height.
Final confirmation that the assembly process is complete.