8
EN
Steady The brewer is not installed or is not installed properly.
Flashing The lateral door is open or is not closed properly.
Steady Descaling required.
Flashing Descaling in progress.
On Empty function of the internal circuits in progress.
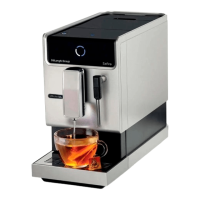
Identification data
The following identification data of the appliance are reported on the plate under the base of the appliance:
• manufacturer and CE marking
• model (Mod.)
• serial number (SN)
• power supply voltage (V) and frequency (Hz)
• electrical power consumption (W)
• assistance toll-free phone number
For any requests to the Authorized Service Centres, specify model and serial number.
INSTRUCTIONS FOR USE
Starting the appliance
Remove the packing material and check that all components are present.
Place the appliance on a flat and stable surface.
Rinse and dry the water tank.
Warning!
Before assembling operations, make sure the appliance is turned off and unplugged from the power
outlet.
Preliminary operations
1 Install the cup-holder grid (J) on the drip tray (I) (Fig. 2).
2 Insert the drip tray (I) at the base of the appliance (Fig. 3).
3 Hold and lift the lid (A) to remove the water tank (B) from the appliance (Fig. 4).
4 Open the water tank lid (A) (Fig. 5).
Warning!
Do not fill the water tank while it is installed in the appliance. Danger of electric shock.
Warning!
When filing the water tank, do not use sparkling, hot or warm water or any other liquids that could
damage the appliance.
5 Fill the water tank with fresh still water up to the MAX level (Fig. 6).
Warning!
The water tank shall be filled with water only when it is not installed in the appliance.
6 Close the water tank lid (A) (Fig. 5).
7 Insert the water tank (B) into its seat (Fig. 7).
Properly and fully install the water tank in its seat for the proper operation of the appliance.
8 Remove the coffee beans container lid (W) (Fig. 8).
9 Insert coffee beans inside the coffee beans container (U) (Fig. 9).
Alternatively, you can use the large coffee beans container (V) to increase the capacity of the container.
- Place the large coffee beans container (V) on top of the coffee beans container (U) (Fig. 10).