Do you have a question about the Arlec PC697 Series and is the answer not in the manual?
Details the built-in rechargeable battery and its function during power failures.
Provides steps for plugging in, powering up, and initial charging of the timer.
Details the purpose and operation of each physical button on the timer interface.
Guides users on setting the current time, day, and selecting 12/24 hour format.
Explains the process for setting specific ON and OFF times for programmed operations.
Describes various options for grouping days for timer programming, including individual and combined days.
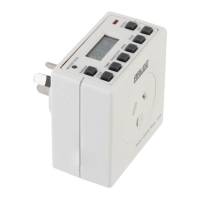
The Arlec Compact Digital Time Switch (model PC697 series 7) is a versatile device designed to automate the switching of electrical appliances. It features a built-in, non-replaceable rechargeable battery that powers the time switch in the event of a power failure or when the unit is unplugged from the mains outlet, ensuring that preset programs are not lost. However, it's important to note that this battery does not provide power to any connected appliance during a power failure.
To begin using the time switch, plug it into a mains outlet and switch it on. Upon initial power-up, all segments of the display should flash momentarily. If the screen remains blank, the unit requires charging; leave it connected to the mains supply for approximately 14 hours to fully charge the internal battery before operation. If the unit was previously operational, a master reset can be performed by pressing the small reset button (typically with a paperclip or pen). This action will illuminate all display segments and reset the unit to a default time of 0:00.
The time switch features several buttons, each with specific functions for setting up and operating the device:
Upon a master reset, the clock defaults to 0:00:00 MONDAY in 24-hour format. To switch to 12-hour format, press the "CLOCK" and "TIMER" buttons simultaneously; the "AM" or "PM" indicator will appear on the top left of the LCD display. To adjust the hours, press "CLOCK" and "HOUR" simultaneously, repeating until the desired hour is displayed. Similarly, to set the minutes, press "CLOCK" and "MIN" together. To set the day, press "CLOCK" and "WEEK" simultaneously, continuing until the correct day is shown at the top of the display.
The timer allows for up to 10 "ON" and 10 "OFF" settings. To program, press the "TIMER" button. The display will show the "ON" setting for program No. 1. Note that one of the "ON - OFF - AUTO" settings will also be visible at the bottom of the display. Use the "HOUR," "MIN," and "WEEK" buttons to set the desired time and day for the program to switch "ON." For example, program 1 could be set to turn on at 3:30 AM on Monday. Press the "TIMER" button again to move to the "OFF" time for program 1. Use the "HOUR," "MIN," and "WEEK" buttons to set the desired "OFF" time. For instance, program 1 could be set to turn off at 6:30 PM on Thursday. This process can be repeated for all 10 available programs. It is not necessary to use all 10 settings if fewer are required.
The timer offers several day/week grouping options for programming, which can be selected by pressing the "WEEK" button during programming:
Timer programs can be temporarily disabled or re-enabled by pressing the "RST/RCL" button while the relevant program is displayed. When disabled, the display will show a specific pattern (e.g., "--:--"). Pressing "RST/RCL" again will revert the timer display back to its original day and time program.
The Compact Digital Time Switch includes a daylight savings advance function. To activate it, press the "CLOCK" and "ON/AUTO/OFF" buttons simultaneously. A "S" symbol will appear on the screen, and the clock time will advance by one hour. To cancel this function, simply repeat the procedure.
The time switch can also be used as a manual switch. To turn on a connected device, press the "ON/AUTO/OFF" button until "ON" is displayed. To turn it off, toggle the button until "OFF" is displayed. If the timer is set to "ON" and then switched to "AUTO" (by pressing the "ON/AUTO/OFF" button), the appliance will remain "ON" until the next programmed "OFF" time. If no "OFF" time is set, it will stay "ON" indefinitely. Similarly, if the timer is set to "OFF" and then switched to "AUTO," it will remain "OFF" until the next programmed "ON" time.
The random mode function introduces slight variations (between 0 and 31 minutes) to the preset program turn-on times, making the appliance's operation less predictable. To activate this function, press the "RANDOM" button during normal clock operation. An "R" symbol will appear on the display to indicate that the random function is active. Press the "RANDOM" button again to deactivate it.
Arlec provides a 12-month warranty to the original purchaser against defects in materials and workmanship, provided the product is used as intended and has not been subjected to abuse, misuse, neglect, damage, modification, or commercial use. To claim warranty, the product, along with proof of purchase and contact details, must be returned to Arlec or the retailer. Arlec will, at its discretion, repair, replace, or refund the product. The warranty is in addition to consumer rights under Australian Consumer Law.