INTRODUCTION
D D D D D D D D D D D D D D D D D
Welcome to the
ATARI
XE
Game System!
The
ATARI
XE
game system
is
made
fo
r you , the serious game
player.
Its expansive memory capability (64 kilobytes) easily
handles the most exciting and complicated games with a variety
of great acti
on
features.
And
you can control the game any way
you
want- with a joystick,
Trak-Ball
~
light
gun,
mouse, or from the
keyboard.
The
XE
comes with two game controller ports
so
you
can share the
fun
with a friend (or opponent).
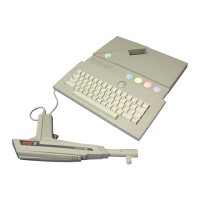
The
XE
game system starts
you
out with Missile Command™,
its own built-in game.
As
a bonus, the system also contains the
programming language
ATARI
BASIC
™
in
ROM
, its
perman~nt
memory. With the
XE
keyboard connected to your system,
you
can
access
BASIC
and begin writing your own computer programs.
Once
you
become familiar with your
XE
,
you
'
ll
want to expand
your system with a number of peripherals.
By
attaching a disk
drive
you
'
ll
be
able to store the programs
you
write with
BASIC,
or
the documents
you
create with other programs. Adding a printer
or modem to your system lets
you
publish your work and take
advantage of outside databases,
bulletin boards, and other com-
puters. And
don
't forget the large library of cartridge, disk, and
cassette games available to
you
once
you
have the add-ons.
The
ATARI
XE
game system
is
compatible with most software and
hardware from both the
ATARI
XE
and
ATARI
XL™
computer lines.
Using This Manual
Operating your
XE
game system is easy, and you'll get the best
results if you connect and operate it correctly from the start.
This manual explains how to do that
in
clear, nontechnical
language.
Chapter
1:
Getting Started explains how to set up your system
and begin using it. Later sections of the chapter tell you how to
expand your system by adding peripheral devices.
Chapter
2:
Helpful Information tells you how to maintain your
system
in
top operating condition , and what to do
in
case of
problems.
XE
game system owners
in
the United Kingdom
should refer to the additional set-up instructions
in
this chapter
when connecting their systems.
1