2920 1251 02
8
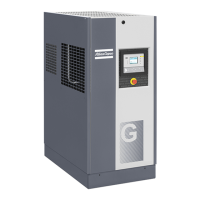
Instruction book
Designation Function
(4-Fig. 3a)
Load To load the compressor manually
Main Screen To return from a menu to the main display
(Fig. 3b)
Menu Starting from the main display (Fig. 3b), to
initiate the main menu (Fig. 3c) which gives
access to submenus
Starting from a submenu, to return to the main
menu (Fig. 3c)
Modify To modify programmable settings
Show More To have a quick look at the compressor status
Program To program modified settings
Reset To reset a timer or message
Return To return to a previously shown option or
menu
Select To select a submenu or to read more details
of a selection shown on the display
Unload To unload the compressor manually
1.2.3 Compressor control modes
Key switch (S5-Fig. 3a) allows the operator to select four control
modes:
Key position Compressor control mode
10 Compressor off.
11 Local control mode (remote control mode
is made inactive):
- The compressor can only be controlled
by the buttons on the control panel.
- The compressor can be started and
stopped via function Timer (see section
1.2.1), if programmed and activated.
12 Remote control mode 1 (local control is
made inactive):
- The compressor can only be started and
stopped by an ES100 sequence selector
or by external switches. Do not use
maintained-action buttons in case of
remote starting/stopping.
- Compressor start/stop commands via
function Timer (see section 1.2.1) are still
possible, if programmed and activated.
- Emergency stop button (S2) remains
active.
13 Remote control mode 2. The compressor
can be controlled by an ES-type controller or
by computer. Consult Atlas Copco.
Important
- The regulator will only react to a new control mode if the
new position of the control mode switch is maintained for
3 seconds.
- To avoid unauthorized switching over to another control
mode, take out the key after selecting the required mode.
1.2.4 External compressor status indication
Terminal strip (1X1-Fig. 2) is provided with auxiliary contacts
for external indication of:
Indication Relay Terminals Max. load
on strip
1X1
Automatic operation K06 50-51 10 A / 230 V AC
Warning K07 52-53 10 A / 230 V AC
Shut-down K08 54-55 10 A / 230 V AC
Control mode
REMOTE 1 -- 56-57 10 A / 230 V AC
Warning
Stop the compressor and switch off the voltage before
connecting external equipment.
1.2.5 External communication
If it is desired to connect the compressor to an Atlas Copco ES
system (e.g. to an ES100 sequence selector), an optional
communication module (COM1) needs to be installed.
Installation (Fig. 4)
1. Fit the communication module (COM1) and fix it using
plate (3).
2. Connect the 24V power supply from terminals (11 and
12) of terminal strip (1X1) to connector (5X1) of
communication module (COM1).
3. Connect an earth cable between module (COM1) and the
module of the regulator.
4. Connect the cable delivered with the COM1 module from
connector (5X3) of the COM1 module to a free ..X2
connector on a module of the compressor regulator.
5. Consult Atlas Copco to check the installation and to have
the communication software loaded.
1.3 Regulating system (Figs. 5)
1.3.1 Air flow
GA/GA W 90 up to -160
Air drawn through filter (AF) and unloader (UA) is compressed
 Loading...