This document outlines the operation, coding, maintenance, and troubleshooting for B&D Smart Pro, Smart & Secure Sectional Door Openers. It serves as a quick operation guide for users.
Function Description
The B&D Smart Pro, Smart & Secure Sectional Door Openers are designed to automate the opening and closing of sectional garage doors. They offer various control methods, including manual operation, remote control, and smart phone control (for Smart Pro & Smart Only models). The system includes indicators for various statuses such as door position (open/closed), battery status, remote status, adjustment status, and network connectivity. Safety features are integrated, such as the ability to disengage the opener for manual door operation and warnings regarding potential hazards.
Usage Features
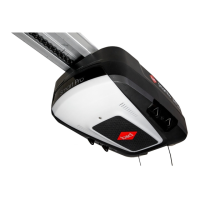
User Operating Controls:
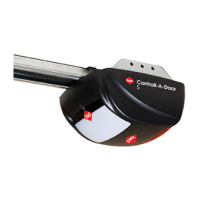
The opener features a control panel with several buttons and indicators:
- 01 Close Button: Initiates the closing sequence of the garage door.
- 02 Close Indicator: Illuminates to show that the door is in the closed position or is in the process of closing.
- 03 Stop Button: Halts the door's movement at any point during its operation.
- 04 Open Button: Initiates the opening sequence of the garage door.
- 05 Open Indicator: Illuminates to show that the door is in the open position or is in the process of opening.
- 06 Mode Button: Used to cycle through different operating modes or settings.
- 07 Status Indicator: Provides general operational status feedback.
- 08 Battery Status Indicator: Shows the current charge level or status of the backup battery.
- 09 Remote Status Indicator: Indicates the status of remote control communication.
- 10 Adjustment Indicator: Lights up when adjustments to the opener settings are being made.
- 11 Network Indicator: Shows the status of the opener's network connection (for smart models).
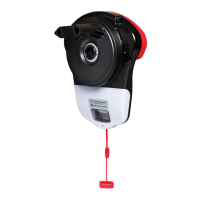
Manual Door Operation:
The opener can be disengaged to allow for manual operation of the garage door.
- To Disengage: With the door in the closed position, pull the string handle towards you until a click is heard. This unlocks the door, allowing it to be operated manually. A caution is provided that when disengaged, the door is no longer locked, and to re-engage the opener after the door is closed to restore locking.
- To Engage: Pull the string handle away from you until a click is heard. After engaging, press the "test" button on the opener to confirm it's working correctly. A critical caution warns against using the string handle as a mechanism to open the door, as this may cause serious injury.
Coding a Remote Control:
Remote controls can be programmed in two ways:
- Coding Remote from the Opener:
- Switch power on and remove the controls cover.
- Press the "MODE" button repeatedly until the remote LED lights up.
- Press and hold the desired button on the remote for 3 seconds, then release. The opener will flash and beep. Press and hold the same remote button again for 3 seconds, then release both buttons.
- Replace the controls cover.
- Press the remote button to test its operation. Up to 64 remotes can be programmed.
- Remotely Coding a Remote Control: This method is used when a pre-coded remote control is available and within range of the opener.
- Take a pre-coded remote and press the button you wish to duplicate.
- Using a pen, press and hold the middle button through the coding hole on the new remote for 2 seconds.
- The opener will flash and beep.
- Take the new remote and press and hold the desired button for 3 seconds, then release. Press and hold the same button again for 3 seconds, then release both buttons.
- The opener will stop flashing and beeping.
- Press the new remote button to test its operation.
Smart Phone Control (Smart Pro & Smart Only):
This feature allows control of the garage door via a smartphone app connected to the home's WiFi network.
- Before You Start:
- Download the B&D App to your smartphone.
- Ensure limits are set prior to connecting to WiFi.
- Verify that the home WiFi router is within range of the opener.
- A warning states that this device allows operation when not in line-of-sight, and the door may operate unexpectedly, so nothing should be in its path.
- Setup Process:
- Remove the controls cover and press the "MODE" button repeatedly until the network LED is lit.
- Press and hold the "Open" button for 5 seconds until the LED turns PURPLE (Hotspot ON).
- Go to your phone settings, select WiFi, and choose the network named (B&D000000). Then open the B&D App and click "START".
- Set up the new Smart Hub in the app. The Smart Hub connect will appear, ensuring the WiFi network is (B&D000000).
- The network LED and light will flash. Press the "STOP/SET" button. Follow the instructions in the app. The network LED will turn Blue, then return the controls cover.
Maintenance Features
Changing a Battery (Remote Control):
The remote control uses a CR2032 battery.
- Check Light Status Table: Observe the light status on the remote.
- Solid: Battery OK.
- Flashing: Replace battery.
- No light: Replace battery.
- Use a screwdriver to remove screws and open the remote casing.
- Use a non-metallic object to push out the old battery.
- Insert the new CR2032 battery, ensuring correct polarity.
- WARNING: The battery is hazardous and must be kept out of reach of children. Swallowing or placing it inside any part of the body can cause severe or fatal injuries within 2 hours or less. Seek immediate medical attention if suspected.
Troubleshooting:
The main light on the opener acts as a service/warning indicator, flashing a number of times followed by a pause to indicate specific issues.
- Normal operation (door is fully open): No specific remedy needed.
- PE is preventing door from moving: Clear obstructions. Test the door. If the safety beam is faulty, enter Safety Beam Emergency Close by pressing and holding a pre-coded transmitter button until the door closes.
- Wireless Auto-Lock battery is low: Change the Auto-Lock battery.
- Wireless PE battery is low: Change the PE Battery.
- Wireless Auto-Lock is not unlocked and preventing door moving: Check Auto-Lock, test by pressing the emergency release button on the lock and testing door operation.
- Maintenance is due after pre-set number of cycles: Contact the dealer to arrange service.
- Standby battery is faulty: Contact 1300 769 850 within Australia for assistance.
- Door was obstructed: Clear obstructions and test door opens/closes correctly. If the door is damaged, contact a door professional.
- Motor overloaded or stalled: Contact the dealer to arrange a door service.
- Unit running on battery power (Only available with SDO-7 & SDO-9): The main light will flash 3 times at the start of the cycle to indicate battery backup operation, and 10 flashes at the end of the cycle. Check the power supply.
Caring for Your Opener:
- Preventative Servicing: Regular servicing of your garage door and opener is crucial to ensure safe and efficient operation, reduce the risk of failure, and maintain your warranty.
- Service Schedule: Refer to your Owners Opener Handbook for the service schedule.
- Monthly Testing: Refer to the installation manual for monthly testing procedures in Section 13 to ensure the garage door is fit for use.
- Warranty Details: Online warranty details are available.
Need a Service Call?
If the opener requires service, contact the dealer who installed the garage door opener. Their contact details are typically found on a sticker on the back of your garage door. For product assistance, general inquiries, or more information, visit bnd.com.au or call 13 62 63.