UK UK
42 43
SE SE
NO NO
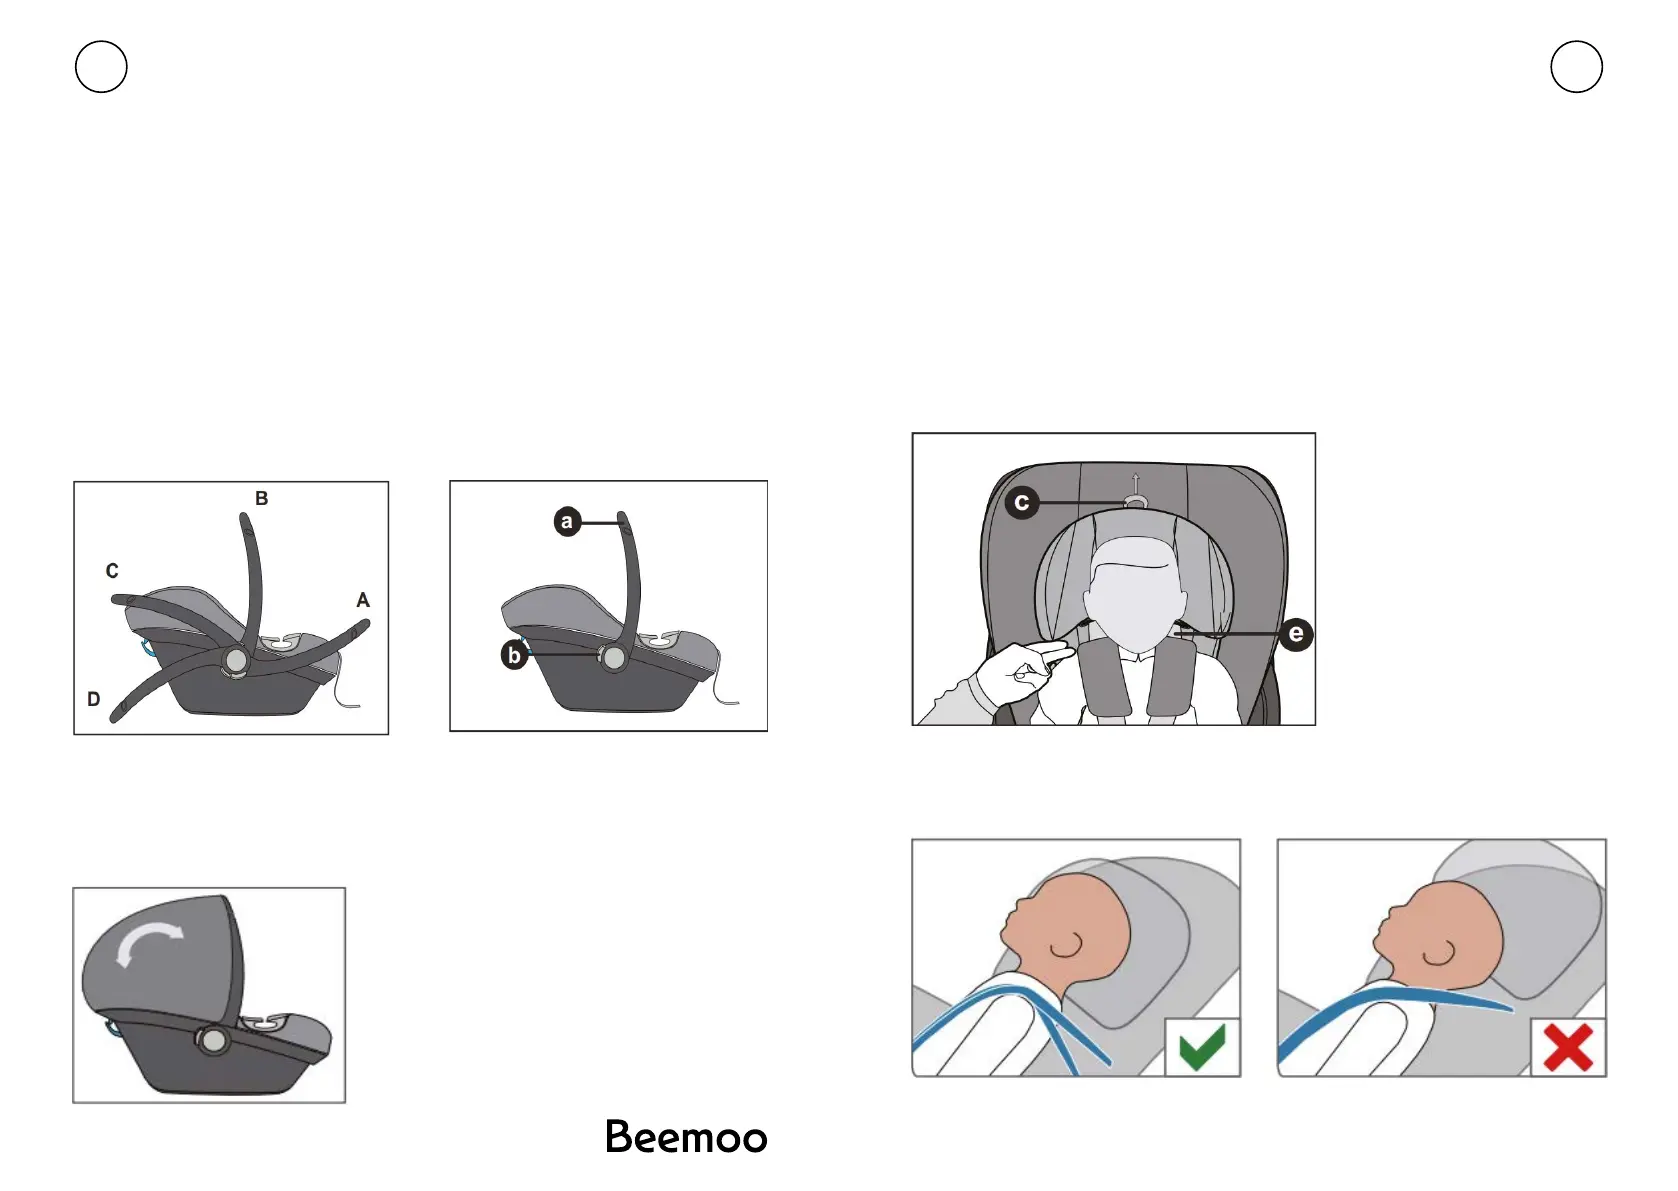
JUSTERING AV BÆREHÅNDTAK
Du kan låse bærehåndtaket på plass i re posisjoner:
A) Kjørestilling
B) Bæreposisjon
C) For å plassere babyen i setet
D) For en sikker oppstilling på et jevnt underlag utenfor kjøretøyet
ADVARSEL!
For å unngå at setet velter under bæring, kontroller om bærehåndtaket A er låst på
plass i bæreposisjon B.
• For å justere bærehåndtaket, trykk samtidig på høyre og venstre knapp (b).
• Vri deretter bærehåndtaket forover eller bakover mens du trykker på knappen (b), til
det automatisk låses på plass i ønsket posisjon.
JUSTERING AV KALESJEN
• Brett ut kalesjen ved å trekke gradvis i plastdekselet.
• For å brette opp kalesjen, skyv kalesjen tilbake til utgangsposisjonen.
JUSTERING AV HODESTØTTEN
MERK! Nyfødtinnlegget beskytter barnet ditt. Den må brukes opp til størrelse på 60
cm.
Hodestøtten sikrer best mulig beskyttelse for barnet ditt når det justeres til optimal
høyde. Det er seks tilgjengelige posisjoner som kan stilles inn. Hodestøtten må
justeres slik at avstanden mellom barnets skuldre og hodestøtten ikke overstiger 2 cm
(ca. 2 ngre bredde).
• Sjekk høyden på selebåndene: Plasser selestroppene ved eller like under barnets
skuldre for bakovervendt bruk.
• Trekk justeringshåndtaket (c) oppover for å låse opp hodestøtten. Nå kan du justere
hodestøtten.
Merk!
Skulderbeltene (e) er godt festet til hodestøtten og må ikke justeres separat.
You can lock the carrying handle in place in four positions:
A: Driving position.
B: Carrying Position.
C: For placing the baby in the seat.
D: For a safe stand on a level surface outside the vehicle..
WARNING! In order to prevent the seat from tipping over during carrying,
check whether the carrying handle a is locked in place in carrying
position B.
• To adjust the carrying handle, simultaneously press the left and right
buttons (b).
• Then pivot carrying handle a forwards or backwards while pressing
button (b), until it automatically locks in place in the desired position.
.
07
08
Adjusting the Headrest
The headrest only ensures the best possible protection for your child if it is
adjusted to the optimum height. There are six positions that can be set.
The headrest has to be adjusted in a way that the distance between
the child‘s shoulders and the headrest doesn‘t exceed 2 cm
(approx. 2 fingers width).
• Check the height of the Harness Straps: Position the Harness
Straps at or just below the child‘s shoulders for rear-facing use.
• Pull the adjustment handle © upwards to unlock the headrest .
Now you can adjust the headrest.
NOTE !
The newborn inlay protects your child. It must be used up to size of 60 cm
ADJUSTING THE CARRYING HANDLE
ADJUSTING THE SUN CANOPY
Unfold the sun canopy by pulling
gradually on the plastic cover.
To fold up, push the sun canopy
back to its starting position.
ADJUSTING TO BODY SIZE
Note! The shoulder belts (e)
are firmly connected to the
headrest and must not be
adjusted separately.
 Loading...