LR-10000 Low-Rise Scissor Lift 11 P/N 5900075 — Rev. B — August 2021
Tools
You may need some or all of the following tools:
• Rotary hammer drill or similar
• 3/4", 3/8", 1 1/4” masonry bits
• Hammer
• Open-end wrench set: 1/2", 15/16" – 1 1/8"
• Socket and ratchet set, 1 1/8"
• Medium crescent wrench
• Chalk line
• Medium flat screwdriver
• Tape measure (25-foot recommended)
• Forklift or Shop Crane
Select a Site
Keep the following in mind when selecting a site for your Lift:
• Enough space. Make sure there is adequate space on all sides, plus enough space above for
the Vehicles you will be raising. See Clearance Around the Lift for more information.
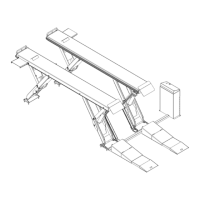
• Power Unit Stand. The Power Unit Stand can go on either side of the Lift, up to 55 inches
away.
• Radial Shift. When you raise the Lift, the geometry of the scissor arms moves the Platforms up
at an angle, towards the Hinged Ramp end of the Lift. The amount of radial shift for the LR-10000
is approximately 12 inches. Note that radial shift is always the same direction, towards the Hinged
Ramp end of the Lift, no matter which way the Vehicle is facing.
• Check for overhead obstructions. The site must be free of overhead obstructions.
• Concrete specifications. Do not install the Lift on cracked or defective concrete. Make sure
the concrete is at least 4.25 inches thick, 3,000 psi, and cured for at least 28 days (if newly
poured). Make sure the floor is defect-free, dry, and level.
⚠ WARNING Do not install the Lift on a surface with 3° of slope or more. A slope in excess of 3°
could lead to property damage, personal injury, or death.
• Power. You will need a power source available near the Power Unit Stand. Use a 25 amp or
greater fuse for a 208 – 240 VAC, 1 phase circuit.
• Operating temperature. The Lift is designed to be used between temperatures of 41º to 104ºF
(5º to 40ºC).
• Outdoor installation. It is for indoor use only.
Outdoor installation is prohibited
. The Lift
cannot
be installed outside.
• Second floor installs. Do not install the Lift on a second floor or elevated floor without first
consulting the building architect and getting their permission.
• Dress properly. Always wear protective gear (like safety goggles, helmet, heavy gloves, suitable
working clothes, safety boots, ear protection, and so on) when installing the Lift. Do not wear loose
clothing or jewelry; contain long hair; keep hair, clothing, and gloves away from moving parts.
⚠ WARNING Always wear appropriate protective gear when installing the Lift.