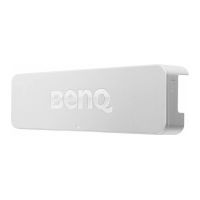
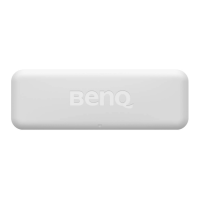
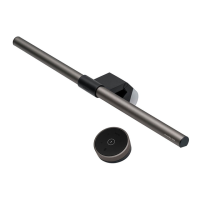
The BenQ PT01 is a PointWrite touch module designed to transform any flat surface into a virtual interactive whiteboard when used with a BenQ PointWrite interactive projector. This device acts as a touch transmitter, enabling scalable finger touch functionality.
Function Description:
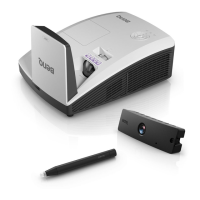
The PT01 touch module works in conjunction with a PointWrite interactive projector and a PointWrite camera module (which needs to be installed separately) to provide interactive capabilities. It projects a laser curtain that covers the screen area, allowing for touch input. The module supports both pen mode (using a dummy pen) and finger touch mode, offering flexibility in interaction. The installation CD includes the PointWrite touch driver, QWrite software, and a user manual, ensuring users have all necessary tools for setup and operation.
Important Technical Specifications:
Touch Module:
- Model Name: PT01
- Operating Voltage: 4.7~5.2V
- Power Consumption: Max 180mA
- USB Type (Power): Mini USB B type
- Power Source: Via USB connector or 5V adaptor
- Wavelength: 850nm ± 10nm
- Fan Angle: Max: 180° (1 laser beam)
- Rolling Control Range: Max 4°
- Pitch Control Range: Max 3.5°
- Safety: Class I
- Dimension: 178.85 x 58.09 x 40.10mm
- Weight: 152g (with cover)
General Function:
- Camera Type: PointWrite series camera module
- Multi Pen Supported: Up to 4 touch points (Pen/Finger)
- Response Time: 0.016 sec
- Refresh Rate: 60 Frames/sec
- Calibration: Auto / Manual 16 points
- Dual screen Calibration: Yes
- USB Cable Distance: Max 15 meters (5-meter USB cable + repeater)
Usage Features:
Setup and Installation:
- Shipping Contents: The package includes the PointWrite Touch Module PT01, an installation CD, a quick manual, a dummy pen with 2 extra pen nibs, a mini USB cable, alignment masks, 2 wrist strips, 2 tapes, and a hex key.
- Projector Requirements: The PT01 is exclusively compatible with BenQ PointWrite series interactive projectors. The PointWrite camera module must be properly installed prior to setting up the PT01.
- Screen Tolerance: For optimal performance, the touch area should be within 50-100mm from the top/bottom edge of the screen (depending on mounting) and 50mm from the side edges. The head of the laser module should face the touch screen. Recommended screen sizes are 65" to 100" (without external lighting interference).
- Mounting: The PT01 is mounted on the screen surface using adhesive tape (3M double tape, 1mm thickness, is recommended) and secured with screws. The front cover can be turned over for installation.
- Power Connection: The PT01 can be connected to the projector via a USB type-A port (recommended for selected projector models), to a computer via USB, or to a 5V USB adapter. Users are advised to disconnect the adapter when the touch function is not in use to preserve the lamp time of the touch module.
Environment and Surface Conditions:
- Environment Condition: For optimal finger touch quality, users should close all window curtains, select a projection area away from direct sunlight, keep infrared devices away from the screen, and remove reflective accessories (watches, necklaces) to prevent interference.
- Surface Condition: The quality of finger touch is highly dependent on the surface. A smooth, flat surface free of protrusions is crucial.
- Wall Surface: Select a straight, flat wall without protruding objects. Test the wall surface with the dummy pen before installation, as writing directly on the wall can cause damage. A smooth, semi-gloss painted surface is recommended to reduce glare and pen nib wear.
- Dry-erase Board: For textured surfaces, attaching a dry-erase board is recommended. This provides a flat surface suitable for digital ink writing.
- Surface Flatness: A flatness variance of 2mm in any direction ensures optimal finger touch performance. Users can measure flatness using a six-foot carpenter's level.
- Surface Obstructions: The projection area must be clean and free of obstructions, such as hanging cables or wires. Leave extra space between cables and the projected image for future adjustments.
Software and Calibration:
- Driver Installation: The PointWrite driver for finger touch functionality is included on the PT01 CD. Users must disconnect the USB cable from the PointWrite camera module during installation. The installation process involves a setup wizard for PointWrite software.
- Configuration Setting: After installation, users need to configure PointWrite settings. This includes selecting the language, choosing options like "Start Program Registration" (for automatic startup), "Ceiling Mount Mode" (if the projector is ceiling-mounted), and "Rear Screen Mode" (for rear projection systems).
- Alignment Instructions: The alignment process involves checking the pattern image position for UST-Mirror type or ST-Short throw projectors. The alignment masks (included accessories) help determine the optimal height of the laser curtain for touch performance.
- Alignment Mark: The alignment mark reflector, visible in the camera view, helps adjust the laser curtain. Masks 1 and 2 (upper side of the screen) require 2 points for best reflection, while masks 3 and 4 (bottom side of the screen) require 3 or 1 points. The high of the laser curtain should be <5mm for masks 1, 2 and 5-10mm for masks 3, 4.
- Adjusting for Reflection: A hex key is used to adjust the top, left, and right screws on the PT01 to control the pitching of the laser curtain, ensuring it is parallel to the surface and has the optimal gap.
- PointWrite Calibration: The system offers both auto and manual calibration.
- Auto Calibration: Click "Auto" to initiate an automatic calibration process, which displays a white image and a pattern.
- Manual Calibration: Click "Manual" to project a calibration window where users click points on the screen using the PointWrite pen. This is recommended if auto calibration fails or accuracy drops due to excessive ambient light.
- Mode Switching: After calibration, users can switch between "Pen Mode" and "Finger Touch Mode" in the configuration settings. Once in "Finger Touch Mode," the QWrite software can be used for interactive tasks.
Maintenance Features:
- Pen Nib Replacement: The dummy pen's nib can be replaced. Users are advised to keep the pen nib clean for better touch performance.
- Laser Curtain Adjustment: The hex key is provided for precise adjustment of the laser curtain's pitch, ensuring optimal finger touch performance.
- Software Updates: Users can visit the local BenQ Website for updates to the PointWrite software.