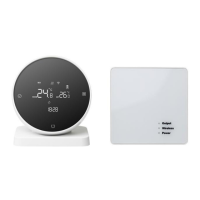
This document describes the TGR-86 WIFI Thermostat, an intelligent digital temperature controller designed for floor heating systems, suitable for room temperature control and household temperature management. It controls the operating state of floor heating equipment by comparing ambient temperature with a set temperature, aiming to improve comfort and achieve energy savings. The thermostat utilizes microcomputer control technology and features full-screen display touch buttons, offering an elegant design and ease of use. It supports manual, automatic, programmable, and state memory functions.
Product Packaging:
- Thermostat host: 1 PC
- Qualification certificate: 1 PC
- Sensing line (optional): 1 PC
- Manual: 1 PC
- Screw: 2 PCS
Product Models:
- WP Plumbing: 3A
- EP Electric Heating: 16A
- WPB linkage, gas boiler: 3A
User Notes:
- Read the manual carefully. Improper operation may damage the product or cause dangerous conditions.
- Installation personnel must be well-trained and experienced service technicians.
- After installation, read the manual carefully and operate the product according to instructions.
- Caution: Risk of electric shock or equipment damage.
Wiring Diagram:
- WP (Water Heating): AC95~240V 3A. Connections: L, N, N1 (NC, NO). Output terminals: O6, O7.
- EP (Electric Heating): AC95~240V 16A. Connections: L, N, N, L (NTC). Output terminals: O6, O7.
- WPB (Gas Boiler): AC95~230V 3A. Connections: L, N (Dry Contact, NTC). Output terminals: O6, O7.
Installation Procedure:
The product is installed with a standard 86 control switch (in compliance with European regulations).
- Slide the mounting plate upward.
- Remove the mounting plate.
- Fix the mounting plate to the cassette with screws.
- After installation, buckle the product in place.
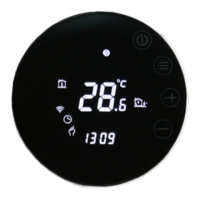
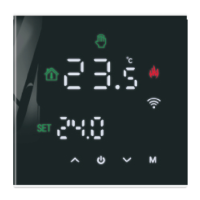
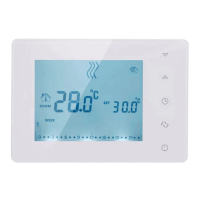
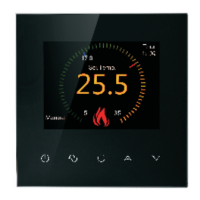
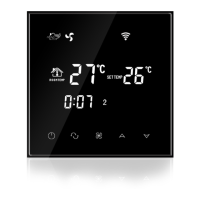
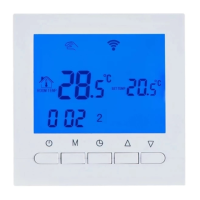
Description of Display & Icon:
The thermostat display includes several icons:
- WEEK ICON: Indicates the current day of the week (1 to 7).
- HEATING ICON: Shows when the heating system is active.
- ROOM TEMPERATURE: Displays the current room temperature.
- MODE ICON: Indicates the current operating mode (e.g., manual, auto).
- SET FLOOR: Displays set temperature or floor temperature.
- KEY ICON: Represents the power button.
- PRG ICON: Indicates programmable mode.
- LOCKING ICON: Shows when the child lock is active.
- TIME ICON: Displays the current time.
Operating Instruction:
- Power on/off: Press the power button to turn the thermostat on or off.
- Mode Switch: Press the "mode" key to switch between manual and automatic modes.
- Temperature Adjustment (Automatic Temporary Mode): In automatic mode, press the "+" or "-" keys to adjust the temperature. This enters an automatic temporary mode that runs for one session.
- Clock Setting: Long press the "mode" key and the "+" key to enter clock settings. Press the "mode" key to switch settings items, and use the "+" and "-" keys to adjust the value of each parameter. For WIFI models, the time is automatically obtained from the internet.
- Child Lock: Press the "+" and "-" keys simultaneously for 5 seconds to activate or cancel the child lock.
- WIFI Link: When the thermostat is on, long press the "+" button for 5 seconds. The WIFI icon on the thermostat display will flash, indicating that the thermostat is in code matching state.
Time Programming Instructions:
To enter programming settings, press and hold the "mode" key. Short press the "mode" key to switch options. Use the "+" or "-" keys to adjust each option parameter. Press the power button to exit and save.
- Workday Schedule:
- Option 1: 06:00, 20°C
- Option 2: 08:00, 15°C
- Option 3: 11:30, 15°C
- Option 4: 12:30, 15°C
- Option 5: 17:00, 22°C
- Option 6: 22:00, 15°C
- Holiday Schedule:
- Option 1: 08:00, 22°C
- Option 2: 23:00, 15°C
Advanced Options:
When the thermostat is OFF, press the "mode" key and the power button simultaneously for 5 seconds to enter advanced option settings. Press the "mode" key to navigate to the next option. Use the "+" and "-" keys to adjust parameters. Press the power button to exit and save.
- Temperature compensation: Default -2°C, adjustable from -9.9°C to 9.9°C.
- Sensor selection: Default IN (internal sensor).
- Modify the temperature limit: Default 35°C, adjustable from 5°C to 60°C.
- Temperature difference start: Default 1°C, adjustable from 1°C to 10°C.
- Antifreeze function: Default OFF. Press up key to turn ON.
- Holiday option and turn off weekly programming: Default double OFF. Adjustable to double OFF (1-5), single OFF (1-6), no OFF (1-7), or turn off week programming (OFF).
- Primary and secondary reverse selection: Default 0 (main and auxiliary reversal off). 01: auxiliary reverse, 02: auxiliary reverse, 03: main and auxiliary reverse, shutdown and antifreeze not on, stop output.
- Passive linkage output delay time: Default 0 minutes, adjustable from 0 to 5 minutes.
- Set upper temperature limit: Default 60°C, adjustable from 35°C to 95°C.
- Restore Factory Defaults: Display "-" by default. Press up button to display "---", then press enter button to restore factory settings.
About WIFI Connection:
Before using the WIFI thermostat for the first time, you need to configure the WIFI signal through your smartphone or tablet to enable communication between devices.
- Download the APP: Search for "Tuya" in the App market or scan the provided QR Code to download.
- Register Account: If you don't have an APP account, you can register or log in via SMS verification code. Click "Create a new account," agree to the Tuya Smart Platform Privacy Policy, and then proceed to the mobile phone registration page.
- Registration Process: The system automatically determines your country/region. You can also select it manually. After entering your mobile phone number or email, click "get verification code." Enter the received verification code, then enter a password, and click "finish" to register successfully.
- Add Device: Click "add device" or "+" on the top right of the APP homepage to enter the "add device" page. There are two ways to add a device: manually add device or search device.
- Connecting to WIFI: Find the thermostat product (WIFI model) in the device list. In the specified network mode, the indicator will flash (slowly). Click the confirm button on the page. Select the device's work area, connect to the Internet's WIFI, and enter the WIFI password. Click "ok" to start the matching network process.
- Distribution Network Status: If the default mode distribution network is selected, the APP will show the distribution process. Upon successful distribution, the interface will display, allowing you to change the device name or select the room location.
- Troubleshooting Connection: If the distribution network fails, the APP will display a specific page. You can choose to add or view help again. If the connection fails, confirm that the temperature control device has entered the code matching state (refer to item 6 of the operation manual).
Display of Temperature Controller APP Interface:
The APP interface allows control and monitoring of the thermostat, including:
- Manual mode
- Current temperature display
- Output status
- Settings:
- Working day setting (e.g., 5+2)
- Week programming settings
- Sound
- Backlight brightness
- Temperature calibration
- Max setting temperature
- Temperature control switch difference
- External Sensor temperature limit
- Sensor selection (Internal Sensor)
- Frost protection
- Output main reverse
- Restore factory settings
- Child Lock
- Mode selection
- General settings