86
USB Interface
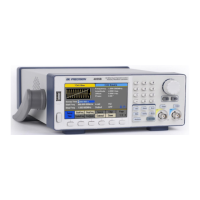
The instrument has a USB interface (USBTMC) in the rear panel for remote communication with
EasyWave software.
To connect with EasyWave software, you must install NI-VISA. NI-VISA is downloadable from
LabVIEW™ website. There are no settings for USBTMC. Make sure to set the LAN State to OFF.
GPIB Interface
The generator can be remotely controlled via GPIB using the optional AK40G USB-to-GPIB
adapter.
Connecting AK40G
1. Connect the USB end of the AK40G to the front USB host port of the instrument. Since
this port is a shared port, an external USB flash drive cannot be used during GPIB
operation.
2. Connect the GPIB end of the AK40G to the computer’s GPIB bus controller via a GPIB
cable.
3. On the AK40G adapter, a RED LED light indicates power to the adapter. A YELLOW LED
light indicates communication is in process.
Note: Users who have LabVIEW™ or NI-VISA installed will automatically have this driver in their system.
In this case, driver download is not required.
Note: Be sure all devices are powered off before connecting the adapter to the USB port of the generator
and/or the GPIB port on your computer.