8 9
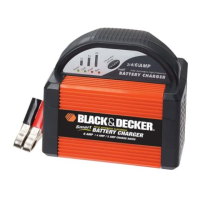
“Good”, the alternator icon and the gauge without the pointer will light
solid.
3. If the unit detects that the alternator is out of typical voltage range, the
LCD screen will display the following:
The fault icon will flash; and the alternator icon, “ALT” and the gauge
without the pointer will light solid.
4. Press the alternator check button again to stop the test.
Notes: All buttons except the alternator check button are disabled in alternator check mode.
The unit may detect that the alternator is out of typical voltage range because someone
has added a number of accessory loads on the charging system, thereby increasing current
demand from the alternator. MAKE SURE THAT THE ALTERNATOR IS RATED TO SUPPORT
THE APPLICATION.
This check may not be accurate for every make, manufacturer and model of vehicle. Check
only 12 volt systems.
When disconnecting the charger, disconnect AC cord, remove clamp from
vehicle chassis, and then remove clamp from battery terminal.
RECONDITIONING THE BATTERY
Periodic reconditioning is recommended to maintain a battery’s optimum
performance. Battery recondition sends a series of electrical pulses to break
up the crystalline form of lead sulfate and turn these chemicals into useful
battery electrolytes. The process will stop automatically after 24 hours.
To stop the process sooner, press the battery recondition button a second
time. More than 24 hours may be needed to restore performance on some
batteries. If so, repeat the process.
1. Set up the battery charger and connect to the battery following steps 1
through 2 in the “Charging the Battery” section.
2. Press the battery recondition button. The LCD screen will display the
following:
The battery recondition indicator, the clamp icons, the battery icon and
the gauge without the pointer will light solid, the bars on the battery
icon will change from solid to empty (top to bottom) repeatedly and the
battery recondition icons will flash.
3. To stop the reconditioning process, press the battery recondition button
again. Pressing any other button during this process will have no effect.
Important: If 5 cycles of reconditioning does not improve battery
performance, discontinue and recycle the battery. The battery charger will
go into charging mode after 24 hours automatically.
When disconnecting charger, disconnect AC cord, remove clamp from
vehicle chassis, and then remove clamp from battery terminal.
USING THE ENGINE START FUNCTION
1. Set up the battery charger and connect to the battery following steps 1
through 2 in the “Charging the Battery” section.
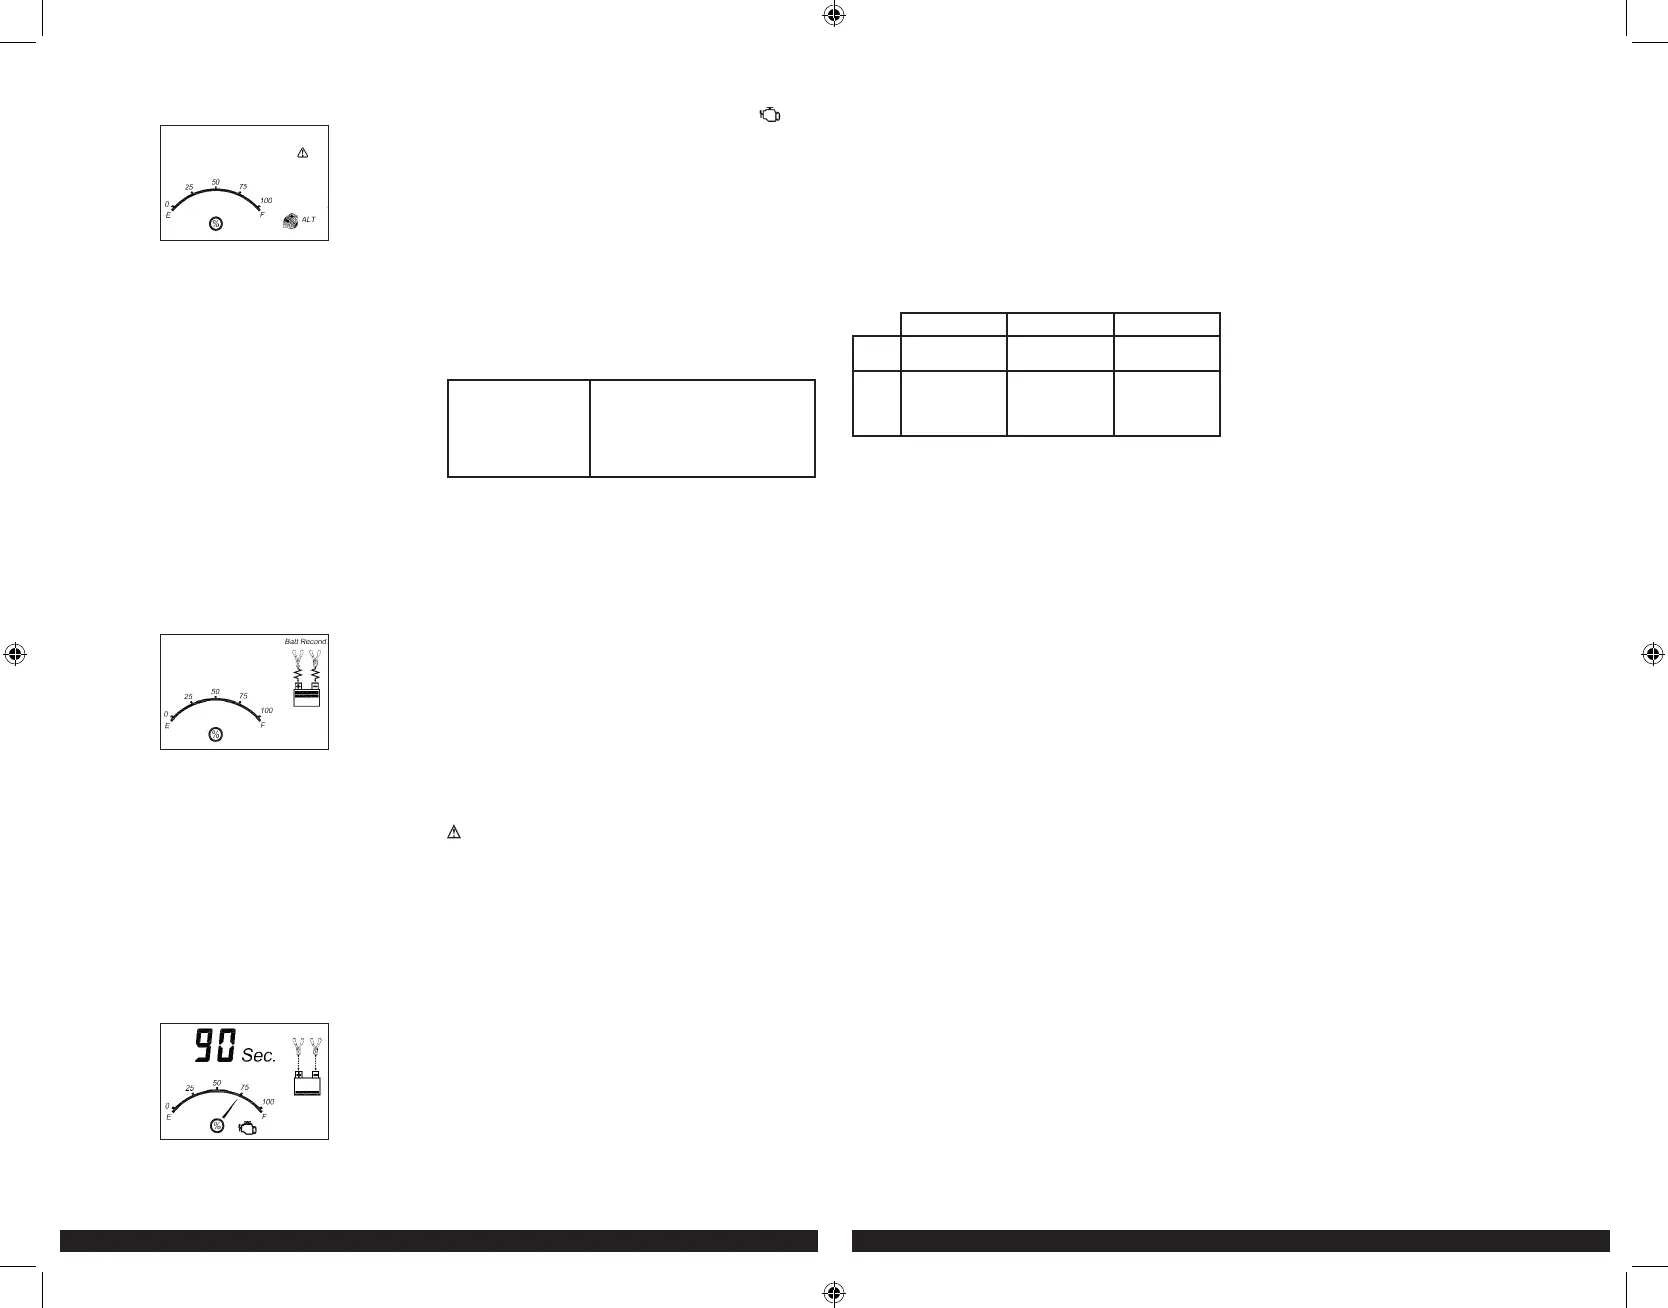
2. Press the engine start button. The LCD screen will display the following*:
The digital display shows the countdown.* The battery charge gauge
will indicate the battery’s current charge status. The engine start icon,
clamp icons and battery icon light solid, and the bars on the battery
icon will change from empty to solid (bottom to top) repeatedly and
the arrow icons will gradually and repeatedly move downward to the
battery icon.
*The countdown will commence from “90” to “0”.
3. When “00” is reached, a beep will sound, engine start icon ( ) will
begin flashing. The vehicle is ready to start.
4. Crank the engine using manufacturer’s guidelines, typically in 3 to 5
second bursts. The digital display shows “5 sec.” indicating a 5-second
countdown.
5. After cranking, the unit will automatically adjust the charging current to
2A for 5 minutes and then revert to charging mode. To stop charging,
press the charge button.
Important: The function requires a resting/cooling period between attempts.
Wait 4 to 5 minutes before a second attempt at starting the engine, if
needed.
When disconnecting charger, disconnect AC cord, remove clamp from
vehicle chassis, and then remove clamp from battery terminal.
TROUBLESHOOTING
Unit Not Charging
• Make sure all connections are secure.
• Check that the charger is properly
connected to a live 120 volt AC outlet.
• If the battery to be charged has fallen
below 2 volts, the battery cannot be
recharged with these chargers.
CARE AND MAINTENANCE
CLEANING AND STORAGE
To reduce the risk of electric shock, unplug the battery charger from the
outlet before attempting any maintenance or cleaning. Turning off the
controls will not reduce this risk.
• Store the unit in a clean, dry, cool place when not in use.
• Do not immerse the appliance in water. Clean the unit casing and
cords (as necessary) with a dry cloth. Ensure that unit is completely
disconnected from battery and power source before cleaning.
• To maintain the operating condition and maximize the life of the charger
cords, always coil them loosely for storage. Do not wrap them around the
unit or crimp them with a tight band.
ACCESSORIES
Recommended accessories for use with this unit may be available from the
manufacturer. If you need assistance regarding accessories, please contact
the manufacturer at 1-877-571-2391.
WARNING: The use of any accessory not recommended for use with
this appliance could be hazardous.
SERVICE INFORMATION
Whether you need technical advice, repair, or genuine factory replacement
parts, contact the manufacturer at 1-877-571-2391.
ONE YEAR LIMITED WARRANTY
The manufacturer warrants this product against defects in materials and
workmanship for a period of ONE (1) YEAR from the date of retail purchase
by the original end-user purchaser (“Warranty Period”).
If there is a defect and a valid claim is received within the Warranty Period,
the defective product can be replaced or repaired in the following ways:
(1) Return the product to the manufacturer for repair or replacement at
manufacturer’s option. Proof of purchase may be required by manufacturer.
(2) Return the product to the retailer where product was purchased for
an exchange (provided that the store is a participating retailer). Returns to
retailer should be made within the time period of the retailer’s return policy
for exchanges only (usually 30 to 90 days after the sale). Proof of purchase
may be required. Please check with the retailer for their specific return
policy regarding returns that are beyond the time set for exchanges.
This warranty does not apply to accessories, bulbs, fuses and batteries;
defects resulting from normal wear and tear, accidents; damages sustained
during shipping; alterations; unauthorized use or repair; neglect, misuse,
abuse; and failure to follow instructions for care and maintenance for the
product.
This warranty gives you, the original retail purchaser, specific legal rights
and you may have other rights which vary from state to state or province
to province.
Please complete the Product Registration Card and return within 30 days
from purchase of the product to: Baccus Global LLC, 621 NW 53rd St.,
Suite 450, Boca Raton, FL 33487. Baccus Global LLC, toll-free number:
1-877-571-2391.
SPECIFICATIONS
BC15BD BC25BD BC40BD
Input: 120V AC, 60Hz,
270W
120V AC, 60Hz,
450W
120V AC, 60Hz,
740W
Output: 12V DC, 15A
40A engine start
(ON: 5 seconds,
OFF: 5 minutes)
12V DC, 25A
75A engine start
(ON: 5 seconds,
OFF: 5 minutes)
12V DC, 40A
110A engine start
(ON: 5 seconds,
OFF: 5 minutes)
Imported by Baccus Global LLC, 621 NW 53rd St., Suite 450, Boca Raton, FL 33487
www.Baccusglobal.com 1-877-571-239
BC15_25_40BD_ManualENSP_061920.indd 8-9BC15_25_40BD_ManualENSP_061920.indd 8-9 6/24/2020 2:58:27 PM6/24/2020 2:58:27 PM
 Loading...