10
ENGLISH
(Original instructions)
Never direct the water jet at people,
animals, the machine or electric
components
Electrical safety
#
This tool is double insulated; therefore no
earth wire is required. Always check that the
power supply corresponds to the voltage on the
rating plate.
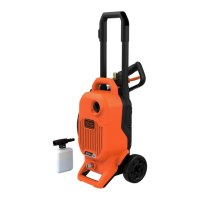
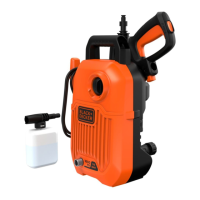
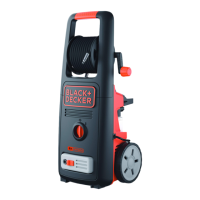
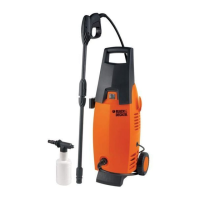
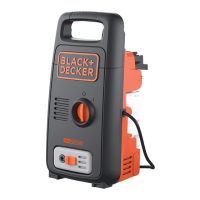
Features
This appliance includes some or all of the following features.
1. High pressure hose
2. Spray wand
3. Nozzle button
4. Spray handle
5. Spray handle grip
6. Trigger lock-off
7. Trigger
8. Spray fan to pencil jet nozzle
9. Hose connector
10. Filter
11. Soap bottle
12. Soap bottle applicator
13. Hose connect button
14. Nozzle cleaning tool
15. Turbo nozzle (BEPW2200)
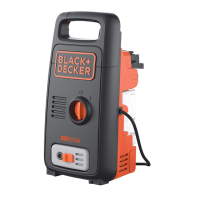
16. Pressure washer unit
17. ON/OFF dial
18. Handle
19. Retractable handle (BEPW1800T, BEPW2200)
20. High pressure water outlet
21. Cord retaining hook
22. Power cord
Assembly
Warning! To reduce the risk of serious personal injury, turn
unit off and disconnect it from power source before making
any adjustments or removing/installing attachments or acces-
sories. An accidental start-up can cause injury.
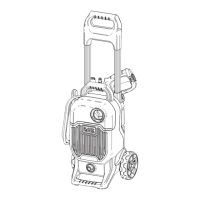
Attaching Handle (Fig. A)
BEPW1600L, BEPW1750
Press the handle (18) onto the pressure washer unit (16) and
secure with the screws supplied. Do not overtighten.
Attaching Spray Handle (Fig. B)
u To connect the spray handle ( 4 ) to the spray wand ( 2 ),
insert the end of the spray handle onto the end of the
spray wand.
u Press in and turn the spray handle counterclockwise to
lock it into position.
Attaching High Pressure Hose (Fig. C)
Notice: Never pull high pressure hose or water supply hose
to move pressure washer. This could damage hose and/or
pump inlet and/or pump outlet.
u To connect the high pressure hose ( 1 ) to the
spray handle ( 4 ), depress the hose connect button ( 13 )
while clicking the hose end ( 23 ) into the spray handle.
Release the hose connect button when the hose end has
clicked into position.
u To connect the high pressure hose to the pressure washer
unit ( 16 ), screw the hose collar ( 24 ) onto the high pres-
sure water outlet ( 20 ).
Note: Uncoil the high pressure hose before installation to
prevent kinks.
Note: Avoid cross threading when installing the hose. Cross
threading will cause leaks.
Attaching Garden Hose (Fig. D, K2)
Note: Before connecting the garden hose to the pressure
washer unit, run water through the garden hose for thirty
seconds to clear any debris from inside the garden hose.
u To connect the garden hose to the pressure washer
unit ( 16 ), screw the lter ( 10 ) to the water intake ( 25 ).
u Connect the garden hose to the hose connector ( 9 ) by
loosening the screw of the garden connector and attach-
ing the hose onto the connector
u Attach the garden hose ( 28 ) mounted onto the garden
connector to the lter ( 10 ) until it "clicks".
Note: Always disconnect the garden hose after usage.
Attaching Nozzles (Fig. A, E)
Danger! Risk of uid injection. Do not direct discharge
stream toward persons, unprotected skin, eyes or any pets or
animals. Serious injury will occur.
Warning! Flying objects could cause risk of serious injury. DO
NOT attempt to change nozzles while pressure washer is run-
ning. Turn pressure washer unit OFF before changing nozzles.
u To connect a nozzle to the spray wand ( 2 ) , depress
the nozzle button ( 3 ) on the spray wand and insert the
appropriate nozzle.
u Release the button to lock the nozzle in place.
u Give the nozzle a rm tug to ensure the nozzle is locked
into place.
Spray Fan to Pencil Jet Nozzle
Adjusting Fan Pattern (Fig. E1)
The angle of spray coming out of the spray wand may be
adjusted by rotating the nozzle. This will vary the spray pattern
from approximately a 0 ° narrow high impact stream to a 60 °
wide fan spray.
A wide fan pattern distributes the impact of the water over
a larger area, resulting in excellent cleaning action with a
reduced risk of surface damage. Large surface areas can be
cleaned more quickly using a wide fan pattern.
 Loading...