6 7
Audio Settings
TONE CONTROL: Enable to adjust your Player’s Treble and Bass output levels.
Note: When enabled, the total volume of your Player is reduced by 6dB to allow adjustment of the bass and treble outputs from
-6dB to 6dB. Tone Controls is disabled and not displayed when MQA external DAC is enabled.
REPLAY GAIN: Select any of the following to configure consistent volume levels between tracks in the play queue:
• Track gain – To use the track gain value from the song’s metadata to have the current track’s volume be more consistent with
other tracks.
• Album gain – To use the album gain value from the metadata to provide a consistent volume level between all audio tracks on
a particular album.
• Smart gain – To allow the BluOS to automatically choose between track gain and album gain values to provide the best replay
gain option for your current listening.
Note: BluOS uses the metadata of the selected audio track to configure consistent volume levels between tracks.
OUTPUT MODE: Select any of the following to configure the channel output on the BluOS Player:
• Left/Right – Outputs only the Left or Right audio channel.
• Mono – Outputs single-channel audio out.
• Stereo – Outputs both Left and Right audio channels.
MQA EXTERNAL DAC: Enable this option when you require an MQA-certified external DAC to handle MQA unfolding rather than
the BluOS Player.
Note: To enable MQA external DAC, you should enable the Output level fixed and disable – Tone Controls and Replay Gain. Learn
more.
OUTPUT LEVEL FIXED: Enable to set and fix the volume of the BluOS Player at the maximum level. This allows you to control
volume using the external device connected to the BluOS Player instead of the BluOS Controller App.
AUDIO CLOCK TRIM: Enable to reduce jitter and increase audio clock timing precision when using an external DAC.
Note: Not all DACs can handle this. If audible clippings or dropouts occur, disable Audio Clock Trim to avoid BluOS’s accuracy
setting from interfering with the external DAC’s firmware.
Settings
IR REMOTE: Setup an IR Remote, either by teaching your Bluesound Player to work with one of your old remotes or by using the
Bluesound RC1 remote which works out-of-box.
• BluOS Remote: Enable/Disable the Bluesound RC1 Remote if you have multiple Bluesound Players in the same room, and
only want the remote to control one of them. If you have multiple remotes, you can change the IR Channel for each Player.
Learn more
• IR Learning: Program your own remote to work with your Bluesound Player. Learn more
Indicator Light: Adjust the brightness of the light on your Bluesound Player
• Normal – Default brightness
• Dim – Lower the brightness
• Off – Turns off the light
BLUETOOTH: Settings for Bluetooth visibility and functionality.
• Manual – This mode allows you to manually switch between Bluetooth as a local source in the Inputs section of the Music Tab.
• Automatic – (Default mode) This mode automatically switches to the Bluetooth source when a Bluetooth-connected device
starts playing audio.
• Guest – This mode switches the Bluesound player to the Bluetooth source when your connected Bluetooth device starts
playing audio. However, switching sources disconnects the Bluetooth connection. The Bluetooth source is not displayed under
the Inputs section of the Music tab. This configuration is ideal for streaming audio from multiple Bluetooth-enabled devices.
• Disabled – This mode turns off the Bluetooth receiver on the player.
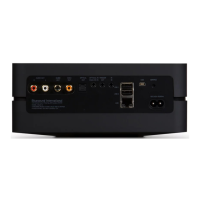
SERVER MODE: To make your USB library accessible in the BluOS Controller app, plug the USB drive (in NTFS or FAT32 file
format) into the USB port at the back of the BluOS Player and follow the onscreen prompts on the BluOS Controller app.
• [Yes] Server Mode enabled - USB drive is shared with other players on the network from the local Library.
• [No] Server Mode disabled - USB drive access is restricted to the USB-connected Player.
Note: After the connection, the player’s Status Indicator LED turns white, indicating that it is indexing the connected library.
Depending on the size of your music library, the indexing process may take some time to complete. The indexing process is
complete when the Status Indicator LED returns to solid Blue.
Visit the Bluesound Knowledge Base for more help, tips, and tricks.
USB Server Mode - How to connect external USB Library to the BluOS Players? – The BluOS Support Crew
 Loading...