Do you have a question about the BLUM AVENTOS HF and is the answer not in the manual?
Warning regarding risk of injury from spring-loaded arm.
Instructions for safe handling and removal of spring-loaded mechanisms.
Attaching the lift mechanism using locator pins and wood screws.
Procedure for clipping telescopic arms in the upright position.
Procedure for attaching the top door to the cabinet.
Attaching the bottom door to the top door and telescopic arms.
Adjusting lift mechanism tension for desired closing force.
Adjusting hinges and plates to align the top door.
Adjusting hinges and plates to align bottom door to cabinet and top door.
Procedure for locking the telescopic arms into position.
Warning regarding risk of injury from spring-loaded arm during removal.
Instructions for safe removal of mechanisms and arms.
This manual describes the AVENTOS HF bi-fold lift system, designed for wood and wide aluminum frame doors. The system allows for smooth, effortless opening and closing of cabinet doors, providing full access to the cabinet interior. It is particularly suitable for tall wall cabinets with large fronts, offering a convenient and ergonomic solution for kitchen and living spaces.
The AVENTOS HF system operates as a bi-fold lift mechanism, meaning the cabinet front folds in the middle as it opens, then lifts up and out of the way. This design is ideal for cabinets where a single large door would obstruct movement or require excessive clearance. The core components include lift mechanisms, telescopic arms, and various hinges and mounting plates.
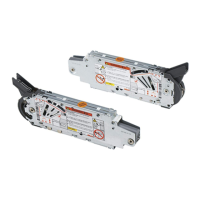
The lift mechanisms, available in different power factors, are responsible for the lifting and holding function of the door. The power factor selection depends on the weight and height of the cabinet doors, ensuring optimal performance and ease of use. These mechanisms are installed inside the cabinet, typically on the side panels, and are secured with wood screws. A key feature of the lift mechanism is its integrated spring-loaded design, which assists in lifting the doors and holds them securely in any desired open position. This spring-loaded nature necessitates a warning about potential injury if not handled correctly during installation or removal.
Telescopic arms connect the lift mechanisms to the cabinet doors. These arms extend and retract as the doors open and close, guiding the bi-fold movement. They are designed to clip onto the lift mechanisms in a fully upright position during installation, ensuring proper alignment and function. Mounting plates are crucial for attaching the hinges and telescopic arms to the cabinet and doors. Different mounting plates are used for the top door hinge, bottom door hinge, and telescopic arm, accommodating various door constructions such as small overlay, large overlay, and five-piece doors.
The system incorporates hinges, specifically CLIP top 120° hinges and COMPACT 33° hinges, for both the top and bottom doors. These hinges facilitate the folding action of the bi-fold door. Mounting plates for these hinges are selected based on the overlay type and door construction. For five-piece doors, a specialized mounting plate with a bracket is available for the telescopic arm, addressing specific panel thickness requirements.
The AVENTOS HF system is designed for ease of use and adjustability. Once installed, the doors can be opened with minimal effort, and they will stay in any position, allowing for convenient access to cabinet contents. The system includes tension adjustment features, which allow users to fine-tune the closing force of the doors. This adjustment is critical for achieving a consistent and smooth closing action across both lift mechanisms. A screw gun with a #2x2 POZI driver bit is used for this adjustment, ensuring that the desired function is achieved and that the tension is the same on both lift mechanisms.
Finalizing the door adjustments involves aligning the top and bottom door hinges and their respective mounting plates. This ensures that the top door is properly aligned to the cabinet and that the bottom door is aligned to both the cabinet and the top door. Horizontal adjustments of the telescopic arm mounting plates are also possible, offering further precision in door alignment.
The system features a locking mechanism for the telescopic arms. After installation and initial adjustments, the doors are closed and then slightly opened to engage and lock the levers on the telescopic arms. This step secures the arms in their operational position, ensuring stable and reliable performance.
Cover plates are provided to conceal the lift mechanisms and telescopic arm connections, offering a clean and aesthetic finish to the cabinet interior. These covers are easily attached after all adjustments and locking procedures are complete.
Maintenance of the AVENTOS HF system primarily involves periodic checks and adjustments to ensure continued smooth operation. The tension adjustment feature allows users to compensate for any changes in door weight or usage over time, maintaining the desired closing force. Similarly, the ability to adjust hinge and telescopic arm mounting plates ensures that door alignment can be corrected if needed, preventing issues like sagging or uneven gaps.
The manual provides clear instructions for both installation and removal, which can be considered a maintenance feature as it facilitates servicing or replacement of components. When removing the doors, the process is reversed: covers are removed, telescopic arms are detached, and then the doors are unclipped from their hinges. The spring-loaded nature of the telescopic arms requires careful handling during detachment to prevent injury. The release tabs on the telescopic arms allow for their removal from the lift mechanisms, and if the cabinet is being transported, the lift mechanisms can remain inside for convenience.
The robust design of the components, including the lift mechanisms and hinges, contributes to the system's longevity and minimizes the need for frequent maintenance. The use of durable materials ensures that the system can withstand regular use in a demanding environment like a kitchen. The detailed instructions for adjustment and removal empower users or technicians to perform necessary maintenance tasks effectively, prolonging the life and performance of the AVENTOS HF system.
| Type | Bi-fold lift system |
|---|---|
| Cabinet Width | Up to 1800 mm |
| Soft Close | Yes |
| Adjustment | 3-dimensional front adjustment |
| Application | Wall cabinet |
| Motion Technology | BLUMOTION, TIP-ON, SERVO-DRIVE |
| Material | Steel |
| Assembly | Tool-free assembly |
| Cabinet Height | 480 mm to 1040 mm |
| Opening Angle | 90° |