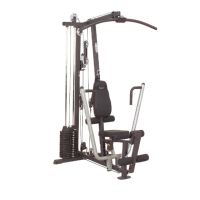
Do you have a question about the Body Solid G1S and is the answer not in the manual?
Secure Bench Press Frame (J) to Main Base Frame (A) using Pivot Shaft (Y).
Connect Leg Frame (P) to Seat Extension Frame (M) using bolts and washers.
Insert Weight Stack Plates (30) onto Chrome Guide Rods (R).
Connect Guide Rods (R), Plate (N), and Top Weight Stack Frame (S) to Top Frame (F).
Perform final tightening of all bolts and nuts on the main frame unit.
Thread Lat Cable (23) through openings for Pulleys A1 and A2.
Mount 3 1/2" diameter Pulleys (A1, A2) onto the Top Frame (F).
Thread Cable (23) through Bracket (V) and secure Pulley (A3).
Thread Lat Cable (23) through openings for Pulleys A4 and A5.
Mount Pulley (A5) to the top of the Top Weight Stack Frame (S).
Mount Pulley (A4) to the bottom of the Top Weight Stack Frame (S).
Attach the metal ball end of Lat Cable (23) to Selector Rod Top Bolt (70).
Ensure Selector Rod Top Bolt (70) is threaded and Jam Nut (73) is tight.
Thread Ab Crunch Cable (25) through Angled Support Pillar (E) and above Back Pad (T).
Adjust the Selector Rod Top Bolt (70) for proper cable tension.
Adjust pulleys in the Double Bracket (V) for cable tension.
Adjust the Rubber Stop (35) on Main Base Frame (A) for cable slack.
Procedures to reduce cable tension if it is too high.
Procedures to reduce cable slack if it is too low.
| Brand | Body Solid |
|---|---|
| Model | G1S |
| Category | Home Gym |
| Language | English |