EN
27
06 Analysing Glass with the
GlassBuddy
The glass must always be clean and dry. Even a
finger print can cause unwanted refraction and con-
sequently incorrect measurement results. Glass
that is laid flat should always be placed on a dark,
non-reflecting base (e.g. a black felt cloth) for ana-
lysis, as incorrect results can occur on reflective
bases. Already installed insulated glass panes
should be preferably analysed in the marginal areas.
Switch on the GlassBuddy, select the glass type
(see point 5) and place it on top of the glass surface
in a way that all plastic feet touch the glass and
keep the device from slipping. Press . The
light turns off and on the display of the GlassBuddy
appears the following message:
Measuring –
please wait …
Note: The GlassBuddy should not be moved during
the measuring procedure as this could lead to
inaccurate measuring results. After 1-2 seconds, the
light will turn on again and you can remove the
GlassBuddy from the glass.
The measurement result is shown on the display.
Use or to scroll through the measuring
results. After the rounded individual measurements,
the single values (accurate to +/-0.1 mm) are dis-
played. Afterwards the structure of the glass pane is
shown graphically. The graphical display shows the
structure from left to right as analysed by the Glass-
Buddy. The measuring results are shown in a scroll-
ing display.
The measuring result can be rejected with .
When pressing , you can choose between the
following options:
Save
The current measuring result can be saved in the
GlassBuddy by pressing . The result is saved
under the number shown in the top left of the
GlassBuddy display together with the result.
Hint: If in individual cases the message
“Measurement not possible” appears on the display
after measuring, even this result can be saved, also
see chapter 8.
Reject
You can delete the current measuring result by
pressing . You can always directly delete the
result by pressing .
07 Reading the
Measurement Results
After the measuring procedure described above, the
GlassBuddy shows the result on the illuminated
display. You can page up and down the measuring
results row by row with the or keys.
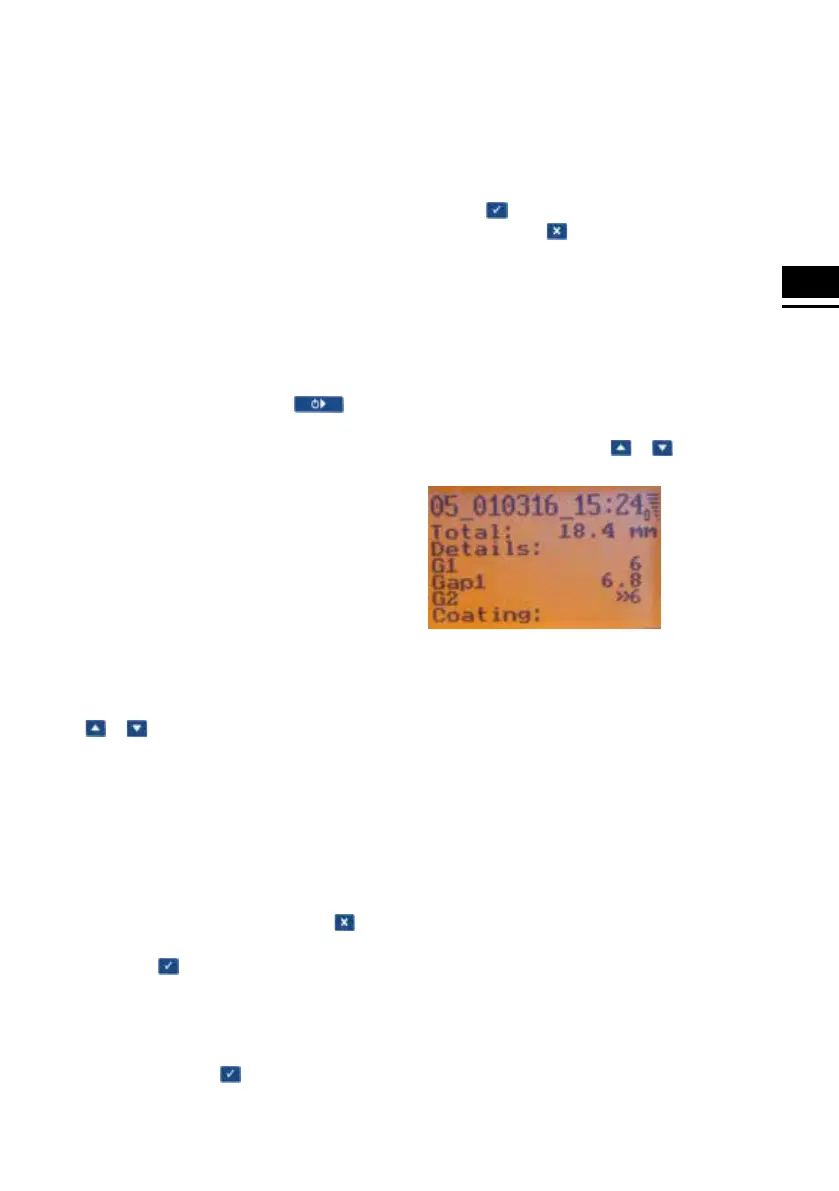
In the first row, the GlassBuddy shows the position
under which the measuring result is saved (here
position 05; there are a total of 99 memory slots
available). After this you can see the date and the
time of the measurement.
In the second line, the GlassBuddy displays
the measured total thickness of the measured
object.
The details of the pane composition, rounded to
trading thicknesses, are displayed starting from the
third line. Afterwards the measuring results of the
individual layers are displayed, followed by the
graphical presentation of the configuration of panes.
The measuring results are shown in a scrolling
display.