Do you have a question about the Bowflex VeloCore and is the answer not in the manual?
Provides essential safety warnings and precautions to follow before and during the use of the equipment.
Information and preparation required before starting the assembly process.
Lists the tools required for assembly and identifies pre-installed hardware.
Instructions for attaching stabilizers and assembling the seat and handlebar posts.
Steps for installing the seat assembly and connecting the console mast.
Details on attaching the adjustable console mast and connecting console cables.
Procedure for correctly installing the left and right pedals onto the crank arms.
Instructions for attaching accessories like the dumbbell holder and final setup steps.
Guide for setting up the machine, including Wi-Fi connection, and performing a final inspection.
Instructions on how to level the machine and move it safely for storage or repositioning.
Details on how to perform an emergency stop and engage/disengage the lean mode.
Information on USB charging, fitness app compatibility, and Bluetooth heart rate monitoring.
Guidance on appropriate attire, exercise frequency, mounting, seat, handlebar, and pedal adjustments.
Procedures for locking the flywheel for storage and understanding power-up and auto-shut off modes.
Instructions on adjusting resistance and managing workout states like pausing and completion.
Steps for safely turning off and restarting the machine, including software update considerations.
Guidelines for daily, weekly, and monthly checks, including belt tension and part tightness.
Defines what is covered under the warranty, including terms and Nautilus's support obligations.
Outlines what the owner must do, what is not covered, and limitations of remedies.
Information on how to get service, state laws, and international purchase considerations.
This document serves as a Quick Start Manual for the Bowflex VeloCore, an exercise machine designed for home use. It provides essential information for assembly, safe operation, maintenance, and warranty details.
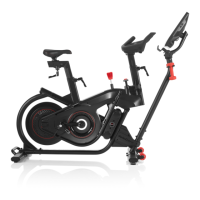
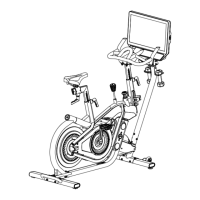
The Bowflex VeloCore is an indoor cycling machine that offers a comprehensive workout experience. Its primary function is to provide a stationary cycling platform for cardiovascular exercise and strength training. A key feature is its ability to switch between a stationary mode and a "lean mode," which allows the user to engage in a more dynamic, full-body workout by leaning into turns, simulating an outdoor cycling experience. The machine is equipped with a console that displays workout metrics and offers connectivity to fitness apps, enhancing the user's training experience. It also includes a resistance adjustment knob to vary workout intensity and a lean lock knob to switch between stationary and lean modes. The machine is designed to be used with specific cycling shoes that have cleats, providing secure footing during intense workouts.
Before operating the VeloCore, users are strongly advised to read and understand the complete Owner's Manual, available online. This ensures proper assembly, safe usage, and understanding of all warnings. The assembly process involves attaching the front and rear stabilizers, handlebar, seat stem, console mast, and pedals. Specific tools are provided, and detailed instructions guide the user through each step, emphasizing the importance of proper tightening and cable management. Once assembled, the machine needs to be set up. This includes plugging it into a functioning wall outlet, which activates the console. The console guides the user through connecting to Wi-Fi, which is required for full functionality, and setting up a user account. A Fitness Assessment workout is recommended to unlock all available content. The VeloCore offers several adjustable features to accommodate different users. The seat and handlebar posts can be adjusted for height, and the seat can also slide forward or backward. These adjustments are crucial for maintaining proper form and comfort during exercise. Users are warned not to exceed the "STOP" mark on the posts when adjusting height. The pedals are designed to be used with cycling shoes equipped with SPD-compatible cleats. Instructions are provided for engaging and disengaging the cleats, as well as adjusting the retention force of the pedal mechanism. For users who prefer regular athletic shoes, the pedals also feature straps for secure footing. The machine's resistance can be adjusted using a dedicated knob, allowing users to increase or decrease workout intensity. The lean mode feature is activated by pushing down a button, enabling a dynamic, leaning motion. Pulling the button up locks the machine in stationary mode. For safety, an Emergency Brake/Resistance Adjustment Knob is present to immediately stop the pedals. Users are cautioned that the bike cannot stop the pedals independently of the flywheel, so reducing pace to slow down is necessary before dismounting. The VeloCore is equipped with Bluetooth® connectivity, allowing it to pair with heart rate monitors and other fitness apps. A Bluetooth® Heart Rate Armband is provided, with instructions for its use, including placement on the forearm and activation. For storage, the machine can be moved using its transport rollers after removing the power adapter, dumbbells, and other accessories. The flywheel should be locked by tightening the Emergency Brake/Resistance Adjustment Knob, and the Lean Lock Knob should be pulled up to stabilize the machine in an upright position.
Regular maintenance is crucial for the longevity and safe operation of the Bowflex VeloCore. The manual outlines a schedule for daily, weekly, and monthly/after 20 hours maintenance tasks. Daily maintenance involves examining the machine for any loose, broken, damaged, or worn parts before each use. Adjustment knobs and pedals should be checked and tightened as necessary. After each workout, the machine and console should be wiped clean with a damp cloth. Users are specifically warned against using petroleum-based solvents, automotive cleaners, or ammonia-containing products on the console. Weekly maintenance includes cleaning the machine to remove dust, dirt, or grime from all surfaces. Pedals and crank arms should be checked and tightened, along with all bolts and screws. Smooth seat operation should also be verified. Monthly or after 20 hours of use, the drive belt tension should be checked and adjusted if necessary. Instructions are provided for checking the belt tension by pedaling at a steady RPM and then suddenly increasing to maximum ability, observing for any slipping. In case of any damage or issues, users are instructed to contact Customer Service (for US/Canada) or their local distributor (outside US/Canada) for replacement labels or repair information. Only genuine replacement parts supplied by Nautilus should be used. The owner is responsible for ensuring regular maintenance is performed.
| Model | VeloCore |
|---|---|
| Resistance Levels | 100 Micro-Adjustable Resistance Levels |
| Dimensions | 59.8" L x 24.1" W x 55.3" H |
| Weight Capacity | 325 lbs |
| Heart Rate Monitoring | Bluetooth Heart Rate Armband Included |
| Built-in Speakers | Yes |
| Display | 16" or 22" Console |
| Connectivity | Bluetooth, Wi-Fi |
| Features | JRNY App Compatibility |
| Power Requirements | AC Adapter |
| Programs | Via JRNY App: Personalized Workouts, Adaptive Workouts |