36
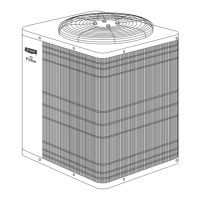
Fig. 39 — Pivot and Support Top Cover
3. Remove all surface loaded fibers and dirt with a vacuum
cleaner. If a vacuum cleaner is not available, a soft
non-metallic bristle brush may be used. In either case, the
tool should be applied in the direction of the fins. Coil sur-
faces can be easily damaged (fin edges can be easily bent
over and damage to the coating of a protected coil) if the
tool is applied across the fins.
NOTE: Use of a water stream, such as a garden hose, against sur-
face loaded coil will drive the fibers and dirt into the coil, making
cleaning efforts more difficult. Surface loaded fibers must be com-
pletely removed prior to using low velocity clean water rinse.
4. Using a low velocity garden hose thoroughly wet finned
surfaces with clean water. Be careful not to bend the fins.
5. Mix Totaline environmentally sound coil cleaner in a 2
1
/
2
gallon garden sprayer according to the instructions included
with the cleaner. The optimum solution temperature is
100°F (38°C).
NOTE: Do NOT USE water in excess of 130°F (54°C), as the
enzymatic activity will be destroyed.
6. Thoroughly apply Totaline environmentally sound coil
cleaner solution to all coil surfaces including the finned
area, tube sheets and coil headers.
7. Hold garden sprayer nozzle close to finned areas and apply
cleaner with a vertical, up-and-down motion. Avoid spray-
ing in horizontal pattern to minimize potential for fin
damage.
8. Ensure cleaner thoroughly penetrates deep into finned
areas.
9. Interior and exterior finned areas must be thoroughly
cleaned.
10. Finned surfaces should remain wet with cleaning solution
for 10 minutes.
11. Ensure surfaces are not allowed to dry before rinsing.
Reapply cleaner as needed to ensure 10-minute saturation
is achieved.
12. Thoroughly rinse all surfaces with low velocity clean
water using downward rinsing motion of water spray noz-
zle. Protect fins from damage from the spray nozzle.
13. Replace top cover and rear corner posts.
Fastener Torque Values
Table 22 — Torque Values
TROUBLESHOOTING
See Table 23 for troubleshooting.
ITEM TORQUE VALUE
Compressor mounting bolts
65-75 in-lbs
(734-847 N-cm)
Condenser fan motor mounting bolts
20 ± 2 in-lbs
(226 ± 23 N-cm)
Condenser fan hub setscrew
84 ± 2 in-lbs
(949 ± 136 N-cm)
High-flow service port
96 ± 10 in-lbs
(1085 ± 23 N-cm)
Schrader-type service check valve
2-3 in-lbs
(23-34 N-cm)
Compressor oil sight-glass thread
330 ± 31 in-lbs
(23-34 N-cm)
Compressor to Compressor rail torque
120-168 in-lbs
(1356-1898 N-cm)
Compressor rail to base pan torque
70 ± 5 in-lbs
(791 ± 57 N-cm)

 Loading...