Do you have a question about the Bryce 9K-L and is the answer not in the manual?
Steps to remove and check printer contents against the provided list.
A checklist to verify all necessary components are present after unpacking the printer.
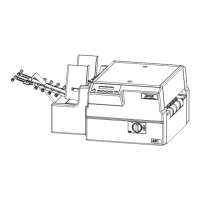
Identifies and describes key components like Input Bin, Control Panel, and Paper Catch Assembly.
Explains the function of the control panel and print station for operation and quality adjustment.
Environmental considerations for optimal printer placement and performance.
Steps to install the wire form assembly into the printer's feed carriage.
Instructions on installing the sliding fence to guide media during printing.
Steps to connect the printer to a computer via serial or parallel port.
Instructions for connecting the printer's power cord to a grounded outlet.
Instructions on how to safely remove protective packaging from the printer.
Steps to turn on the printer and verify its initial status.
Step-by-step instructions for safely removing the ink jet cartridge from the printer.
Steps to prepare media for printing to avoid misfeeding and jams.
Details the various types of media the printer can use and their recommended loading methods.
Procedure for setting the feed gap to ensure correct media feeding.
Specific steps for setting up the printer to feed #10 envelopes correctly.
How to adjust the wire form center to prevent media skewing during printing.
Guide for setting wire form height based on media density for optimal feeding.
Proper positioning of the sliding fence to guide media into the input bin.
Procedure for correctly installing the ink jet cartridge into the printer.
Explains the three basic adjustments for the wire form assembly to assist media feeding.
Instructions on how to adjust the feed ramp assembly for proper media support.
Steps to fine-tune the adjustment lever for optimal print quality.
Explains the function of each button on the printer's control panel.
Explains the function of each button on the printer's control panel.
Guide on navigating and using the printer's menu system for configuration.
Overview of main menu options for print specifications and page layout.
Adjusts the distance from the media's right edge to the first printable character.
Sets the distance between lines of text, measured in lines per inch.
Changes the direction of print appearance on the media (Normal or Invert).
Allows the printer to ignore or use orientation commands sent from the computer.
Changes printer speed and character density for print quality.
Sets a polished print quality, balanced for appearance and ink usage.
Selects from twelve internal typefaces or installs optional fonts via a font card.
Sets font size from 4 to 30 points, supporting downloaded sizes from Windows.
Adjusts character and space width (Condensed, Normal, Wide, Expanded) for font appearance.
Increases character stroke weight to emphasize or highlight text in an address.
Prints font outlines, appearing as hollow text to emphasize text in an address.
Prints the barcode on the lower right edge of the media, disabled if Orientation is Invert.
Stops the printing of a Delivery Point Barcode (DPBC) on the media.
Retrieves up to 20 records from the data buffer for reprinting or review.
Saves current menu configuration as a job number (1-8) for future use.
Guide on navigating and using the printer's menu system for configuration.
Steps to access the printer's Main Menu and Setup Menu via the LCD panel.
Instructions on how to select and use options within the main menu.
Sets the distance between the media's bottom edge and the first line of the address.
Sets the darkest print quality, slowest speed, and highest ink usage for professional appearance.
Sets the fastest print speed and lightest quality, saving ink.
Applies an oblique shape to characters to emphasize text in an address.
Positions or omits barcodes on the printed media.
Prints the barcode within the address block, above the first line.
Enables printing of a 5-digit ZIP code barcode; cannot generate DPBC from it.
Removes data from the printer's data buffer, either clearing all or none.
Saves or loads up to eight different menu presets for quick printer setup.
Option to change page layout for mail pieces, including sub-menus.
Allows alteration of font characteristics like typeface, size, weight, and style.
Disables or selects the print location for the US Postal Service Postnet Barcode.
Prints the barcode within the address block, below the last line.
Reprints last records or clears printer memory to resolve printing issues.
Retrieves previously saved menu settings from a previous job setup.
A chart listing common symptoms, their causes, and suggested solutions.
A chart listing common symptoms, their causes, and suggested solutions.
Recommended cleaning and maintenance procedures for optimal printer performance.
Steps for addressing print quality issues related to the ink cartridge.
Overview of the main menu options available for configuring the printer.
Overview of the setup menu options for printer configuration.
Increases transport motor torque for heavy media, reducing throughput by 10%.
Prints a test pattern to check ink jet cartridge nozzles for blockages.
Cleans ink jet nozzles to dislodge dried ink and restore print quality.
Flow chart for Test Print Head function.
Flow chart for Purge Print Head function.
Information on printing USPS Delivery Point Bar Codes (DPBC) for mail rates.
Details the printer's certification by NAIC for meeting POSTNET Bar-Code standards.
Explains how the printer uses data to print the DPBC.
Options for sending ZIP+4+2 or ZIP+4+3 addresses to print Delivery Point Bar Codes.