9
6 Switch on and Programming
i
Notice!
You can separate PCB panel with multiple cuts very softly. It means, more cuts are gentle for material and
elements on the PCB board.
6.1 Switch on and synchronize the blade
1. Switch on the device by power switch (1). LED not ready is blinking.
i
Notice!
Are all connections ready and the device is swiched on and not in function check the emergency swith!
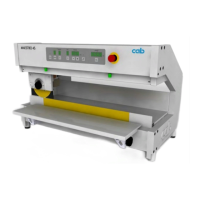
1
Fig.6 Power Switch
2. Press button home.
3. Press the foot-switch and hold it.
- Device will run to the start position or from the start position short out and back into the start position.
4. Loose the foot switch and the device is ready. LED not ready don't glow.
It's possible to use 9 program places.
After the rst switch on the program 1 will be loaded.
Setting ex factory:
Material separation in 3 cuts,with increasing cut deepness respectively declining blade distance.
1. cut = blade distance: 0,6 mm
2. cut = blade distance: 0,3 mm
3. cut = blade distance: 0 mm
6.2 Programming
1. Press button program and hold it over 3 seconds.
The display of the selected program is blinking.
2. Select desired program place by the button program.
3. Press the button key for 3 seconds up to the LED key is blink.
4. Select cut step by the button step.
5. With the button distance - and distance + adjust the distance of the blades for this cut step.
- maximum distance = 0,6 mm
Adjusting in steps of = 0,05 mm
- minimum Distance = 0 mm
6. Select next cut step.
7. Adjust the blade distance
- Blade distance smaller the former distance and higher 0 mm; back to point 5.
- Blade distance = 0 mm or the same value as the former distance and pressing the button step;
closing the programming mode. LED key don't glow.
In case of end programming with two same distance value with a value greater 0 mm is the last cut a cut in this
distance.
Maximum 5 cuts are possible.