LEVEL 4
Access to level 4 is gained through
UEr
in level 3. Press and hold ▲ and ▼ for 10
seconds.
Enter level 4 at
Lock
, release ▲ and ▼ together. Display reads
LoCK nonE
Program security using Lock
Select from three
Lock
options: Press and hold ✱, press ▲ to index.
LEV.3
locks level 3 and 4 only- Technical Functions.
LEV.2
locks levels 2, 3 and 4 only - Configuration and
Technical Functions.
ALL
locks all functions
LoCK ALL
Note: Locked functions and options may be read.
Press ▼ to access following functions
Function Options
[Factory settings] shown in brackets
ProG [Auto] StAY
Program mode auto-exit switch
Auto-exit returns display to normal if 60 seconds of key inactivity, select
StAY
to disable
no.AL [oFF] on
Disable SP2 alarm annunciator -AL-
Select on to disable -AL-
di.SS dir 1 to 32 [6]
Display sensitivity
dir
= direct display of input
1
= maximum,
32
= minimum sensitivity
dEr.S 0.1 to 1.0 [0.5]
Derivative sensitivity
MECHANICAL INSTALLATION
The Controllers are designed to be mounted either in a 1/16 or a 1/32 DIN panel cutout.
The units are sleeve mounted with the front bezel assembly rated NEMA4/IP66 provided
that:
● the panel is smooth and the panel cutout is accurate;
● the mounting instructions are carefully followed.
DIN PANEL CUTOUT
1/16 DIN: 45.0mm +0.6 / 0.0 wide, 45.0mm +0.6 / 0.0 high
1/32 DIN: 45.0mm +0.6 / -0 wide, 22.2mm +0.3 / -0 high
Maximum panel thickness 9.5mm
Minimum spacing 20mm vertical, 10mm horizontal
MOUNTING
To mount a Controller proceed as follows:
1 Check that the controller is correctly orientated and then slide the unit into the cutout.
2 Slide the panel clamp over the controller sleeve pressing it firmly against the panel until
the controller is held firmly.
3 The controller front bezel and circuit board assembly can be unplugged from the sleeve.
Grasp the bezel firmly by the recesses on each side and pull. A screwdriver can be used
as a lever if required.
4 When refitting the bezel assembly it is important to press it firmly into the sleeve until the
latch clicks in order to compress the gasket and seal to NEMA4X/IP66.
CLEANING
Wipe down with damp cloth (water only)
Note: The controller should be isolated before removing or refitting it in the sleeve, and
electrostatic precautions should be observed when handling the controller outside
the sleeve.
9
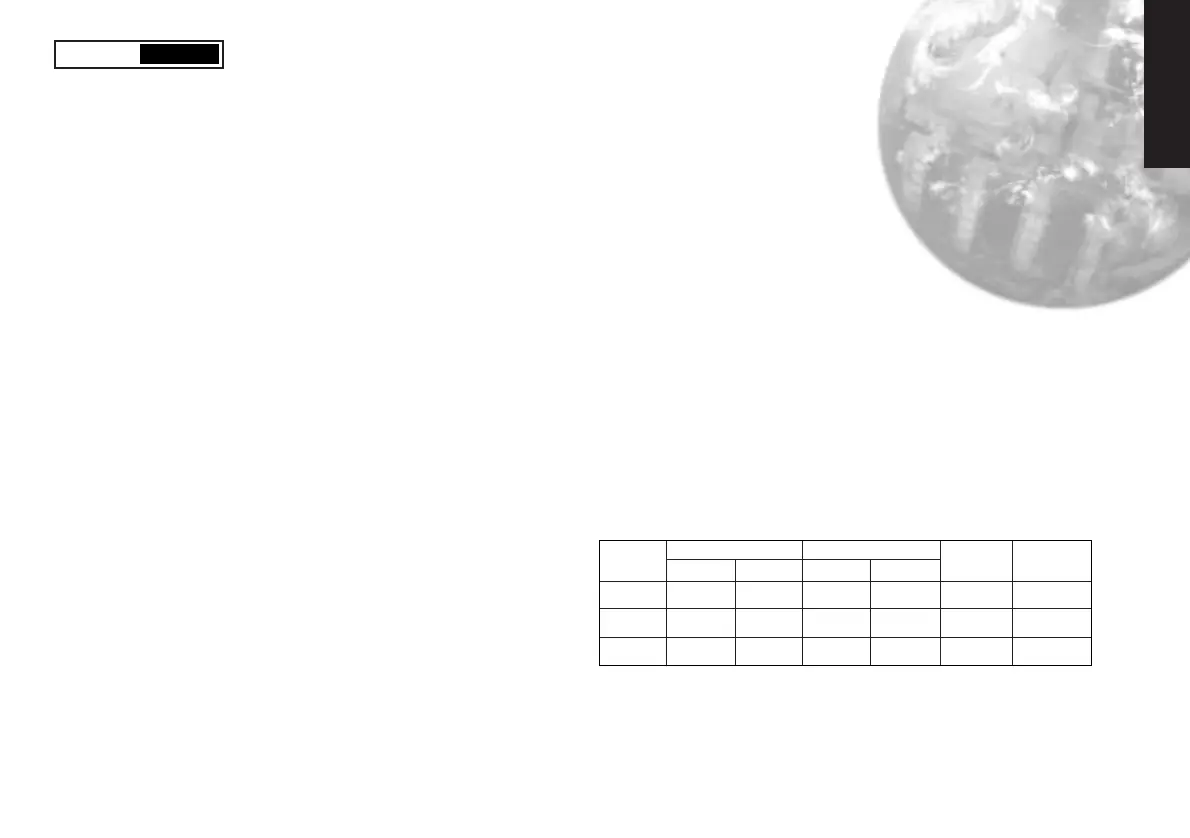
DIMENSIONS: MODELS 3300 / 9300 / 9400
Model Bezel* Behind Panel Overall Behind panel
Width Height Width Height Length Length*
3300 51.0 28.5 44.8 22.0 116.2 106.7
9300 51.0 51.0 44.8 44.8 116.2 106.7
9400 51.0 51.0 44.8 44.8 116.2 106.7
Dimensions in mm
* includes gasket
English
LEVL 4
Artisan Technology Group - Quality Instrumentation ... Guaranteed | (888) 88-SOURCE | www.artisantg.com
 Loading...