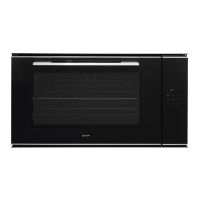
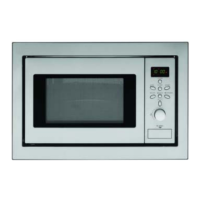
Instruction manual C290216 Please keep this instruction manual for future reference
15
Instruction manual C24 02SS
Please keep this instruction manual for future reference
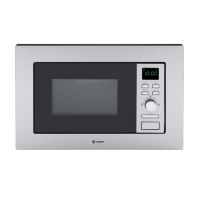
CONTROL PANEL AND DISPLAY
1
Control Panel and display
Button Description
1
○
Power
2
○
Programme
○
3 Timer
4
○
Temperature
5
○
Light
6
○
Up / Down (+/-)
○
7 Select
8
○
Boost
○
9 S ta rt
/ Pause
Display
Description
10
○
/ programme
11
○
Time r
12
○
Actual Temperature/Time
13
○
Set Temperature
14
○
Curr ent Time
15
○
Safety Lock
61
○
Boost
71
○
Cooking Dura tion Time
81
○
Rotisserie
91
○
Alarm
02
○
Heating Indicator
12
○
Light
2
2
○
Cooking End Time
1 2
4 3 10 11
13
12
16
14
15
6
5
19
17
18
21
20
22
7 8 9
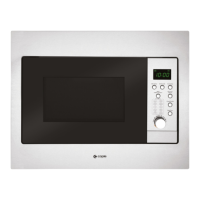
BUTTON
DESCRIPTION
1. Power
2. Programme
3. Timer
4.
Temperature
5. Light
6. Up / Down (+/-)
7. Select
8. Boost
9. Start / Pause
DISPLAY
DESCRIPTION
10. Function / programme
11. Timer
12. Actual Temperature/Time
13. Set Temperature
14. Current Time
15. Safety Lock
16. Boost
17.
Cooking Duration Time
18.
Pyro Lock
19.
Alarm
20.
Heating Indicator
21.
Light
22.
Cooking End Time
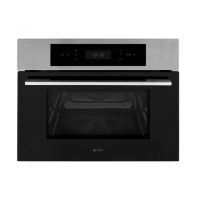
2 x Chrome oven shelves
1 x Grill pan with rack and handle
2 x Telescopic runners (x2 pairs)
To purchase additional or replacement accessories, please visit www.caple.co.uk
A CCESSORIES
C2105SS Single Oven Instruction manual.indd 15 28/05/2019 15:57
yro
clean
P
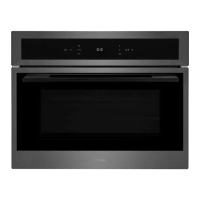
CONTROL PANEL AND DISPLAY
Press the button to turn the oven on. When turned on, the display will light up and the time of
day will be shown.
FUNCTION / TEMPERATURE
To select a function, press the buttons to toggle through the functions and press SELECT
once you have reached the required function. Press the buttons to adjust the temperature
followed by SELECT again to confirm and start cooking. The symbol will illuminate on the
display whilst the oven is heating up to the required temperature.
Note: All functions that include the symbols can also use the Rotisserie function. If required
ensure the Rotisserie equipment is inserted into the motor before starting the programme.
OPERATION
DISPLAY
DESCRIPTION
1. Function / Programme
2. Set Temperature
3. Boost
4. Timer
5. Alarm
6. Light
7. Child Lock
8. Duration Cooking Time
9. End Cooking Time
CONTROL
DESCRIPTION
10. On/Off
11. Up
12. Down
13. Left
14. Right
15. Boost
16. Timer
17. Light
18. Select
1
23
4
5
6
7
8
9
10
11
12
13
14
15
16
17
18
OPERATION
Press the button to turn the oven on. When turned on, the display will light up and the time
of day will be shown.
Function / temperature
To select a function, press the
/
buttons to toggle through the functions and press
SELECT once you have reached the required function. Press the / buttons to adjust the
temperature followed by SELECT again to confirm and start cooking. The symbol will
illuminate on the display whilst the oven is heating up to the required temperature.
The functions are in the below order:
Light function
Press the button to turn the internal oven lights on & off. The lights will
automatically turn off if no operation within 3 minutes.
Boost function BOOST
when the set temperature exceeds 100ºC, you can press the BOOST key to heat up the
oven faster. Once pressed the boost symbol will be displayed on the screen. The boost
function will deactiovate once the oven gets to the set temperature.
The boost function can only be used with the following programmes:
Note: All functions that include the symbols can also use the Rotisserie function. If
required ensure the Rotisserie equipment is inserted into the motor before starting the
programme.
Time setting
Time zone can show “Time, Duration time, End of cooking time and Alarm” in this sequence:
All time settings can be operated by pressing
/
, SELECT, and
Alarm setting
To set the Alarm/minute minder, press the button until the symbol starts to flash. Use /
to adjust the time, and then press SELECT to confirm. If you want to cancel the alarm, set the alarm
time back to '0.00' and press SELECT to confirm.
When the time is up, the alarm will sound for 90 seconds, and the symbol will begin to flash. To
stop the alarm, press either , , or SELECT.
Setting the time
To set the time, turn the oven on, and then press and hold the button for 3 seconds until the
time begins to flash. Adjust the time using the / and then press SELECT to confirm.
when the oven is first turned on or restarts, the time must be set before using the oven.
Duration cooking(0-10hrs)
Once a function and temperature have been selected, press the button and the Duration time
will start to flash. press / to adjust the time, and then SELECT to confirm. Once the time is
up, the alarm will sound and the oven will switch off.
Press any of the buttons to turn off the alarm
To cancel Duration cooking set the cooking time to '0:00' and confirm.
/
, SELECT, and
End cooking time
Once the Duration cooking time has been set, press twice and the End cooking time should
start to flash. Adjust the time to the time you wish cooking to stop and press SELECT to confirm.
Your oven will then work out when to turn on, so that it cooks for the required duration time, and
finishes at the required end time. E.g. Duration time set at 30 minutes, and the end time set to
18.15, the oven will automatically turn on at 17.45 and cook for 30 minutes on the set function and
temperature (start time = End time - duration time).
Child lock
Press and hold SELECT for 5 seconds to set the child lock. The symbol will appear in the display
once activated.
To cancel the Child lock, press and hold SELECT again for 5 seconds. The symbol will disappear
from the display once deactivated.
OPERATION
Press the button to turn the oven on. When turned on, the display will light up and the time
of day will be shown.
Function / temperature
To select a function, press the / buttons to toggle through the functions and press
SELECT once you have reached the required function. Press the / buttons to adjust the
temperature followed by SELECT again to confirm and start cooking. The symbol will
illuminate on the display whilst the oven is heating up to the required temperature.
The functions are in the below order:
Light function
Press the button to turn the internal oven lights on & off. The lights will
automatically turn off if no operation within 3 minutes.
Boost function BOOST
when the set temperature exceeds 100ºC, you can press the BOOST key to heat up the
oven faster. Once pressed the boost symbol will be displayed on the screen. The boost
function will deactiovate once the oven gets to the set temperature.
The boost function can only be used with the following programmes:
Note: All functions that include the symbols can also use the Rotisserie function. If
required ensure the Rotisserie equipment is inserted into the motor before starting the
programme.
 Loading...