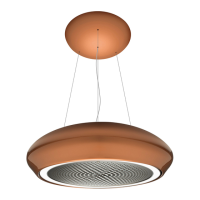
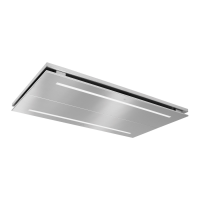
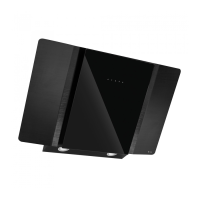
This document is an instruction manual for the Caple COR541SL Ceiling Hood, a domestic appliance designed for extracting vapours and removing odours from cooking. It is intended for household use and similar applications, including staff kitchen areas in shops, offices, and other working environments, farmhouses, hotels, motels, other residential type environments, and bed and breakfast type environments. The appliance is not intended for outdoor use.
Function Description:
The Caple COR541SL Ceiling Hood operates as a ducted cooker hood, meaning it extracts air and conveys it through a duct to the outside. It is equipped with intelligent electronics that include a timer device for speed controls. For internal motor models with a maximum air capacity higher than 650m³/h, the timer automatically switches the speed from 4th to 3rd speed after 6 minutes of operation. For external motor models with remote motors, if the air capacity exceeds 650m³/h at both 4th and 3rd speed, the speed is automatically switched from 4th to 2nd speed after 6 minutes of operation. If the appliance is working at 3rd speed, it automatically switches to 2nd speed after 7 minutes of operation. Operation speeds can also be changed during operation. The energy consumption of the appliance in standby mode is lower than 0.5W.
The hood features dimmable lights, allowing for light intensity adjustment from 20% to 100%. It also offers a colour temperature setting for the lights, allowing users to change the colour temperature from warm to cold.
Usage Features:
The ceiling hood is operated via a radio remote control. The remote control is powered by a 12V 27A alkaline battery and operates at a frequency of 433.92 MHz. It has 32,768 possible combinations and a maximum consumption of 25 mA. The operating temperature range for the remote control is -20°C to +55°C. Its dimensions are 130x45x15 mm.
The remote control features five buttons:
- Light ON/OFF command: Controls the hood's lighting.
- Motor ON (speed level 1) / OFF command: Turns the motor on at speed level 1 or turns it off.
- Reduce speed: Decreases the motor's extraction speed.
- Increase speed: Increases the motor's extraction speed.
- 10-minute timer: Activates a 10-minute timer function.
Dimmable Lights Function:
- To turn the hood light off from 100% brightness, briefly press the light key.
- To turn the hood light on at 100% brightness, briefly press the light key.
- To reduce brightness from 100% brightness, continuously press the light key.
- Releasing the key during reduction or increase will set the light to the luminous intensity reached at that moment.
- If the light is dimmed, continuously pressing the key will invert the brightness adjustment direction compared to the previous function.
Colour Temperature Setting:
To adjust the colour temperature, ensure both the lights and the fan are off.
- Hold down the TIMER key to turn on the light at the previously set colour temperature.
- Press and hold the Light key to change the colour temperature.
- As long as the Light key is continuously pressed, the colour temperature will change from warm to cold. Release the Light key to select the desired colour.
- To exit the colour temperature selection function, press the ON/OFF key.
Remote Control Configuration:
The radio control unit is supplied with preset codes. If two cooker hoods with radio control systems are installed in the same room or nearby, their operation may interfere. In such cases, the transmission code of one radio control system must be changed.
- Generating a New Transmission Code: Simultaneously press the '+' and '-' buttons for two seconds. When the LEDs light up, press the '+' and 'light' buttons within 5 seconds. The LEDs flashing three times indicate the procedure is complete. This operation permanently deletes the preset codes.
- Learning the New Transmission Code: After changing the transmission code on the radio control unit, the electronic central unit of the cooker hood must be updated. Press the main power-off button on the hood, then restore power to the electronic control unit. Within the next 15 seconds, press the light button on the remote control to synchronise the central unit with the new code.
- Resetting to Factory Configuration: To restore the factory configuration, simultaneously press the '+' and '-' buttons for two seconds. When the LEDs light up, press the 'light' and 'timer' buttons within 5 seconds. The LEDs flashing six times indicate the procedure is complete. This operation permanently deletes the preset codes.
In case the radio control does not work, an emergency button is available to switch the appliance off. After any necessary repairs, the emergency button should be reset. The products are endowed with an electronic device which allows the automatic switching off after 4 hours working from the last operation.
Installation Requirements:
For installation, a plasterboard false ceiling is required, maintaining at least 220mm distance between it and the solid ceiling. The supplied fixings allow installation in false ceilings ranging from 220mm to 300mm distance. A circular opening of 510mm diameter must be made in the plasterboard. The cooker hood should be placed at a minimum distance of 65cm above the hob. If no instructions are supplied with a gas hob, the minimum distance between the hob and the hood must be at least 760mm.
Maintenance Features:
Careful maintenance ensures smooth operation and long-lasting performance. Special care must be taken with the grease filter.
- Accessing the Filter: The grease filter cover panel can be opened by pulling it gently. The panel is fixed with three magnets and has two safety cables that need to be released to remove the panel from the product.
- Removing the Grease Filter: Use the special handle to remove the grease filter.
- Replacing the Grease Filter: After cleaning, replace the grease filter by performing the removal steps in reverse order.
- Removing the Carbon Filter (if installed): Follow the same steps as for the grease filter. The carbon filter is located immediately above the grease filter.
- Cleaning the Appliance: Warm water and neutral detergents are recommended for cleaning the appliance. Abrasive products should be avoided.
- Power Cord: If the power cord is damaged, it must be replaced by a qualified person.
- LED Lighting Replacement: The LED light must be replaced by an authorised engineer or similar only. Before starting the process, unplug the unit from the power supply. Un-install the LED Ceiling light from the hood, remove the screws from the top of the light structure, remove the white deflector, carefully remove the LED bar, disconnect the connector, and change the LED light. Implement the steps in reverse order. After waiting 5 minutes, plug in the unit.
- Remote Control Battery Replacement: The remote control battery should be replaced annually to ensure optimal transmitter range. To replace the exhausted battery, remove the plastic lid, take out the old battery, and insert a new one, observing the correct battery polarities. Used batteries should be discarded in special collection bins.