Instruction manual DD810BK
26
Please keep this instruction manual for future reference
GRILL FUNCTION:
OPERATING THE HOB
The hob is operated with touch control sensor keys. The sensor keys are operated as follows:
Lightly touch a symbol on the surface of the ceramic glass plate. A buzzer will indicate when the
controls have been operated correctly.
The touch control sensor key will then be indicated as “key”.
PERMANENT PAN RECOGNIT ION
A cooking setting can only be switched on via the slider (touch control) after a
pan has been detected on the hob and the power display shows 0.
ON/OFF KEY: ( 6 ) COOKING ZONES LEFT OR RIGHT
This key is used to switch the left or right hob on and off.
POWER BOOST IN THE TOUCH CONTROL: (7)
The power boost setting makes additional power available for induction cooking zones.
S T O P / PA USE KEY: ( 8 )
The STOP/PAUSE function can be used to briefly stop the cooking process.
( 8 )
RECALL FUNCTION:
(Recovery function)
The most recent setting can be recovered if the hob is switched off unintentionally.
C H IL D SAFETY LOCK KEY: ( 9 )
The lock key can be used to lock all of the keys.
KEEP WARM KEY: (10 )
To keep warm.
GRILL KEY: (11)
Grill function with a griddle plate for induction.
MINUS /PLUS KE Y: ( 1 2 )
These keys are used to set the timer and the automatic switch-off function of the
cooking zones as well as the automatic delay stop of the fan.
Use the grill function with the recommended griddle plate for induction.
1. Switch on the hob.
2. Use the front power setting display (as a key)
to select a cooking zone. The stand-by dot of
the selected cooking zone will light up.
3. Press the Grill key
OPERATING THE HOB
The hob is operated with touch control sensor keys. The sensor keys are operated as follows:
Lightly touch a symbol on the surface of the ceramic glass plate. A buzzer will indicate when the
controls have been operated correctly.
The touch control sensor key will then be indicated as “key”.
PERMANENT PAN RECOGNIT ION
A cooking setting can only be switched on via the slider (touch control) after a
pan has been detected on the hob and the power display shows 0.
ON/OFF KEY: ( 6 ) COOKING ZONES LEFT OR RIGHT
This key is used to switch the left or right hob on and off.
POWER BOOST IN THE TOUCH CONTROL: (7)
The power boost setting makes additional power available for induction cooking zones.
S T O P / PA USE KEY: ( 8 )
The STOP/PAUSE function can be used to briefly stop the cooking process.
( 8 )
RECALL FUNCTION:
(Recovery function)
The most recent setting can be recovered if the hob is switched off unintentionally.
C H I L D SAFETY LOCK KEY: ( 9 )
The lock key can be used to lock all of the keys.
KEEP WARM KEY: (10 )
To keep warm.
GRILL KEY: (11)
Grill function with a griddle plate for induction.
MINUS /PLUS KE Y: (1 2 )
These keys are used to set the timer and the automatic switch-off function of the
cooking zones as well as the automatic delay stop of the fan.
to activate the grill
function. The front and back cooking zones
are activated together.
4. The touch control
OPERATING THE HOB
The hob is operated with touch control sensor keys. The sensor keys are operated as follows:
Lightly touch a symbol on the surface of the ceramic glass plate. A buzzer will indicate when the
controls have been operated correctly.
The touch control sensor key will then be indicated as “key”.
PERMANENT PAN RECOGNIT ION
A cooking setting can only be switched on via the slider (touch control) after a
pan has been detected on the hob and the power display shows 0.
ON/OFF KEY: ( 6 ) COOKING ZONES LEFT OR RIGHT
This key is used to switch the left or right hob on and off.
POWER BOOST IN THE TOUCH CONTROL: (7)
The power boost setting makes additional power available for induction cooking zones.
S T O P / PA USE KEY: ( 8 )
The STOP/PAUSE function can be used to briefly stop the cooking process.
( 8 )
RECALL FUNCTION:
(Recovery function)
The most recent setting can be recovered if the hob is switched off unintentionally.
C H I L D SAFETY LOCK KEY: ( 9 )
The lock key can be used to lock all of the keys.
KEEP WARM KEY: (10 )
To keep warm.
GRILL KEY: (11)
Grill function with a griddle plate for induction.
MINUS /PLUS KE Y: (1 2 )
These keys are used to set the timer and the automatic switch-off function of the
cooking zones as well as the automatic delay stop of the fan.
must be
activated immediately afterwards. A power
setting will be switched on.
5. Put the griddle plate onto the cooking zone
and then the food to be grilled.
Level 1-3 for vegetables
Level 4-6 for fish
Level 7-9 for meat
6. To switch off the grill function press the Grill
key
OPERATING THE HOB
The hob is operated with touch control sensor keys. The sensor keys are operated as follows:
Lightly touch a symbol on the surface of the ceramic glass plate. A buzzer will indicate when the
controls have been operated correctly.
The touch control sensor key will then be indicated as “key”.
PERMANENT PAN RECOGNIT ION
A cooking setting can only be switched on via the slider (touch control) after a
pan has been detected on the hob and the power display shows 0.
ON/OFF KEY: ( 6 ) COOKING ZONES LEFT OR RIGHT
This key is used to switch the left or right hob on and off.
POWER BOOST IN THE TOUCH CONTROL: (7)
The power boost setting makes additional power available for induction cooking zones.
S T O P / PA USE KEY: ( 8 )
The STOP/PAUSE function can be used to briefly stop the cooking process.
( 8 )
RECALL FUNCTION:
(Recovery function)
The most recent setting can be recovered if the hob is switched off unintentionally.
C H I L D SAFETY LOCK KEY: ( 9 )
The lock key can be used to lock all of the keys.
KEEP WARM KEY: (10 )
To keep warm.
GRILL KEY: (11)
Grill function with a griddle plate for induction.
MINUS /PLUS KE Y: (1 2 )
These keys are used to set the timer and the automatic switch-off function of the
cooking zones as well as the automatic delay stop of the fan.
or switch off the hob.
NOTE:
Never operate the appliance unattended.
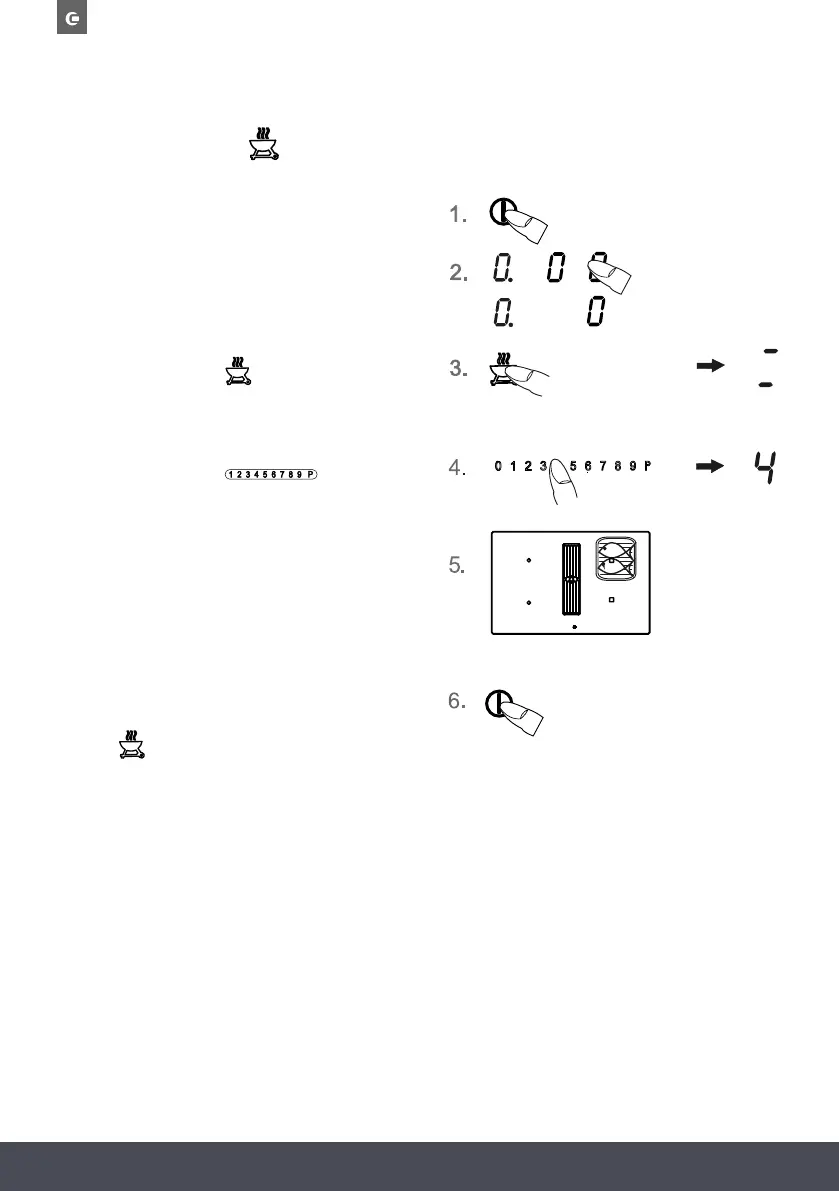
GRIL L FUNCTION:
Use the grill function with the recommended griddle plate for induction.
1. Switch on the hob.
2. Use the front power setting display (as a key)
to select a cooking zone. The stand-by dot of
the selected cooking zone will light up.
3. Press the Grill key to activate the grill
function. The front and back cooking zones are
activated together.
4. The touch control must be
activated immediately afterwards. A power
setting will be switched on.
5. Put the griddle plate onto the cooking zone
and then the food to be grilled.
Level 1-3 for vegetables
Level 4-6 for fish
Level 7-9 for meat
6. To switch off the grill function press the Grill
key or switch off the hob.
NOTE:
Never operate the appliance unattended.
 Loading...