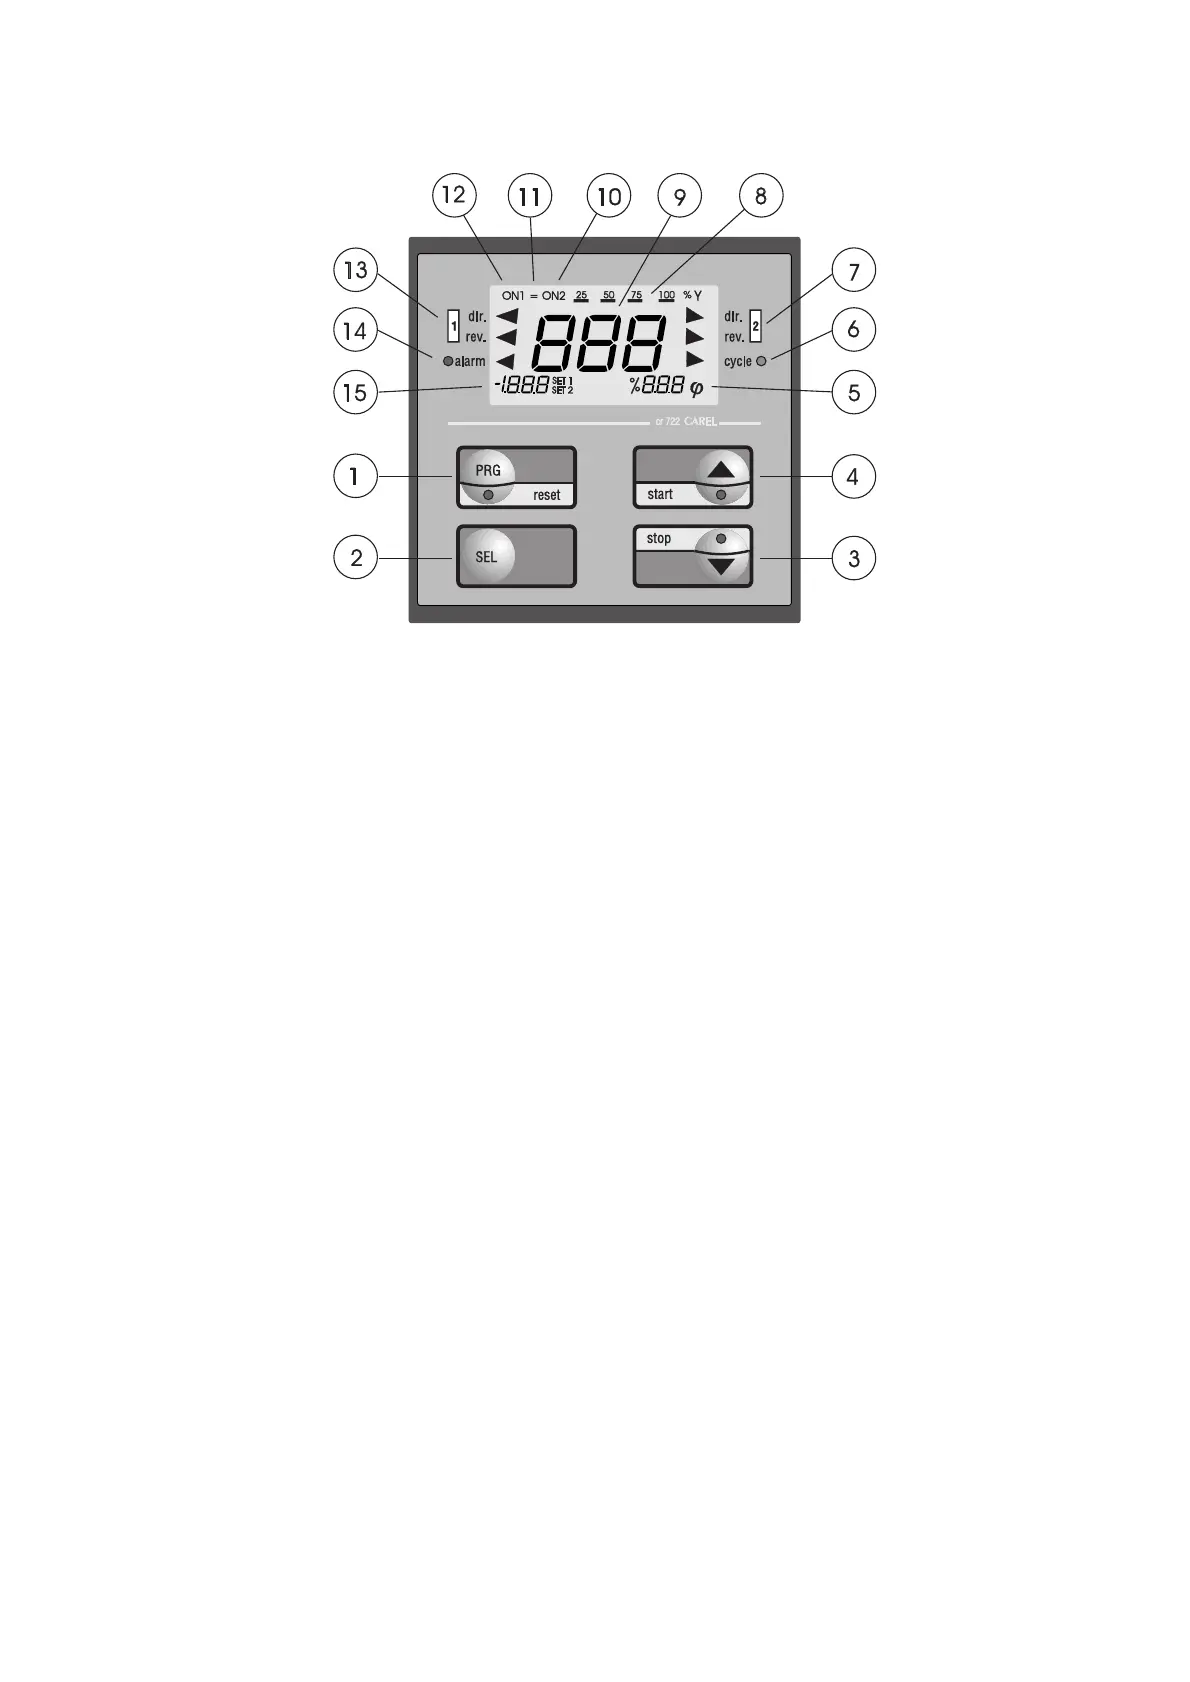
2. Interfaccia utente
2.1 Descrizione del frontale e funzioni dei tasti
Tasto 1
• Il tasto PRG premuto per 5 secondi contemporaneamente a SEL
attiva la procedura di impostazione dei parametri di configurazione.
• Termina le procedure di configurazione registrando le modifiche fatte.
• RESET nella configurazione dotata di uscita di allarme.
Tasto 2
• Il tasto SEL premuto per 1 secondo attiva la procedura di
impostazione dei Set-Point.
• Nelle procedure di configurazione visualizza il parametro successivo.
• Premuto per 5 secondi attiva la procedura di configurazione dei
parametri operativi.
• Premuto per 5 secondi contemporaneamente a PRG attiva la procedura
di programmazione dei parametri di configurazione.
Tasto 3
• Decrementa il valore visualizzato nelle procedure di configurazione.
• STOP nella configurazione 2d (vedere cap. “parametri di configurazione”).
Tasto 4
• Incrementa il valore visualizzato nelle procedure di configurazione.
• START nella configurazione 2d (vedere cap. “parametri di configurazione”).
Indicazione 5
• IN FUNZIONAMENTO: visualizza l'unità di misura impostata.
• IN IMPOSTAZIONE PARAMETRI: visualizza una sigla che identifica il
parametro selezionato.
Indicazione 6
• Indicatore attivazione funzionamento ciclico (configurazione 2.d).
Indicazione 7
• Indicatore modalità di funzionamento dell'uscita 2 (Direct o Reverse).
Indicazione 8
• Indicatore della percentuale di attivazione dell'uscita analogica
(visualizzata solo se è installata la scheda Seriale/Analogica opz.).
Indicazione 9
• IN FUNZIONAMENTO: visualizza il valore corrente della grandezza
regolata.
• IN IMPOSTAZIONE PARAMETRI: visualizza il numero del parametro
corrente.
Indicazione 10
• Indica lo stato di attivazione della uscita 2.
Indicazione 11
• Se acceso, la grandezza regolata si trova nella zona neutra
(configurazione n.n).
Indicazione 12
• Indica lo stato di attivazione dell'uscita 1.
2. User interface
2.1 Front panel
Button 1
• By pressing the PRG and SEL buttons simultaneously for 5 seconds,
it is possible to enter the procedure for the selection of the
configuration parameters.
• It ends the configuration procedure and stores any modification.
• RESETs alarms in the configuration equipped with an alarm output.
Button 2
• Pressed for 1 second, it enables the Set-Points selection procedure.
• In the configuration procedure it displays the next parameter.
• If pressed for a few seconds, it enables the procedure allowing the
configuration of the operating parameters.
• If pressed together with PRG, it enables the configuration procedure.
Button 3
• Decreases the value displayed in the configuration procedure.
• Enables the STOP function in the configuration 2d (see ch. 8).
Button 4
• Increases the value displayed in the configuration procedure.
• Enables the START function in the configuration 2d (see ch.8).
No. 5
• FUNCTIONING MODE: displays the selected temperature scale.
• PARAMETERS SELECTION: shows a letter which identifies the
selected parameter.
No. 6
• Indicator of enabled cyclic functioning (configuration 2.d)
No. 7
• Indicator of output 2 functioning mode (Direct or Reverse)
No. 8
• Indicator of the % of activation of the analog output (only if the
serial/analog optional board has been inserted).
No.9
• FUNCTIONING MODE: displays the actual value of the parameter
being controlled.
• PARAMETERS SELECTION: displays the number of the current
parameter.
No.10
• Indicates the status of output 2.
No. 11
• If ON, the controlled parameter is within the dead zone
(Configuration n.n).
No. 12
• Indicates the status of output 1.
3
Fig. 2
 Loading...