26
40VMH072 - 096 —
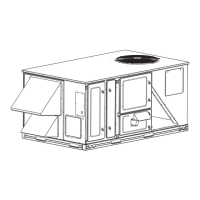
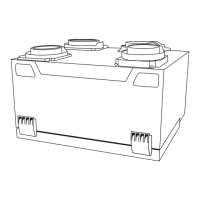
Fig. 43 —Fan disassembly (072-096)
1. Remove the bottom cover plate. See Fig. 43.
2. Remove the 6 bolts from the front plate.
3. Support the fan sub-assembly from the bottom, then lift up and remove the fan sub-assembly.
4. After motor maintenance is complete, install the motor assembly in the reverse order of steps 1, 2 and 3 (steps 3, 2, and 1).
IMPORTANT: During this process, the indoor unit does not need to be removed.
INDOOR UNIT ADDRESSING
For proper system operation, each indoor unit must have a
unique address set from 0 to 63. When setting an address by
remote controller, outdoor units, indoor units, and MDC must
be powered on. If “FE” appears on the LED screen or display
board, this unit has no address. After setting all indoor units’
addresses, turn off the power supply to all indoor units to clear
errors.
Indoor units’ addressing can be distributed automatically in the
heat pump system. The heat recovery system cannot
accomplish this function at this time. When dip switch “S6”
on, the outdoor unit’s main PCB board is set to 00 (default set
in factory), indoor units are set for auto-addressing. When
powering on for the first time, it takes six minutes or more to
finish auto-addressing each indoor unit.
motor
assembly
bottom
cover plate
screw
pothook
scroll
bolt