4-3 T -312
d. Frontseat the liquid line (King) valve by turning
clockwise. Start system and run in cooling. Stop the
unit when the suction pressure reaches 1 psig (0.07
BAR).
e. Frontseat (close) suction service valve to trap the
refrigerant in the high side of the system between the
compressor suction service valve and the filter drier
inlet valve. The low side of the system will now be at 1
psig (0.07 BAR) pressure and ready for servicing,
f. Service or replace the necessary component on the
low side of the system.
g. Leak check connections. (Refer to paragraph 4.5)
h. Evacuate and dehydrate the low side. (Refer to
paragraph 4.6)
i. Reconnect the suction pressure transducer (SPT).
j. Clear the low pressure alarm. (Refer to paragraph
2.1.6)
4.4.2 Removing the Refrigerant Charge
Connect a refrigerant recovery system to the unit at the
condenser service (King) valve to remove refrigerant
charge. (See Figure 4-4) Refer to instructions provided
by the manufacturer of the refrigerant recovery system.
NOTE
1. Before opening up any part of the
system, a slight positive pressure should
be indicated on the gauge.
2. When opening up the refrigerant system,
certain parts may frost. Allow the part to
warm to ambient temperature before
dismantling; this avoids internal
condensation, which puts moisture into
the system.
3. When opening or closing the service
valves, care should be given to note if the
packing around the valve stem is worn or
may need adjustment to prevent
refrigerant leaks.
4.4.3 Refrigerant Removal From An Inoperative
Compressor.
To remove the refrigerant from a compressor that is not
operational, do the following:
a. Attach a manifold gauge set as shown in Figure 4-3
and isolate the compressor by front seating the
suction and discharge valves.
b. Recover refrigerant with a refrigerant reclaimer . If the
discharge service valve port is not accessible, it will
be necessary to recover refrigerant through the
suction service valve port only.
c. Service or replace components as required and leak
check t he compressor.
d. Using refrigerant hoses designed for vacuum service,
connect a vacuum pump to center connection of
manifold gauge set. Evacuate compressor to 500
microns. Close off pump valve, isolate vacuum gauge
and stop pump. Wait 5 minutes to verify that vacuum
holds.
e. Once vacuum is maintained, recharge low side with
R-134a to 20 to 30 PSIG by admitting vapor from the
refrigerant cylinder. Backseat compressor service
valves and disconnect manifold gauge set.
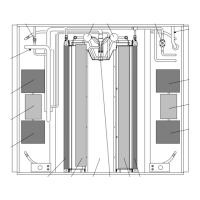
DS
1. Discharge Service
Valve and Port
2. Suction Service
Valve and Port
3. Manifold Gauge
Set
4. Vacuum Pump
5. Reclaimer
6. Refrigerant Cylinder
7. Thermistor Vacuum
Gauge
1
7
6
5
4
3
2
Figure 4-3. Compressor Service Connections
4.4.4 Pump Down An Operable Compressor For
Repair
To service an operable compressor , pump the
refrigerant into the condenser coil as follows:
a. Install manifold gauge set. (See Figure 4-3)
b. Unplug the suction pressure transducer (SPT).
c. Frontseat the compressor suction service valve by
turning clockwise.
d. Start the unit and run in cooling until 10 ”/hg (0.69
BAR) of vacuum is reached. Shut the system down
and tag out system power source.
e. Frontseat the compressor discharge service valve
and wait 5 minutes to verify vacuum is maintained. If
the pressure rises above vacuum, open the
compressor discharge service valve and repeat steps
c and d until a vacuum is maintained.
f. Service or replace components as required and leak
check t he compressor.
g. Using refrigerant hoses designed for vacuum service,
connect a vacuum pump to center connection of
manifold gauge set. Evacuate system to 500
microns. Close off pump valve, isolate vacuum gauge
and stop pump. Wait 5 minutes to verify that vacuum
holds.
h. Once vacuum is maintained, backseat compressor
service valves and disconnect manifold gauge set.
i. Reconnect the suction pressure transducer (SPT).
j. Clear the low pressure alarm. (Refer to paragraph
2.1.6)

 Loading...