4-12T -312
b. Use a digital volt-ohmmeter to measure voltage
across the transducer and compare to values in
Table 4-5. A reading within two percent of the values
in the table would be considered good.
Table 4-5. Suction and Discharge Pressure
T ransducer (SPT and DPT) Voltage
Psig Voltage Psig Voltage Psig Voltage
20” 0.369 105 1.495 220 2.622
10” 0.417 110 1.544 225 2.671
0 0.466 115 1.593 230 2.720
5 0.515 120 1.642 235 2.769
10 0.564 125 1.691 240 2.818
15 0.614 130 1.740 245 2.867
20
0.663 135 1.789 250 2.916
25 0.712 140 1.838 255 2.965
30 0.761 145 1.887 260 3.014
35 0.810 150 1.936 265 3.063
40 0.858 155 1.985 270 3.112
45 0.907 160 2.034 275 3.161
50 0.956 165 2.083 280 3.210
55 1.007 170 2.132 285 3.259
60 1.054 175 2.181 290 3.308
65 1.103 180 2.230 295 3.357
70 1.152 185 2.279 300 3.406
75 1.204 190 2.328 305 3.455
80 1.250 195 2.377 310 3.504
85 1.299 200 2.426 315 3.553
90 1.348 205 2.475 320 3.602
95 1.397 210 2.524 325 3.651
100 1.446 215 2.573 330 3.700
4.16 REPLACING SENSORS AND
TRANSDUCERS
a. T urn main battery disconnect switch to OFF position
and lock.
b. Tag and disconnect wiring from defective sensor or
transducer.
c. Remove and replace defective sensor or transducer .
d. Connect wiring to replacement sensor or transducer .
e. Checkout replacement sensor or transducer. (Refer
to paragraph 4.13, 4.15 or 4.14, as applicable.)
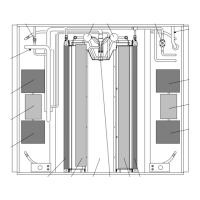
4.17 SERVICING MAIN EVAPORATOR BLOWER
ASSEMBLY
a. T urn main battery disconnect switch to OFF position
and lock.
b. Remove access door located in the #3 baggage
compartment. To remove the access door, unlatch,
then open the door enough to slide the hinge pins out
of the pin brackets.
c. Disconnect electrical connections to the motor.
d. Remove blower transitions ducts.
e. Remove the four bolts securing the evaporator motor
mounting plate, motor and blower housing assembly
to the bottom panel.
f. Remove motor and blower wheel assembly by sliding
out of evaporator housing.
g. Repair or replace any defective component(s), as
required.
h. Replace by reversing steps b. thru f.
4.18 ACCESSING MAIN EVAPORATOR MOTOR
BRUSHES
a. T urn main battery disconnect switch to OFF position
and lock.
b. Remove access door. (Refer to 4.17.b.)
c. Disconnect electrical connections to the motor.
d. With a marker, trace the outline of the motor on the
motor plate.
e. Remove the four brush access doors on the motor .
f. Service two brushes (top front and top rear).
g. Remove the four bolts securing the evaporator motor
to the mounting plate.
h. Rotate the motor to gain access to the lower front
brush.
i. Rotate the motor the opposite way to gain access to
the lower rear brush.
j. Rotate the motor back to its feet and position back to
its original position guided by the outline drawn in step
d.
k. Re--secure the motor with the four bolts removed in
step g. Check fan rotation, insuring that the fan
wheels do not make contact with the fan housings.
l. Complete the procedure by performing steps a. thru
c. in reverse.
4.19 SERVICING MOTOR BRUSHES
If the brushes are broken, cracked, severely chipped, or
worn to 1/3 their original length, replace them.
a. Remove the four brush access doors on the motor .
b. With fingers or a suitable hook, lift the brush spring
end up so the brush may slide up and out of the
holder. Loosen the brush screw to remove the brush
shunt terminal. Remove the brush.
c. To replace, lift the brush spring and place the brush in
the holder . Position the end of the spring on top of the
brush.
d. Connect the brush shunt terminal to its proper
crossover with the brush screw assembled loosely.
NOTE
Assure positioning of the brush to permit the
brush shunt to travel freely in the holder slot
as the brush wears. If the brush hangs up,
commutator damage and motor failure will
result
e. T ighten screw.

 Loading...