9
10
Cooling /Heating/Fan operation
Ensure the unit is plugged in and power is
available.
1. Press the MODE button to select COOL, HEAT,
(cooling & heating models only) or FAN mode.
2. Press the TEMP buttons to set the desired
temperature. The temperature can be set
O O O O
within a range of 17 C(62 F)~ 30 C(88 F) in
O O
1 C/2 F increments.
3. Press the FAN SPEED button to select the
fan speed in four steps- Auto, Low, Med,or High.
4. Press the ON/OFF button to start the air
conditioner.
In the FAN mode, the setting temperature is not
displayed in the remote controller and you are not
able to control the room temperature either. In this
case, only step 1, 3 and 4 may be performed.
NOTE
Dehumidifying operation
Ensure the unit is plugged in and power is
available. The OPERATION indicator on the
display panel of the indoor unit illuminates.
1. Press the MODE button to select DRY mode.
2. Press the TEMP buttons to set the desired
temperature. The temperature can be set
O O O O
within a range of 17 C(62 F)~ 30 C(88 F) in
O O
1 C/2 F increments.
3. Press the ON/OFF button to start the air
conditioner.
In the Dehumidifying mode, you can not switch
the fan speed. It has already been automatically
controlled.
NOTE
Auto operation
Ensure the unit is plugged in and power is
available. The OPERATION indicator on the
display panel of the indoor unit illuminates.
1. Press the MODE button to select Auto.
2. Press the TEMP button to set the desired
temperature. The temperature can be set
O O O O
within a range of 17 C(62 F)~ 30 C(88 F) in
O O
1 C/2 F increments.
3. Press the ON/OFFbutton to start the air
conditioner.
3
1
2
1. In the Auto mode, the air conditioner can logically
choose the mode of Cooling, Fan, Heating and
Dehumidifying by sensing the difference between the
actual ambient room temperature and the setting
temperature on the remote controller.
2. In the Auto mode, you can not switch the fan speed.
It has already been automatically controlled.
3. If the Auto mode is not comfortable for you , the
desired mode can be selected manually.
NOTE
Adjusting air flow direction
Use the AIR DIRECTION and SWING buttons to
adjust the Up/Down airflow direction.
1. When press the AIR DIRECTION button, the
o
horizontal louver will move at an angle of 6 .
Keep pressing the button to move the louver to
the desired position.
2. Press the SWING button , the horizontal
louver would swing up/down automatically.
Press it again to stop.
NOTE: When the louver swing or move to a
position which would affect the cooling
and heating effect of the air conditioner,
it would automatically change the swing/
moving direction.
1
2
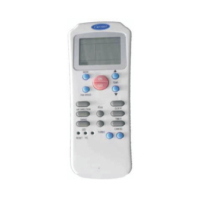
Ca rri er
MODE
FAN SPE ED
TEMP.
AIR DI RECTION
SWIN G
LED
SLEE P
TURB O
CLOC K
TIME R
CANC EL
RESET
F/C
AUTO
SET TEMP.
CLOCK
SPEED
AUTO
ON
OFF
4
1
2
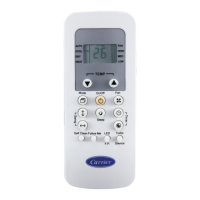
Ca rri er
MODE
FAN SPE ED
TEMP.
AIR DI RECTION
SWIN G
LED
SLEE P
TURB O
CLOC K
TIME R
CANC EL
RESET
F/C
COOL
SET TEMP.
CLOCK
SPEED
AUTO
ON
OFF
3
Ca rri er
MODE
FAN SPE ED
TEMP.
AIR DI RECTION
SWIN G
LED
SLEE P
TURB O
CLOC K
TIME R
CANC EL
RESET
F/C
DRY
SET TEMP.
CLOCK
SPEED
AUTO
ON
OFF
2
1
Ca rri er
MODE
FAN SPE ED
TEMP.
AIR DI RECTION
SWIN G
LED
SLEE P
TURB O
CLOC K
TIME R
CANC EL
RESET
F/C
DRY
SET TEMP.
CLOCK
SPEED
AUTO
ON
OFF