English
Installation Procedures
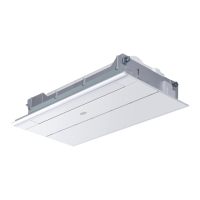
Diagram of pipe
[Rear piping]
• Draw the pipes and the drain hose, then fasten them using an adhesive tape.
[Left-Left-rear piping]
• In case of left side piping, cut away the excess using a snipper
1. In case of left-rear piping, bend the pipes according to the piping instructions Coat the aring seal face with refrigerant
oil and connect the pipes.
Cover the connected part using heat insulation materials and ensure that you are xing it using adhesive tapes.
[Other direction piping]
• Cut away at the lid, using a snipper, the lid for according to the piping direction instructions and then bend the pipe
according to the position of the hole in the wall. When bending, be careful not to break the pipes.
• Connect the indoor/outdoor electric cable in advance, and then pull out the connection to the heat insulation of the
connecting part specially.
Fixing the indoor unit body
Indoor installation can be done in one of the following two ways:
Lid for right
piping
Lid for left
piping
Piping
Indoor/outdoor electric cable
Heat insulation material
Wall board
Hanging wall
Console mode
Drain hose
Pipe supporting
plate
Fix with adhesive
tape
12
 Loading...