puppies and kittens, must not be left alone for long periods without someone to check periodically that all is
well.
Fitting the batteries
1. Lift the hopper out of the base unit.
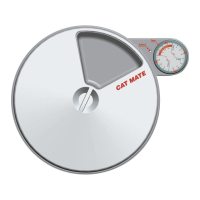
2. Invert the base unit and remove the battery cover by releasing the retaining clip (Fig. 3).
3. Insert 4 good quality alkaline `C’ batteries using the orientation symbols marked in the bottom of the battery
compartment. Replace the battery cover.
Setting the clock
1. Press and hold the `TIME’ button for 5 seconds until the hour figure on the clock starts to flash.
2. Press the `+’ or `-‘ buttons to adjust the clock to the correct hour. Hold down either the `+’ or `-‘ button for longer
than 3 seconds to scroll through.
3. Press the `TIME’ button and the minute figure will flash. Adjust the minutes using the `+’ or `-‘ buttons.
4. Press the `TIME’ button to save the setting.
5. To change the clock between 12 hours (AM/PM) and 24-hour formats, press and hold the `TIME’ button, and
within 3 seconds press the `+’ button.
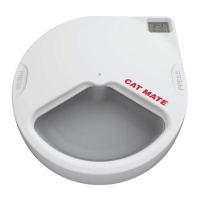
Wait 60 seconds for the display to stop flashing and the clock to set (Fig. 2) before proceeding to the next step.
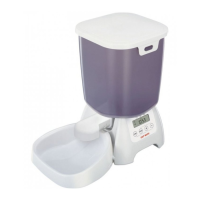
Assembling the pet feeder
1. Open the hopper lid (Fig. 4) and remove the feeding bowl, feeding nozzle, and feeding mechanism.
2. Push the nozzle into the front aperture at the base of the hopper (Fig. 5). Ensure correct location with the
nozzle opening turned downwards.
3. Carefully insert the feeding mechanism into the rear aperture at the base of the hopper (Fig. 6) until the
retaining clip clicks into position. Fit assembled hopper to base unit.
4. Fit the feeding bowl by locating the tab at the back bowl into the base unit and clicking the sprung clips on either
side of the bowl into position (Fig. 7).
Calculation of daily `feed units’
We strongly recommend that you check your dry food packaging for the `Daily Feeding Guide’ giving information on
the quantity that is needed to maintain your pet’s health. Many pets are overfed which is both expensive and
detrimental to your pet’s health.
To calculate the number of `feed units’ for your pet’s daily requirement, proceed as follows:
1. Fill the hopper with a suitable quantity of dry food well in excess of a daily amount. To maintain maximum food
freshness/appeal, we recommend that a maximum of 10 days food is loaded.
2. Fill the feeding mechanism by pressing and holding the `FEED’ button and within 3 seconds pressing and
holding the `+’ button until the display shows `10′. When feeding stops, press the `TIME’ button to display the
clock again. Return food in bowl to hopper.
3. Repeat 5.2 above, this time holding both buttons until the required daily amount of food has been dispensed.
When the desired daily amount of food appears in the feeding bowl release both buttons and the feeder will
complete its current feed unit. Make a note of the number of feed units displayed on the LCD. After 60 seconds
the display will revert to the clock.
4. We recommend that you weigh the dispensed food from the feeding bowl and cross-reference to the `Daily
Feeding Guide’ on the food packaging. If the weight is correct, your pet’s `daily feed units’ will be the displayed
number noted in 5.3. If incorrect, return all of the food back to the hopper and repeat instruction 5.3, making use
of the feed unit count on the LCD to increase/decrease the amount of dispensed food.
Setting meal sizes
Once you have calculated the number of daily feed units for your pet, decide how you would like that number of units
to be dispensed across the programmed mealtime settings. (Example: A pet’s daily allowance of 20 units can be
divided over 3 mealtime settings of 6 units in the morning, 8 units at midday, and 6 units in the evening.)