Do you have a question about the Certikin COH280 and is the answer not in the manual?
Lists the standard components included with the burner for installation and operation.
Instructions and diagrams for priming the oil pump system.
Explains how to access and work with the burner's control box.
Lists compatible nozzle types and recommended angles for optimal performance.
Details factory settings and adjustments for pump pressure for different fuels.
Details the specific placement of electrodes for proper ignition.
Explains how to adjust pump pressure for light oil, especially in cold conditions.
Guides on adjusting the combustion head position for optimal output.
Describes adjusting the air damper for smoke number and excess air.
Information on how to identify the burner and the importance of the identification plate.
Essential safety precautions for operating and maintaining the appliance.
Lists the standard components included with the burner for installation and operation.
Instructions and diagrams for priming the oil pump system.
Explains how to access and work with the burner's control box.
Table of settings for light oil, including nozzle, pressure, and air adjustments.
Table of settings for kerosene, including nozzle, pressure, and air adjustments.
Details the specific placement of electrodes for proper ignition.
Explains how to adjust pump pressure for light oil, especially in cold conditions.
Guides on adjusting the combustion head position for optimal output.
Describes adjusting the air damper for smoke number and excess air.
Information on how to identify the burner and the importance of the identification plate.
Essential safety precautions for operating and maintaining the appliance.
Crucial safety advice and operational guidelines for the heater.
Requirements for air supply for conventional flue installations.
Electrical and oil supply connection requirements.
Importance of professional installation and commissioning by OFTEC engineers.
Basic steps to start the heater operation.
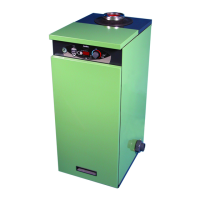
Overview of the heater's control panel and indicators.
Procedure for re-pressurising the heating system.
How to operate the pool pump using the heater's controls.
Instructions for temporarily stopping the heater.
Guidance on safely shutting down the heater for the winter season.
Advice on oil delivery to prevent contamination.
General guidance on cleaning and routine maintenance.
Steps to diagnose and resolve issues when the burner fails to start.
Importance of professional servicing by qualified engineers.
Maintaining proper water pH and chlorine levels for the system.
Overview of the manual's content covering operation, installation, commissioning, and maintenance.
Mentions a pending patent application for the internal baffling system.
Describes available flue system choices and their characteristics.
Emphasizes the necessity of professional commissioning by an OFTEC engineer.
Crucial safety instructions regarding modifications and electrical supply.
Details the types of liquid fuels (Kerosine, Gas Oil) the heaters can use.
Provides key technical specifications like working pressure, temperature limits, and draught requirements.
Identifies the specific burner models used and mentions manual air adjustment.
Specifies the electrical supply requirements and wiring regulations.
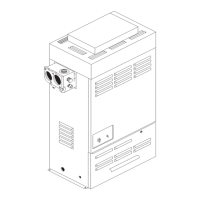
Lists the physical dimensions and service clearances for different models.
Provides data for commissioning, including nozzle, pressure, and firing rates for different models.
Lists applicable standards, regulations, and building codes for installation.
Describes the features and functions of the heater's control system.
Details the electrical connections required for the burner.
Explains how to integrate the heater with a separate heating system.
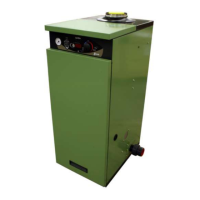
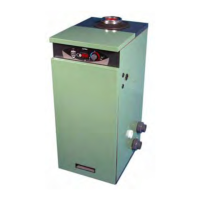
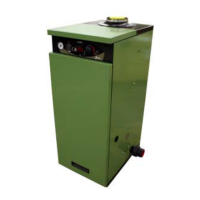
Guidelines for choosing a suitable location for the heater, considering noise and access.
Requirements for the installation hearth, including material and loading.
Considerations for oil tank placement and capacity.
Details on oil connection points, line requirements, and filter installation.
Refers to the manufacturer's technical leaflet for burner details.
Location of temperature sensors and limit stat on the heater.
Provides schematic diagrams of the electrical wiring.
Requirements and installation guidelines for conventional flue systems.
Essential air supply requirements for combustion and ventilation.
Specifies required opening sizes for combustion and ventilation air.
Information on balanced flue kits and their installation benefits.
Guidelines for positioning balanced flue terminals to avoid nuisance.
When terminal guards are necessary for safety.
Considerations for heater placement, especially regarding noise.
General information and requirements for balanced flue installations.
Step-by-step instructions for installing horizontal balanced flues.
Specific instructions for horizontal flue installation on certain models.
Specific instructions for horizontal flue installation on the Model 280.
Instructions for installing vertical balanced flues, including extensions.
Instructions for installing outdoor flue kits to convert heaters.
Emphasizes the importance of commissioning by a qualified OFTEC engineer.
Procedures for filling the heater with water and inhibitor.
Guide to configuring heater settings like display units and priority.
Explains the function of the pressure switch and how to adjust it.
Outlines the installer's responsibility for proper commissioning.
Recommendation to use report sheets and checklists for commissioning.
A comprehensive checklist for verifying installation and commissioning steps.
Checklist items related to the oil tank's condition and fittings.
Checks regarding the oil tank's position relative to the pump.
Checks for the oil supply line, including material, joints, and filter.
Checklist items specific to two-pipe oil systems.
Checklist items for the heater itself, including sensors, baffles, and flueway.
Steps to perform during the final commissioning tests.
Overview of maintenance frequency based on fuel type and general inspection guidance.
Details on adjusting the burner's air shutter for optimal combustion.
Shows the baffle arrangement for different models.
A comprehensive list of spare parts with item numbers and codes for different models.
Lists available accessories like flue kits and terminal guards for different models.
Exploded view and part list for the burner of different models.
Basic checks to perform when the heater fails to start.
How the control board diagnoses and displays faults.
A table listing common troubles, possible causes, and recommended actions.
Details the types of liquid fuels (Kerosine, Gas Oil) the heaters can use.
Provides key technical specifications like working pressure, temperature limits, and draught requirements.
Identifies the specific burner models used and mentions manual air adjustment.
Specifies the electrical supply requirements and wiring regulations.
Lists the physical dimensions and service clearances for different models.
Provides data for commissioning, including nozzle, pressure, and firing rates for different models.
Lists applicable standards, regulations, and building codes for installation.
Describes the features and functions of the heater's control system.
Importance and correct fitting of the oil filter for reliable operation.
Requirement for fitting a fire valve in the suction line.
Explanation and diagram of a single-pipe oil supply system.
Explanation and diagram of a two-pipe oil supply system.
Description of using an oil deaerator for improved oil supply.
Instructions for fitting the bypass screw for two-pipe systems.
Requirements and installation guidelines for conventional flue systems.
Essential air supply requirements for combustion and ventilation.
Specifies required opening sizes for combustion and ventilation air.
Information on balanced flue kits and their installation benefits.
Guidelines for positioning balanced flue terminals to avoid nuisance.
When terminal guards are necessary for safety.
Considerations for heater placement, especially regarding noise.
General information and requirements for balanced flue installations.
Step-by-step instructions for installing horizontal balanced flues.
Specific instructions for horizontal flue installation on certain models.
Specific instructions for horizontal flue installation on the Model 280.
Instructions for installing vertical balanced flues, including extensions.
Instructions for installing outdoor flue kits to convert heaters.
Emphasizes the importance of commissioning by a qualified OFTEC engineer.
Procedures for filling the heater with water and inhibitor.
Guide to configuring heater settings like display units and priority.
Explains the function of the pressure switch and how to adjust it.
Outlines the installer's responsibility for proper commissioning.
Recommendation to use report sheets and checklists for commissioning.
A comprehensive checklist for verifying installation and commissioning steps.
Checklist items related to the oil tank's condition and fittings.
Checks regarding the oil tank's position relative to the pump.
Checks for the oil supply line, including material, joints, and filter.
Checklist items specific to two-pipe oil systems.
Checklist items for the heater itself, including sensors, baffles, and flueway.
Steps to perform during the final commissioning tests.
Overview of maintenance frequency based on fuel type and general inspection guidance.
Guidance on inspecting the heater for signs of operation issues.
Procedures for protecting the heater against freezing during winter.
Steps for performing maintenance, starting with electrical supply isolation.
A comprehensive list of spare parts with item numbers and codes for different models.
Basic checks to perform when the heater fails to start.
How the control board diagnoses and displays faults.
| Model | COH280 |
|---|---|
| Category | Swimming Pool Heater |
| Frequency | 50 Hz |
| Operating Pressure | 3 Bar |
| Safety thermal cut out | Yes |
| Maximum Flow Rate | 12 m³/h |
| Minimum Flow Rate | 2 m³/h |
| Protection Rating | IPX5 |
| Inlet/Outlet | 2 inch |