22
Installation Product Manual - Perma-Cyl
®
w/ FlexFill™ Piping Option
Externally Sited / Gas Use Indoors
Outdoor installations can offer better accessibility for the
Orca
™
Delivery System for lling purposes. Also, lines
do not need to be run except from the tank to the user’s
equipment. Outdoor installations should be made on a
concrete pad. Local soil conditions and seismic codes will
affect the thickness and reinforcement required for the
concrete pad. The Perma-Cyl unit should be bolted to the
concrete pad using appropriate sized anchor bolts. Also in
outdoor installations, a fence can provide added protection
for the Perma-Cyl system and work to eliminate tampering
with any plumbing component.
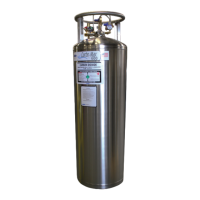
Outdoor Installation Schematic
At a minimum, installation should include a nal line
regulator and a check valve. A typical piping schematic is
depicted in Figure 6.
Item # Description
2 Final Line Regulator
3 Safety Relief Valve
4 Check Valve
5 Coupling Valve for optional back up gas supply
First Fill/Purge Procedure
Note: The Perma-Cyl tank is shipped with low
purity nitrogen gas. Purging is necessary
prior to lling. During rst ll, only ll
the vessel to 75% full to allow for liquid
expansion experienced with a new (warm)
tank. Each ll thereafter can be lled to
100% full. All valves on an empty Perma-
Cyl tank should always be kept closed to
prevent the inner vessel and plumbing from
being contaminated.
Purging and First Fill Procedure
1. Attach the source of liquid purge to the ll connection
of the Perma-Cyl tank.
2. If the ll hose has not been kept under pressure since
the last delivery, it will need to be purged. Purge the
ll hose and connector through the purge valve, if so
equipped, or by loosening the ll connection until vapor
ows from the connection and then retighten. Use the
hose drain on the tank piping if equipped as such.
3. If the Perma-Cyl tank is pressurized, open the vent
valve and blow down to approximately 5 psi. To prevent
drawing atmospheric contaminants back into the tank
during the purging operation, a positive pressure of at
least 5 psig should be maintained in the tank.
4. Partially ll the Perma-Cyl tank with product according
to the table in the next column.
Let liquid build pressure close to safety setting.
Leak check all plumbing circuits while the tank is under
maximum pressure.
While vent gas is still warm and tank is under pressure,
move the four-way valve to the ‘Equalization’ position
and loosen the ttings on either side of the liquid level
gauge to allow the gauge lines to purge with gas. Check
the gas stream coming out of the ttings for evidence of
moisture. Continue to ow the gas until lines have been
purged and there is no visible signs of moisture. Tighten
ttings to stop the ow of gas. Move the four-way valve
to the ‘Normal Operation’ position.
Vent all product out of the liquid valve and close before
pressure drops below 5 psig.
Metered Product per Purge Cycle
Filling Weight Table
Tank Size Product Amount
1000 L Perma-Cyl tank 2000 standard cubic feet
1500 L Perma-Cyl tank 3000 standard cubic feet
2000 L Perma-Cyl tank 4000 standard cubic feet
3000 L Perma-Cyl tank 5000 standard cubic feet
5500 L Perma-Cyl tank 7000 standard cubic feet
5. Fill Perma-Cyl tank with product as indicated in the
table. Primarily use the bottom ll on a FlexFill style
tank. Make sure some product is also routed through
the top ll lines to purge them prior to totally lling the
tank.