16
CLEANING
$MFBOUIFQMBTUJDQBSUTXJUIBTPGUEBNQDMPUI/FWFSVTF
abrasive detergents or solvents. If the highchair comes
into contact with water, dry the metal parts to prevent
the formation of rust.
MAINTENANCE
r5IJTQSPEVDUSFRVJSFTQFSJPEJDBMNBJOUFOBODF
r$MFBOJOH BOE NBJOUFOBODF PQFSBUJPOT NVTUPOMZCF
carried out by an adult.
r1FSJPEJDBMMZDIFDLUIFQSPEVDUGPSCSPLFOEBNBHFEPS
missing parts: do not use it in this case.
r5P BWPJE GSJDUJPO UIBU NBZ DPNQSPNJTF UIF DPSSFDU
functioning of the product, ensure that all the moving
plastic parts located along the metal frame are free of
dust, dirt and sand.
r*GOFDFTTBSZMVCSJDBUFUIFNPWJOHQBSUTXJUIESZ TJMJ-
cone lubricant.
r4UPSFUIFQSPEVDUJOBESZQMBDF
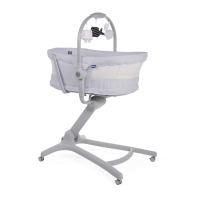
COMPONENTS
5IF QSPEVDU JT DPNQMFUFMZ EJTBTTFNCMFE XIFO QVS-
chased; check that all of the components listed below
BSF QSFTFOU *G BOZ QBSU JT NJTTJOH DPOUBDU "354"/"T
$6450.&34&37*$&4
5IFQSPEVDUBOEBMMPGJUTDPNQPOFOUTNVTUBMXBZTCF
assembled by an adult.
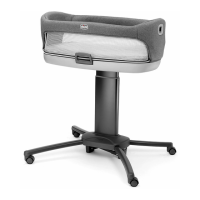
")FJHIUBEKVTUBCMFQFEFTUBMGSBNF
A1 - 4 wheels with brakes
B - Seat frame
$4FBUTUSVDUVSF
%5VCVMBSTFBUGSBNF
E - Fabric (with shoulder straps)
F - Booster cushion
(5PZCBS
(-JHIUTPVOEHBNFCVUUPOT
G2 - 3 soft toys
I - Upper fabric zips
-1MBTUJDDMJQT
.)FJHIUBEKVTUNFOUQFEBM
N - Backrest recline lever
ASSEMBLY
5IFQSPEVDUJTOPUBTTFNCMFEXIFOQVSDIBTFE5PVTF
it, carry out the following assembly operations:
5IFñSTUUIJOHUPEPJTBTTFNCMFUIFi"uXIFFMTPO
IFJHIUBEKVTUBCMFCBTFGSBNFi"u5PEPUIJTQMBDFUIF
frame on a rug or soft surface so as not to damage the
oor or frame. Assemble the 4 “A1” wheels inserting
UIFQJOTJOUIFIPMFTVOEFSIFJHIUBEKVTUBCMFCBTF
frame “A” as shown in gure 1.
WARNING: Fully insert the wheel pin into the hole in
the base. At this point the base can be rested on the
oor.
2. Insert the fasteners of seat frame “B” into the respec-
UJWF UVCFT POTFBU TUSVDUVSFi$u VOUJM UIFZDMJDL JOUP
place (Fig. 2).
3. Assemble the seat (seat frame “B” + seat structure
i$u POUIFCBTFJOTFSU UIF UXPUVCFT PO CBTFi"u
into the corresponding holes on seat frame “B” until
they click into place (Fig. 3).
WARNING:5IFCBDLSFTUNVTUGBDFUIFIFJHIUBEKVTU-
ment pedal (I) as shown in Fig. 3a.
4. Insert tube “D” into the corresponding holes on seat
frame “B” until they click into place (Fig. 4).
5PBTTFNCMFGBCSJDi&uMJOFVQUIFIPMFTPOUIFGBCSJD
with the restraint system installed on seat structure
i$u1BTTUIFUXPMBUFSBMBSNTPGTFBUGSBNFi#uUISPVHI
the side fabric holes (FIG. 5), insert the pins of the
arms into the holes on either side of the backrest (FIG.
5a) until they click into place.
WARNING:$IFDLUIBUCPUIBSNTBSFBTTFNCMFEDPS-
rectly.
6. Attach fabric “E” using the two perimeter zips above
seat frame “B” (Fig. 6).
7. Pass the crotch strap and waist straps on seat struc-
UVSFi$uUISPVHIUIFIPMFTPGGBCSJDi&u'JHBC
7c).
8. Attach the fabric (E) to the bottom of seat structure
i$uNBLJOHTVSFUPJOTFSUBMMPGUIFQMBTUJDDMJQTJOUIF
right slots (Fig. 8-8a).
BOOSTER CUSHION
3FEVDFS DVTIJPOi'u JT JEFBM GSPN CJSUI BOE DBO CF
VTFE PS SFNPWFE BT OFDFTTBSZ 5P BUUBDI JU UP UIF
seat, place it on the fabric, pass the crotch strap and
waste straps through the holes in booster cushion “F”
(reclined cradle mode), (Fig. 9). In highchair mode it
is also necessary to pass the shoulder straps through
the holes of the booster cushion (Fig. 9a).
TOYBAR
5IFUPZTDBOCFBUUBDIFEUPUIFUPZCBSCZQBTTJOHUIF
straps through the plastic openings on the bar (Fig.
10) and fastening the velcro.
11. Assemble the toybar (with the light positioned to-
wards backrest recline lever “N”) inserting the pins of
the bar into the holes on seat frame “B” until it clicks
into place (Fig. 11).
5PJODMJOFUIFUPZCBSJOUIFUISFFQPTTJCMFQPTJUJPOT
press the side buttons (Fig. 12).
5PSFNPWFUIFUPZCBSQSFTTUIFCVUUPOTPOUIFJOTJEF
of the bar support and pull upwards (Fig. 13).
WARNING: Always check that the toybar is properly
fastened before using it.
WARNING:5PQSFWFOUQPTTJCMFJOKVSZCZFOUBHMFNFOU
remove this toy when the child starts trying to get up
on its hands and knees in a crowling position.
HEIGHT ADJUSTMENT
0ODF BTTFNCMFE UIF QSPEVDU DBO CF BEKVTUFE UP
WBSJPVT IFJHIUT JO BMM DPOñHVSBUJPOT 5P BEKVTU JUT
IFJHIUIPMEEPXOIFJHIUBEKVTUNFOUQFEBMi.u'JH
14) and lift or lower the seat to the desired height.
ADJUSTING THE BACKREST
5IFCBDLSFTUDBOCFBEKVTUFEUPGPVSEJíFSFOUQPTJ-
UJPOT5PEPUIJTQVTIEPXOPOCBDLSFTUSFDMJOFMFWFS
“N” (Fig. 15).
 Loading...