Do you have a question about the Christie D4K25 and is the answer not in the manual?
Warning labels indicating potential hazards on the projector.
Safety guidelines for connecting the projector to AC power.
Safety warnings for handling the projector's high-pressure lamp.
Information for contacting the dealer and recording purchase details.
Minimum environmental and physical requirements for the installation location.
List of necessary tools for installing the D4K25 projector.
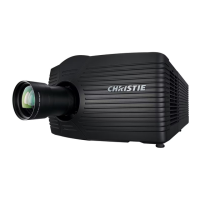
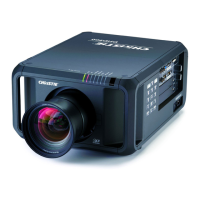
Overview of the D4K25 projector's main parts and their functions.
Critical safety guidelines and warnings for projector installation.
Instructions for correctly positioning the projector for optimal display.
Procedures for adjusting projector tilt and leveling for alignment.
Instructions for installing the primary lens onto the projector.
Procedure for installing the projector lamp, including safety precautions.
Steps for connecting the projector to AC power via a permanent wired connection.
Procedures for connecting input sources and powering on the projector.
Diagram and instructions for connecting server sources to the projector.
Connecting computers or servers via Ethernet or serial ports for communication.
Connecting devices using the Simple Contact Closure Interface (SCCI) port.
Connecting devices to the GPIO port for control signals.
Connecting devices to the 3D connector for 3D signal input and control.
Using LampLOC™ to adjust lamp position for optimal brightness.
Ensuring the projected image is parallel and centered with the screen.
Adjusting horizontal and vertical offsets for optimal image centering.
Balancing lens mount tilt for boresight adjustment.
Adjusting top and bottom boresight for image alignment.
Safety warning and procedure for adjusting DMD convergence for color alignment.
Measuring and setting color values for accurate color display.
Step-by-step instructions for powering on the projector safely.
Procedures for turning off the projector and entering cool-down or standby modes.
Procedures for optimizing lamp performance for brightness and lifespan.
Adjusting lamp position using LampLOC™ for optimal output and uniformity.
Overview of the lens mount and setup adjustments for lenses.
Enabling automatic adjustment of focus, offset, and zoom via ILS.
Introduction to using the Touch Panel Controller for projector operation and status viewing.
Overview of the TPC Main screen controls for power, lamp, douser, and lens adjustments.
Table detailing TPC user permission levels and their access rights.
Viewing projector status information, including system components and alarms.
Viewing and acknowledging projector alarms and their descriptions.
Creating and storing customized projector settings for different input channels.
Accessing advanced settings for projector parameters like lamp and lens.
Accessing administrator settings for projector configuration and management.
Configuring Ethernet, serial, SNMP, and remote access settings.
Managing backups and restoring system settings for the projector.
Adjusting red, green, and blue micromirror devices for digital convergence.
Accessing Microsoft Windows functions directly from the projector interface.
Inspecting projector vents and louvers for proper airflow and clearance.
Procedure for filling the projector's coolant reservoir with approved coolant.
Inspecting lamp connections for cleanliness and security.
Guidelines for inspecting and cleaning the projector lens and lamp reflector.
Procedure for replacing the projector lamp, including safety hazards.
Steps for replacing the projector lens, including calibration and shroud installation.
Troubleshooting steps for when the projector fails to power on.
Troubleshooting steps when the projector lamp fails to ignite.
Troubleshooting steps for when the projector lamp suddenly turns off.
Diagnosing and resolving issues with flickering, shadows, or dim image output.
Troubleshooting steps when the screen remains blank or shows no image.
Troubleshooting steps when the projector is on but no image is displayed.
Specifications related to the projector's display panel, resolution, and refresh rate.
Compatibility information for various input signal formats, including 3GSDI.
Compatibility details for control signal interfaces like Ethernet and RS232.
Specifications related to AC and UPS AC input power requirements.
Specifications for various lamp types, including power and average life.
Physical dimensions, weight, and operating position specifications.
Regulatory compliance information, including safety and EMC standards.
List of serial API commands for controlling projector functions.
Serial API commands for adjusting lens focus position and direction.
Serial API commands to adjust lens offset to specific horizontal position.
Serial API commands to adjust lens zoom position and direction.
Serial API commands to set network parameters like IP, Gateway, and Subnet.
Serial API commands to change the power state of the projector.