Clarke
®
Operator's Manual - Image Mini Spot Page 3-1
SET UP AND OPERATION
1. Upon removing your new mini-extractor from the
box, loosen the latch, at the back end and of the
machine, that secures the recovery tank to the
solution tank. Remove the recovery tank from the
solution tank.
2. Pour clean, hot water to the indicated fill line of the
solution tank. To avoid possible tank distortion,
water temperature must not exceed 140 F (60C).
3. Add a non-foaming cleaning solution concentrate,
for use in hot water extractors at the proportions
noted on the container (See list below), into soluiton
tank.
4. Place the recovery tank back onto the solution tank
and refasten the latch.
5. Plug the power cord into grounded outlet (See
GROUNDING INSTRUCTIONS).
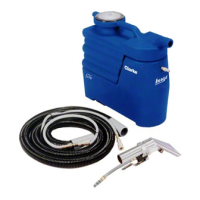
6. Connect the vacuum and cleaning tool hoses to the
extractor. This unit is equipped with an 1/8" male
quick connect for solution hose attachement and a
1" ID vacuum hose hookup. Insure that the female
solution hose coupler is securely locked onto the
male coupler on the exttactor.
7. Turn switch ON. This switch operates both the
vacuum motor and the water pump. NOTE:
The
pump is an oscillating pump and should not be run
dry for extended periods of time. This may cause
damage to your pump, therefore voiding your
warranty.
8. Squeeze the solution lever on the cleaning tool to
spray cleaning solution and place the vacuum head
on the surface to be cleaned. Normally, chemical is
applied ont he
push
stroke while vacuuming is done
on the
pull
stroke. For heavily soiled carpets, the
hand tool may be used in the scrubbing manner,
applying chemical in both the push and pull stroke.
ALWAYS FINISH UP AN AREA WITH A VACUUM
PULL STROKE.
9. The shutoff float inside the recovery tank will
impeded the vacuum flow when the tank is full.
When this occurs, empty the recovery tank. NOTE:
Dispose of waste in a proper manner which would
not violate any Local, State or Federal Law.
Operating vacuum after shutoff has activated could draw
water directly into the vac motor. This will cause damage
to the motor, therefore voiding your warranty.
ALWAYS TEST UPHOLSTERY/CARPET FOR COLOR
FASTNESS IN AN INCONSPICUOUS PLACE. Also, to
avoid prolonged drying times, do not spray too much
solution in any one area.
MACHINE OPERATIONS
CAUTION:
CAUTION:
Always use defoamer if foaming occurs. Foam will
suspend large particles which may damage vacuum
as well as allow liquid into the vacuum motor without
activating the float shutoff.
To prevent possible disease hazard, before
attempting to clean bodily fluids spills, you must kill
any viruses, germs or bacteria present in the bodily
fluid.
SUITABLE INCOMPATIBLE
CHEMICALS CHEMICALS
Alkalis Aldehydes
Clorox II Bleach* Aromatic Hydrocarbons
Defoaming Agents Butyls
Detergents Carbon Tetrachloride
Hydroxides Clorox*
Oxygen Bleaches Chlorinated
Bleaches
Soaps Chlorinated Hydrocarbons
Sta-Puf Fabric D-Limonene
Softner* Lysol*
Vinegar Methyls (MEK)
Perchlorethylene (perc)
Phenois
Trichlorethylene
* Registered Trademark
Before making any adjustments or performing any
maintenance to your machine, disconnect the power
cord from the electrical source.
SHUT DOWN AND STORAGE
1. Turn switch OFF. Empty recovery tank
completely and rinse several times to remove any
dirt or debris that may be left behind.
2. Tip the solution tank over a sink to drain any
unused cleaning solution and rinse with clean
water to remove any suds left behind by the
cleaning chemicals. NOTE:
Dispose of waste in
a proper manner which would not violate any
Local, State or Federal law.
3. Run a small amount of clean water through pump
if chemicals were used. This will help insure the
life of your pump.
4. Check the spray jet on the cleaning tool for full
spray pattern and inspect vac head for any
obstructions. Also make sure to clean the filter
cap attached to portal cover of any debris that
may have been trapped during cleaning.
5. Remove as much moisture from system before
storing in cold climates. Excess water may freeze
during storage and crack internal components,
causing damage to the unit.
WARNING:
WARNING:
WARNING:
 Loading...