ENGLISH
7
Mains operation
Connect theincluded mains adapter to theDC 5 V power input
socket (25) and to a230V wall socket.
Information
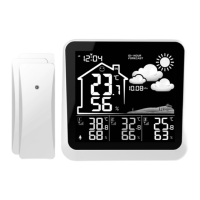
• When themain unit is switched on for thefirst time, it will enter
acalibration mode in which it requires you to enter avalue for
theatmospheric pressure. Theatmospheric pressure varies from
one geographic location to another and in order to be able to
calibrate theweather station you will need to find out thecurrent
atmospheric pressure at your location from anInternet weather
service or other reliable source to use as areferencevalue.
- The value for theatmospheric pressure (14) willflash. Pressor
hold in [ ▲ ] or [ ▼ ] to change thevalue. Confirm by pressing
[ SET ] or wait for 20 seconds.
• After theset reference pressure has been confirmed themain unit
will begin anautomatic scan for nearby sensors. Thescan will
be indicated by the symbol lighting up on thesensor. Ifduring
thescan themain unit can’t find, or loses contact with asensor,
“—.-” will appear on thedisplay. Holdin [ CH ] for 3 seconds to
manually scan for and re-register thesensors.
Placement/mounting
Note:
Things to consider before choosing where to place theunits:
• Avoid radiant heat from surrounding buildings, roofs, etc. Asarule,
thetemperature sensor should be installed about 5 ft (1.5 m) above
theground and shaded from direct sunlight.
• Test theoperation of thesensor in theintended location before
installingit. Therange can also be affected by thetype of obstacles
located between thetransmitter and thereceiver (e.g. aconcrete
wall will interfere with thesignal more than aplasterboard wall).
• Other wireless equipment using thesame frequency band
(433 MHz) can reduce thetransmissionrange.
• Make sure that thewall has no concealed electrical wiring,
gas or water pipes before drilling/screwing.