12
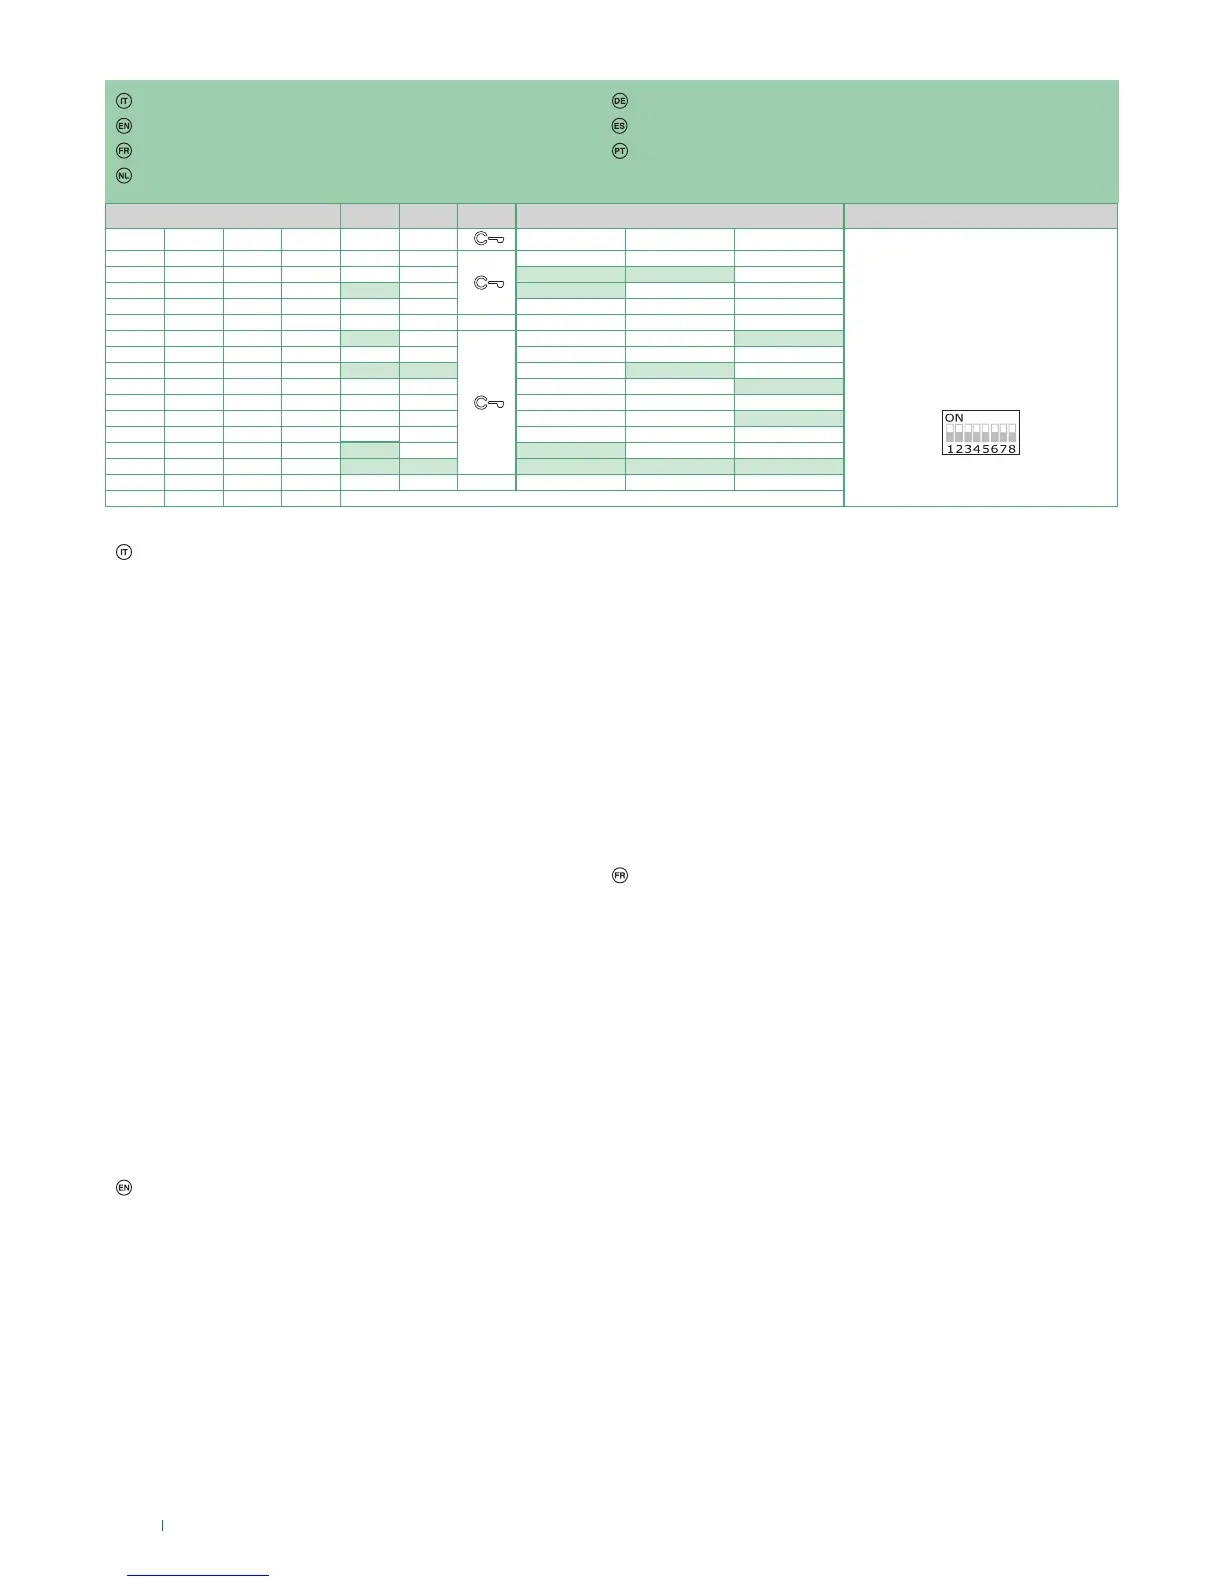
DIP S2 Art. 6721W(/BM) + Art. 6734 DIP S1
DIP 1 DIP 2 DIP 3 DIP 4 P1 P2 P3 P4 P5
INDIRIZZO
ADDRESS
ADRESSE
ADRES
ADRESSE
DIRECCIÓN
ENDEREÇO
0 0 0 0
1 0 0 0
INT INTb
0 1 0 0
INT INTb
1 1 0 0
0 0 1 0
1 0 1 0
INT INTb
0 1 1 0
1 1 1 0
INTb INT INT
0 0 0 1
INTb
1 0 0 1
0 1 0 1
INT
1 1 0 1
0 0 1 1
INTb
INT
1 0 1 1
INT INT INT INT INT
0 1 1 1
1 1 1 1
PROG
Programmazioni pulsanti per chiamata intercomunicante
Esempio 1 - tutti i sistemi (ANCHE KIT!) - Intercomunicante generale
su monitor con codice utente 5 programmazione P3= chiamata
generale interna, P4= intercomunicante generale a indirizzo 9
Esempio 2 - Intercomunicante selettivo
su monitor con codice utente 1 e indirizzo intercomunicante 1
programmazione P3= intercomunicante selettivo a indirizzo 2, P4=
intercomunicante selettivo a indirizzo 3
1. Posizionare DIP 5-6 di S2 in combinazione 01
2. Consultare la tabella pag. 12 e scegliere una combinazione in cui
compare la funzione intercomunicante (INT o INTb indistintamente)
per i tasti che si intendono programmare.
ES1: per P3= chiamata generale interna impostare DIP 1-2-3-4 di
S2 in combinazione 1000 o 0011 o 1011 (P3=INT), impostare S1
con indirizzo 5 secondo tabella A pag. 15, passare al punto 3
ES1: per P4= intercomunicante generale impostare DIP 1-2-3-4
di S2 in combinazione 1110 o 1011 (P4=INT), impostare S1 con
indirizzo 9 secondo tabella A pag. 15, passare al punto 3
ES2: per P3= intercomunicante selettivo impostare DIP 1-2-3-4 di
S2 in combinazione 1000 o 0011 o 1011 (P3=INT), impostare S1
con indirizzo 2 secondo tabella B pag. 11, passare al punto 3
ES2: per P4= intercomunicante selettivo impostare DIP 1-2-3-4
di S2 in combinazione 1110 o 1011 (P4=INT), impostare S1 con
indirizzo 3 secondo tabella B pag. 11, passare al punto 3
» il led privacy lampeggia
3. Premere e rilasciare il tasto a cui si vuole associare la funzione
4. Per uscire dalla programmazione posizionare i DIP 5-6 di S2 in
combinazione 00
5. Al termine della programmazione posizionare i DIP 1-2-3-4 di
S2 in combinazione 1111. Ripristinare su S1 l’impostazione
del codice utente, vedi tabella A pag. 15.
» il led privacy si spegne
» il led apriporta si accende
» viene emesso un tono di conferma
Programming buttons for intercom call
Example 1 - all systems (INCLUDING KITS!) - General intercom
on a monitor with user code 5, P3 programming = general internal
call, P4 = general intercom with address 9
Example 2 - Selective intercom
on a monitor with user code 1 and intercom address 1, P3
programming = selective intercom with address 2, P4 = selective
intercom with address 3
1. Set S2 DIP switch 5-6 to the combination 01
2. Refer to the table on page 12 and select a combination in which
the intercom function (either INT or INTb) is listed for the keys you
wish to program.
E.g. 1: for P3= general internal call, set S2 DIP switches 1-2-3-4 to
the combination 1000 or 0011 or 1011 (P3=INT), set S1 with ad-
dress 5 in accordance with table A on page 15, go to point 3
E.g. 1: for P4= general intercom, set S2 DIP switches 1-2-3-4 to
» the privacy LED flashes
3. Press and release the key to be associated with the function
4. To exit programming mode, set S2 DIP switches 5-6 to the
combination 00
5. When programming is complete, set S2 DIP switches 1-2-3-4
to the combination 1111. Restore the user code setting on S1,
see table A on page 15.
» the privacy LED switches o
» the lock-release LED lights up
» a confirmation tone will sound.
the combination 1110 or 1011 (P4=INT), set S1 with address 9 in
accordance with table A on page 15, go to point 3
E.g. 2: for P3= single-family intercom, set S2 DIP switches 1-2-3-4
to the combination 1000 or 0011 or 1011 (P3=INT), set S1 with
address 2 in accordance with table B on page 11, go to point 3
E.g. 2: for P4= selective intercom, set S2 DIP switches 1-2-3-4 to
the combination 1110 or 1011 (P4=INT), set S1 with address 3 in
accordance with table B on page 11, go to point 3
Programmation des boutons pour appel intercommunicant
Exemple 1 - tous les systèmes (Y COMPRIS LES KITS !) -
Intercommunicant général sur moniteur avec code usager 5
programmation P3= appel général interne, P4= intercommunicant
général avec adresse 9
Exemple 2 - Intercommunicant sélecteur
sur moniteur avec code usager 1 et adresse intercommunicant 1
programmation P3= intercommunicant sélecteur avec adresse 2,
P4= intercommunicant sélecteur avec adresse 3
1. Placer DIP 5-6 de S2 en combinaison 01
2. Consulter le tableau page 12 et choisir une combinaison qui
ache la fonction appel intercommunicant (indiéremment INT ou
INTb) pour les touches qui doivent être programmés.
ex 1 : pour P3= appel général interne, programmer DIP 1-2-3-4
de S2 en combinaison 1000 ou 0011 ou 1011 (P3=INT), pro-
grammer S1 avec adresse 5 conformément au tableau A page
15, passer au point 3
ex 1 : pour P4= intercommunicant général, programmer DIP
1-2-3-4 de S2 en combinaison 1110 ou 1011 (P4=INT), program-
mer S1 avec adresse 9 conformément au tableau A page 15,
passer au point 3
ex 2 : pour P3= intercommunicant sélecteur, programmer DIP
1-2-3-4 de S2 en combinaison 1000 ou 0011 ou 1011 (P3=INT),
programmer S1 avec adresse 2 conformément au tableau B
page 11, passer au point 3
ex 2 : pour P4= intercommunicant sélecteur, programmer DIP
1-2-3-4 de S2 en combinaison 1110 ou 1011 (P4=INT), program-
mer S1 avec adresse 3 conformément au tableau B page 11,
passer au point 3
» la led privacy clignote
3. Appuyer sur le touche puis le relâcher pour associer la fonction
4. Pour quitter la programmation, mettre les DIP 5-6 de S2 en
combinaison 00
» la led ouvre-porte s’allume
» une tonalité de confirmation retentit.
Programmeringen drukknoppen voor intercomoproep
Tastenprogrammierung für Interngespräch
Programación de los pulsadores para llamada intercomunicante
Programação dos botões para a chamada de intercomunicação