EasyManua.ls Logo

Comet KT 1750 extra User Manual

Comet KT 1750 extra
84 pages
Go to English
To Next Page IconTo Next Page
Page #1 background imageLoading...
Page #1 background image
KT 1750
KT 1800
KT 1900
Classic - Extra
Italiano
English
Français
Español
Čeština
Deutsch
Ελληνικά
Magyar
Nederlands
Polski
Português
Slovenčina
Русский
IT
CS
SK
FR
DE
PL
EN
NL
RU
ES
EL
PT
HU
EN •
Cold Water, Electric High Pressure Cleaners Instruction manual - Use and Maintenance
FR •
Nettoyeurs Haute Pression Électriques à Eau Froide Notice technique - Utilisation et Entretien
ES •
Hidrolavadoras Eléctricas de Agua Fría Manual de Instrucciones - Uso y Mantenimiento
CS •
Vysokotlaké čističe na studenou vodu Návod k používání - používání a Údržba
DE •
Elektrische Kaltwasser-hochdruckreiniger Bedienungs- und Wartungsanleitung
EL •
Ηλεκτρικα Υδροκαθαριστικα Μηχανηματα Με Κρυο Νερο Εγχειριδιο Οδηγιων - Χρησησ και Συντηρησησ
HU •
Hidegvizes Elektromos Magasnyomású Tisztítóberendezések Felhasználói Útmutató - Használat és Karbantartás
NL •
Elektrische Koudwaterhogedrukreinigers Instructiehandleiding - Gebruik en Onderhoud
PL •
Myjki Elektryczne Zimnowodne Instrukcja - Obsługi i Konserwacji
PT •
Lavadoras de Alta Pressão Eléctricas com Água Fria Manual de Instruções - Uso e Manutenção
SK •
Vysokotlakové čističe na studenú vodu Návod na použitie - použitie a Údržba
RU
Электрические Гидроочистители Без Подогрева Воды Руководство - Эксплуатация И Обслуживание
IT •
ATTENZIONE. Leggere le istruzioni prima di utilizzare la
macchina.
EN •
WARNING. Read the instructions before using the
machine
FR •
ATTENTION. Lire les instructions avant d’utiliser l’appareil
ES •
ATENCIÓN. Leer atentamente las instrucciones antes de
utilizar la máquina.
CS •
POZOR. Před použitím zařízení si přečtěte návod k
použití.
DE •
ACHTUNG. Vor der Verwendung der Maschine die
Anweisungen lesen.
EL •
ΠΡΟΣΟΧΗ. Διαβάστε προσεχτικά τις οδηγίες πριν από
την χρήση της μηχανής.
HU •
FIGYELEM. Olvassa el az utasításokat a gép használata
előtt.
NL •
LET OP. Voor het gebruik van de machine de aanwijzingen
aandachtig doorlezen.
PL •
UWAGA. Przeczytać instrukcje przed użyciem maszyny.
PT •
ATENÇÃO. Ler as instruções antes de utilizar a máquina.
SK •
UPOZORNENIE. Pred použitím zariadenia si prečítajte
návod na použitie
RU •
ВНИМАНИЕ. Перед использованием оборудования
необходимо прочитать данные инструкции.
IT
IdropulItrIcI ElEttrIchE ad acqua FrEdda
ManualE d’IstruzIonE - uso E ManutEnzIonE

Table of Contents

Question and Answer IconNeed help?

Do you have a question about the Comet KT 1750 extra and is the answer not in the manual?

Comet KT 1750 extra Specifications

General IconGeneral
BrandComet
ModelKT 1750 extra
CategoryPressure Washer
LanguageEnglish

Summary

Instruction Manual - Use and Maintenance

Identification of Components (Diagram & List)

Power Cord (Comp. 1)

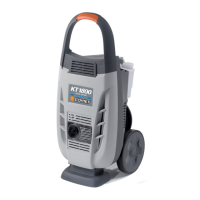
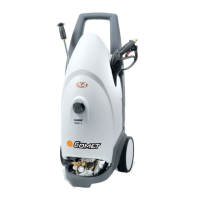
Component 1, power cable.

Main Switch (Comp. 2)

Component 2, on/off control.

Handling Bar (Comp. 3)

Component 3, for carrying.

Accessory Housing (Comp. 4)

Component 4, storage for accessories.

Warning Plate - Risks (Comp. 5)

Component 5, informs on risks, use prohibited before reading.

Hose Reel (Comp. 6)

Component 6, optional hose storage.

Identification Plate (Comp. 7)

Component 7, serial number and characteristics.

Detergent Tank (Comp. 8)

Component 8, for detergent storage.

Nozzle Key (Comp. 9)

Component 9, tool for nozzle.

Lifting Handle (Comp. 10)

Component 10, for lifting the unit.

Warning Plate - Prohibitions (Comp. 11)

Component 11, prohibits specific uses.

Water Inlet Connector (Comp. 12)

Component 12, connects water supply.

Power Cord Housing (Comp. 13)

Component 13, stores power cable.

Water Gun (Comp. 14)

Component 14, the trigger-operated spray gun.

Lance Hose (Comp. 15)

Component 15, connects gun to nozzle.

Nozzle Holder (Comp. 16)

Component 16, holds the nozzle.

Nozzle Cleaning Pin (Comp. 17)

Component 17, tool for cleaning nozzle.

Rotating Lance (Comp. 18)

Component 18, optional rotating spray lance.

Technical Characteristics and Specifications

Identification of Components (Continued List)

Detergent Cap (Comp. 19)

Component 19, seals detergent tank.

Inlet Water Filter (Comp. 20)

Component 20, filters incoming water.

Hose Reel Knob (Comp. 21)

Component 21, knob for hose reel.

Fixed Brush (Comp. 22)

Component 22, cleaning brush accessory.

High Pressure Hose (Comp. 23)

Component 23, delivers pressurized water.

Wheel (Comp. 24)

Component 24, for mobility.

Gun Lever Safety Catch (Comp. 25)

Component 25, locks the gun trigger.

Water Gun Lever (Comp. 26)

Component 26, trigger for water flow.

Machine Foot (Comp. 27)

Component 27, base support.

Hose Support (Comp. 28)

Component 28, holder for hose.

Outlet Coupling (Comp. 29)

Component 29, connection for hose.

Quick Fit Connector (Comp. 30)

Component 30, fast hose connection.

Safety Devices

Amperometric protection (KT 1800 - KT 1900)

Stops unit during electrical overcurrent.

Thermic protection (KT 1750)

Stops unit during electrical overcurrent.

Pressure restriction/adjustment valve

Prevents over-pressure when gun is closed.

Gun lever blocking device

Safety catch to lock the gun lever.

Standard Equipment

Optional Accessories

Installation and Accessories Assembling

Extracting from Carton

Remove unit from packaging carefully.

Mounting the Foot

Attach the machine's base support.

Mounting the Wheels

Attach the unit's wheels.

Mounting the Handlebar

Attach the carrying handle securely.

Connecting the High-Pressure Pipe

Screw the pipe connector to the gun.

Operation - Preliminary Operations

Positioning the Cleaner

Move unit to work position using handles.

Unreeling the High Pressure Hose

Fully uncoil the pressure hose.

Connecting the High Pressure Hose (CLASSIC)

Connect quick coupler to outlet.

Securing the Supply Hose

Connect garden hose to water inlet.

Opening Water Supply

Turn on water tap, check for leaks.

Connecting Power Plug

Connect unit to power socket.

Starting the Cleaner

Turn switch to '1', press gun lever.

Connecting Spray Lance

Attach lance to water gun.

Operation with Detergent

Preparing Detergent Tank

Fill tank with diluted detergent.

Activating Detergent Suction

Use nozzle head for suction/mixing.

Interrupting the Operation - Total Stop

Stopping

Expelling Excess Water

Run cleaner briefly to expel water.

Powering Down

Turn switch off, disconnect plug.

Releasing Residual Pressure

Press gun lever to release pressure.

Winding Power Cable

Store power cable on holder.

Storage

Winding High Pressure Pipe

Coil hose without kinks.

Storing the Cleaner

Place unit in a dry, clean location.

Routine Maintenance

Weekly Maintenance

Clean inlet water filter and nozzle.

Monthly Maintenance

Clean nozzle with pin.

Supplementary Maintenance

Every 50 Hours

Check pump hydraulic circuit and fixing.

Every 100 Hours

Pump oil replacement, check valves and screws.

Problems, Causes and Remedies

Cleaner Does Not Start

Check safety device, plug connection.

Cleaner Vibrates/Noisy

Check inlet filter, water supply.

Problems, Causes and Remedies (Continued)

Low Pressure

Check nozzle position, wear, water supply.

Poor Detergent Suction

Check nozzle position, detergent level/viscosity.

Water Not Exiting Nozzle

Check water supply, nozzle blockage.

Cleaner Stops While Operating

Check safety device, amperometric cut-in.

Cleaner Starts Spontaneously

Check for leaks in delivery circuit.

Motor Hums but Does Not Start

Check electrical system and extension lead.

Related product manuals