Do you have a question about the Concept Pro CP-HSD20-IP and is the answer not in the manual?
Details the analogue (CVBS) video output connection for the camera.
Explains how to set the camera's unique address ID using DIP switches.
Configures baud rate and other settings using DIP switches, including NTSC/PAL and frame rate.
Guides on configuring IP PTZ camera settings via the web browser, including image, privacy, and network options.
Instructions on connecting the IP PTZ camera to an NVR, ensuring they are on the same network segment.
Details the camera's input/output capabilities, including audio, analogue CVBS, and Micro SD card support.
Provides information on recommended power supply adapters for the camera, including AC24V, DC12V, and PoE++.
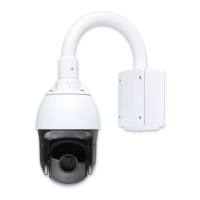
The Concept Pro CP-HSD20/30-IP is an IP PTZ (Pan-Tilt-Zoom) high-speed dome camera designed for surveillance applications. This quick start guide outlines the installation, configuration, and operation of the camera, emphasizing its ease of use and integration into existing security systems.
The CP-HSD20/30-IP is a sophisticated surveillance camera capable of capturing video and offering remote control over its pan, tilt, and zoom functions. It is designed to provide comprehensive coverage of an area, allowing users to monitor specific points of interest with high detail. The camera supports both analogue (CVBS) and IP video outputs, offering flexibility in how it integrates into different monitoring setups. It can be powered by AC24V, DC12V, or optionally via PoE++ (Power over Ethernet Plus Plus), simplifying installation by reducing the need for separate power cables.
The device features a range of connectivity options, including BNC for CVBS output, a network connection for IP functionality, alarm input and output terminal blocks for integration with external sensors and alarms, and an RS-485 connector for control. It also includes audio input and output capabilities, allowing for two-way audio communication or audio monitoring of the surveillance area. A Micro SD card slot supports up to 64GB of storage, enabling local recording of video footage.
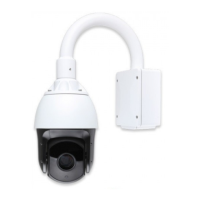
The CP-HSD20/30-IP is designed for straightforward installation and operation. The initial setup involves physically mounting the camera using the provided bracket and mounting template. The process includes drilling holes, affixing the bracket, connecting a safety lanyard, and then attaching all necessary cables before twisting the camera into the bracket and securing it with screws. For wall mount installations, the guide details passing cables through a junction box and configuring DIP switches before securing the dome.
Configuration of the camera is a key aspect of its usage. The device features DIP switches for setting the address ID, baud rate, and video output format (NTSC/PAL). The address ID switch allows for unique identification of the camera, which is crucial when multiple speed domes are connected to the same system. The baud rate can be set to 2400, 4800, or 9600, depending on the system requirements. The video output can be configured for either NTSC or PAL standards, and the frame rate can be set to 30FPS (default). An RS485 matching resistance switch is also available, with a default OFF setting.
Connecting to and operating the camera via Internet Explorer is a primary method of interaction. The camera has a default IP address (http://192.168.12.100) and default login credentials (username: admin, password: admin). Upon initial connection, users are prompted to download a plug-in to enable full functionality. The web browser interface allows for extensive configuration of the IP PTZ camera. Users can adjust stream settings, image settings, and apply privacy masks using a click-and-drag function. Network settings, such as email notifications, live image snapshots, device information, IP settings, firmware updates, and maintenance options, are all accessible through the web interface.
The camera supports integration with Network Video Recorders (NVRs). To connect the camera to an NVR, it is essential that both devices are on the same network segment. This allows the NVR to discover and record footage from the PTZ camera, providing a centralized recording and management solution. The audio in/out and CVBS output capabilities further enhance its versatility, allowing for direct connection to monitors or audio systems as needed.
The CP-HSD20/30-IP incorporates features that facilitate ongoing maintenance and ensure optimal performance. The web browser interface serves as a central hub for managing the camera's settings and status. This includes the ability to update firmware, which is crucial for addressing security vulnerabilities, improving performance, and adding new features. The device information section within the web interface provides details about the camera's current configuration and operational status, aiding in troubleshooting.
When applying settings, it is important to note the synchronization behavior between the web browser and the OSD (On-Screen Display) menu. While the IP camera supports RS485 with access to the OSD menu (via preset 95), the guide specifies that when editing the camera from the OSD menu, settings may not change, and synchronization is not possible using the web browser for certain settings. However, changes made from the web browser are synchronized to the OSD menu. This suggests that the web interface is the preferred method for configuring image quality and other camera options to ensure consistent settings.
The use of recommended power supply adapters (AC24V, DC12V, or PoE++) is emphasized to ensure reliable operation and prevent potential damage to the camera. This highlights the importance of using compatible accessories for long-term device health. The inclusion of a Micro SD card slot for local storage provides a backup recording solution, which can be beneficial in cases of network outages or NVR failures, ensuring that critical footage is not lost. Regular checks of the Micro SD card's status and capacity are part of routine maintenance.
The physical installation process, including the use of a safety lanyard, ensures that the camera remains securely attached, minimizing the risk of accidental falls or damage. The ability to easily twist the camera into the bracket and tighten fixing screws simplifies both initial installation and any subsequent physical adjustments or replacements. The quick start guide itself serves as a valuable maintenance tool, providing clear instructions for initial setup and troubleshooting common issues. For more detailed information, users are directed to the user manual, which likely contains more in-depth maintenance procedures and advanced configuration options.
| Lens | 2.8mm Fixed Lens |
|---|---|
| Vandal Resistance | IK10 |
| Operating Temperature | -30°C to +60°C |
| Resolution | 1920x1080 (Full HD) |
| Night Vision | Up to 30m |
| Connectivity | Ethernet (RJ45) |
| Power Supply | 12V DC or PoE |